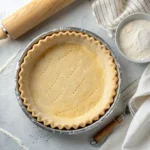
Gluten Free Pie Crust
If you’ve ever tried making pie crust gluten free, you know it can be a challenge. But don’t worry—I’ve got you covered with my nearly fool-proof method for flaky, tender gluten free pie crust every single time.
- Prep Time: 20 minutes
- Cook Time: 25 minutes
- Total Time: 45 minutes
- Yield: 1 9-inch pie crust 1x
- Category: Baking
- Method: Oven
- Cuisine: American
- Diet: Gluten Free
Ingredients
Scale
For the Slurry
- 1/3 cup Measure-For-Measure Gluten-Free Flour Blend (40 grams)
- 1/2 cup cold water
For the Pie Dough
- 2 cups Measure-For-Measure Gluten-Free Flour Blend (240 grams)
- 1 cup shortening (I prefer Spectrum non-hydrogenated shortening)
- 1 tablespoon sugar, honey, or agave
- 1 teaspoon kosher salt
- 1 tablespoon gluten-free flour (for the countertop)
Instructions
1. Make the Slurry
- In a small bowl, combine the cold water and 1/3 cup gluten-free flour.
- Whisk or stir until well blended and evenly combined.
- Set aside while you prepare the dough.
2. Combine the Dry Ingredients
- In a food processor, combine 2 cups gluten-free flour, the shortening, sugar, and salt.
- Pulse briefly to combine. The mixture will still have clumps—this is normal!
- Alternatively, you can use a pastry blender to cut the shortening into the dry ingredients.
3. Add the Slurry
- Pour the prepared slurry over the pie dough mixture.
- Pulse to combine until the dough starts to come together. It will be quite sticky—don’t add extra flour!
4. Shape the Dough
- Sprinkle about 1 tablespoon of gluten-free flour onto your countertop.
- Scoop the dough onto the floured surface.
- Use your hands to gently shape the dough into a ball.
5. Divide the Dough
- Use a knife to divide the dough in half.
- Shape each half into a disc.
- If not baking right away, wrap each disc in plastic wrap and chill or freeze.
- To use later, thaw and bring to room temperature before rolling out.
6. Roll Out the Dough
- Place one disc between two large sheets of parchment paper.
- Roll out into a 9-10 inch circle, about the size of your pie pan.
- Remove the top sheet of parchment.
- Place your pie pan face down onto the rolled-out dough, then carefully flip the pan right side up.
7. Crimp the Edges
- Adjust the crust so it is evenly placed in the pan.
- Gently patch any cracks with your fingers.
- Even out the border of the crust, then crimp the edges.
- I like to use two fingers from one hand in a pinching shape and one finger from the other hand to create a pretty edge.
8. Bake
- Follow the baking directions for your specific pie recipe.
- Fill with pie filling and bake, or blind bake the crust if directed.
Nutrition
- Serving Size: 1 slice (1/8 of crust)
- Calories: 210
- Sugar: 1g
- Sodium: 150mg
- Fat: 18g
- Saturated Fat: 8g
- Unsaturated Fat: 10g
- Trans Fat: 0g
- Carbohydrates: 14g
- Fiber: 1g
- Protein: 1g
- Cholesterol: 0mg
Keywords: gluten free pie crust, flaky pie crust, vegan pie crust, gluten free baking, pie dough, sweet or savory pie crust
Find it online: https://alexandrarecipes.com/how-to-make-gluten-free-pie-crust/