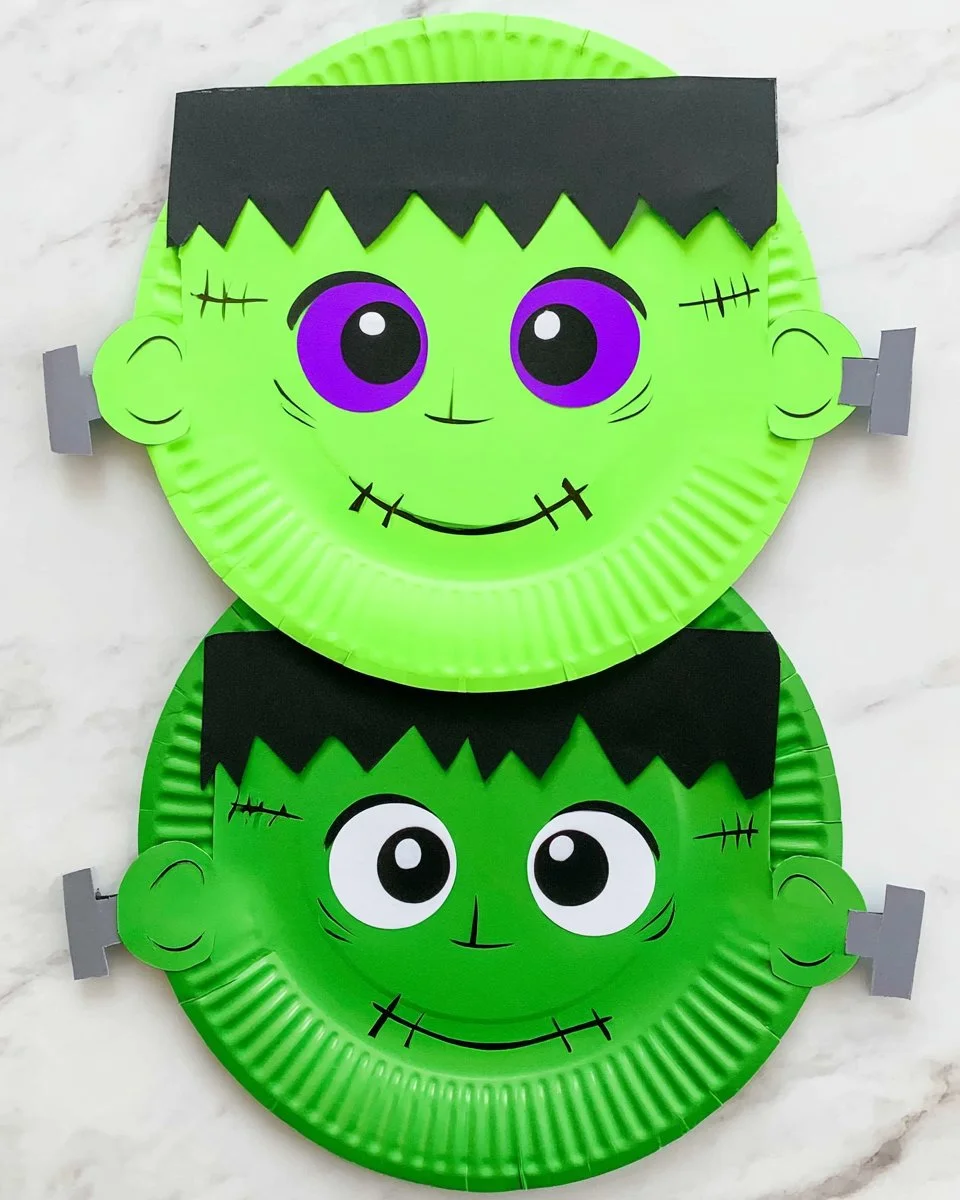
Are you looking for an easy and fun DIY craft project? The Frankenstein Paper Plate Craft is a perfect choice! This engaging and creative DIY project is suitable for both kids and adults. It utilizes simple and budget-friendly materials, making it a fantastic option for those new to crafting or anyone seeking unique homemade decor. Whether it’s for Halloween, spooky parties, or just for fun, this craft is a fantastic way to unleash your creativity. Plus, you can download a free template to make your creation process even smoother!
WHY YOU WILL LOVE THIS Frankenstein Paper Plate Craft
The Frankenstein Paper Plate Craft is an enjoyable and straightforward project that promises fun and satisfaction. Here are several reasons why you’ll love making it:
- Easy for Beginners: This craft is perfect for those just starting in DIY. With minimal steps and simple materials, you’ll find it easy to follow along.
- Uses Simple Materials: Most materials you’ll need are commonly found around the house. This simplicity means you won’t have to make a special trip to the store.
- Budget-Friendly: This craft is a fantastic budget-friendly DIY project, requiring only a few inexpensive materials.
- Quick to Make: You can complete this craft in a short amount of time, making it ideal for a last-minute decoration or for kids’ activities.
- Great for Home Decor: The finished craft can be a delightful addition to your Halloween decorations or other spooky-themed displays.
- Easy to Customize: You can easily add your unique touches to create variations of Frankenstein or give it a personal flair.
PROJECT DETAILS
Before we dive into the project, here’s a quick overview of what you can expect:
Skill Level
This craft is beginner-friendly, making it easy for anyone to follow along.
Estimated Time
You can complete this craft in approximately 30-45 minutes.
Approximate Cost
The materials used are inexpensive, making the total cost around $5 to $10.
Best For
This project is great for kids, families, or anyone looking for seasonal crafts.
Project Type
This is a simple craft that belongs in the category of easy DIY projects and homemade decor.
TOOLS AND EQUIPMENT NEEDED
Before starting your Frankenstein Paper Plate Craft, you’ll need a few basic tools:
Scissors
You’ll need scissors to cut out shapes from the paper plates. Make sure to use safety scissors if children are participating.
Glue
A good craft glue or school glue will help secure all your pieces together. You can also use a glue stick for easier application.
Paintbrush
A small paintbrush is beneficial for applying paint if you plan to add a painted finish to your Frankenstein.
Pencil
A pencil is useful for sketching out your shapes and details before cutting.
MATERIALS
Here’s a list of materials you’ll need for your Frankenstein Paper Plate Craft:
Paper Plates
Two paper plates act as the base for your Frankenstein’s face and hair. Using standard-sized paper plates is recommended for best results.
Green Paint
Green paint gives Frankenstein his iconic color. You can use acrylic or tempera paint, whichever you have on hand.
Black Construction Paper
Black construction paper is perfect for creating Frankenstein’s hair and other design details.
Googly Eyes
These fun eyes will give your craft a lively element and add personality to your Frankenstein.
White Cardstock
White cardstock can be used to create the teeth and any other details you want to add to the face.
Markers
Markers are used for adding final touches and details, such as eyebrows or stitches.
Optional: Glitter or Stickers
You can use glitter or Halloween-themed stickers for extra decoration, making it even more fun and personalized!
HOW TO MAKE Frankenstein Paper Plate Craft
Let’s get started on your Frankenstein project! Follow these easy steps to create your craft:
Step 1: Prepare the Plates
Begin by taking two paper plates. On one plate, paint the entire surface green and set it aside to dry. This will be the main face of Frankenstein. For the second plate, you will leave it plain for now as it will serve as the hair.
Step 2: Create the Hair
While the green paint on the first plate dries, use the second paper plate to cut out the hair. Cut zigzag shapes along the edge of the plate, representing Frankenstein’s wild hair. Once you have the shape, paint it black and set it aside to dry as well.
Step 3: Cut Out Features
Using black construction paper, cut out shapes for Frankenstein’s eyebrows and mouth. Also, cut out teeth shapes from the white cardstock. These will be added once the paint is dry.
Step 4: Assemble the Face
Once the green plate is dry, it’s time to assemble the face. Glue the hair on top of the green plate. Position it so that it looks like an exciting hairstyle.
Step 5: Add the Googly Eyes
Attach the googly eyes to the green paper plate, placing them prominently in the middle to bring your Frankenstein to life.
Step 6: Attach the Mouth and Eyebrows
Now it’s time to glue on the black eyebrows and the mouth shape you cut earlier. Be sure to apply additional glue as necessary to ensure they stick well.
Step 7: Final Touches
Finally, add the white teeth shape into the mouth area, whether it is a big grin or a less formidable expression. Then, use markers to add any extra features like stitches or blush on the cheeks.
Step 8: Display Your Creature
Your Frankenstein paper plate craft is now ready! Find a suitable spot to display it, whether it’s for Halloween decorations or just for fun!
![Frankenstein Paper Plate Craft [Free Template]](https://www.pinterest.com/pin/create/button/?url=https%3A%2F%2Falexandrarecipes.com%2Ffrankenstein-paper-plate-craft-free-template-frankenstein-craft%2F&media=https%3A%2F%2Fcdn.contai.io%2Fpublic%2Ffal-ai-generated%2F1786989757_6a834cbd1f365.png)
TIPS AND TRICKS
Here are some effective tips to make your crafting experience enjoyable:
- Choose Good Materials: Select quality paper plates and paint to ensure your craft lasts longer.
- Cutting Carefully: Be mindful while cutting, especially if kids are involved; use safety scissors where necessary.
- Use Sponges for Paint: If you have extra sponges lying around, consider using them instead of brushes for a different paint texture.
- Avoid Overusing Glue: Too much glue can cause pieces to become soggy. A thin layer is usually more than enough.
- Storage: If you plan to store your finished craft, keep it in a cool, dry place away from humidity to ensure durability.
VARIATIONS AND CUSTOMIZATION IDEAS
You can make this Frankenstein project uniquely yours with these customization ideas:
- Different Colors: Instead of green, experiment with other colors for Frankenstein, like purple or blue for a different look.
- Size Variations: Use smaller plates for mini versions of Frankenstein that can be hung or used as table decor.
- Seasonal Versions: Consider making a Frankenstein pumpkin for Halloween or adapting the design for other seasons or holidays.
- Patterns: Try adding patterns to the hair or face using additional construction paper or stickers for a creative twist.
- Personalized Versions: Add names or sayings to the plates to create custom gifts or friendly Halloween greetings.
![Frankenstein Paper Plate Craft [Free Template]](https://cdn.contai.io/public/images/1ZH5MxhVWVwfIKyqC7EaBifUt64D5neK088W6NLj.jpg)
Frankenstein Paper Plate Craft FAQ
How difficult is this craft?
This Frankenstein Paper Plate Craft is easy and great for beginners. The simple steps ensure that everyone, regardless of their crafting experience, can create a fun decoration.
What materials do I need to make this craft?
You’ll need paper plates, green paint, black construction paper, googly eyes, white cardstock, markers, and glue. These materials are typically inexpensive and easy to find.
How long will this craft take?
The entire process can take around 30-45 minutes, depending on drying time for the paint.
Is it safe for kids to make?
Yes! This craft is safe for kids, but adult supervision is recommended for activities involving scissors.
Can I store this craft after making it?
Yes, you can keep your finished Frankenstein craft for future displays. Store it in a dry place to maintain its shape and color.
CONCLUSION
The Frankenstein Paper Plate Craft is an easy, fun, and budget-friendly DIY project that makes for fantastic seasonal decor or gifts. With its simple instructions and creative possibilities, anyone can enjoy making this fun Halloween decoration. The craft allows for customization, making it a wonderful way to express your creativity. So why not gather your materials and start crafting today? Feel free to share your finished projects and any ideas for customization you might come up with! Happy crafting!
PrintFrankenstein Paper Plate Craft
Create a fun and unique Frankenstein decoration using paper plates. This easy DIY craft is perfect for Halloween and suitable for all ages.
- Prep Time: 15 minutes
- Cook Time: 0 minutes
- Total Time: 30 minutes
- Yield: 1 craft
- Category: Craft
- Method: Crafting
- Cuisine: N/A
- Diet: N/A
Ingredients
- Two Paper Plates
- Green Paint
- Black Construction Paper
- Googly Eyes
- White Cardstock
- Markers
- Glue
Instructions
- Prepare the plates by painting one green and leaving the other plain for hair.
- Create the hair by cutting zigzag shapes from the second plate and painting it black.
- Cut out shapes for eyebrows and teeth using black construction paper and white cardstock.
- Assemble the face by gluing the hair onto the green plate.
- Add googly eyes prominently to bring Frankenstein to life.
- Attach the mouth and eyebrows with glue to complete the face.
- Add white teeth into the mouth area and use markers for final touches.
- Display your finished paper plate craft as a fun Halloween decoration.
Notes
Adult supervision recommended for cutting. Customize with different colors or styles for personal flair.
Nutrition
- Serving Size: 1 decoration
- Calories: 0
- Sugar: 0g
- Sodium: 0mg
- Fat: 0g
- Saturated Fat: 0g
- Unsaturated Fat: 0g
- Trans Fat: 0g
- Carbohydrates: 0g
- Fiber: 0g
- Protein: 0g
- Cholesterol: 0mg
Keywords: DIY craft, Halloween decoration, easy crafts, kids crafts, paper plate craft