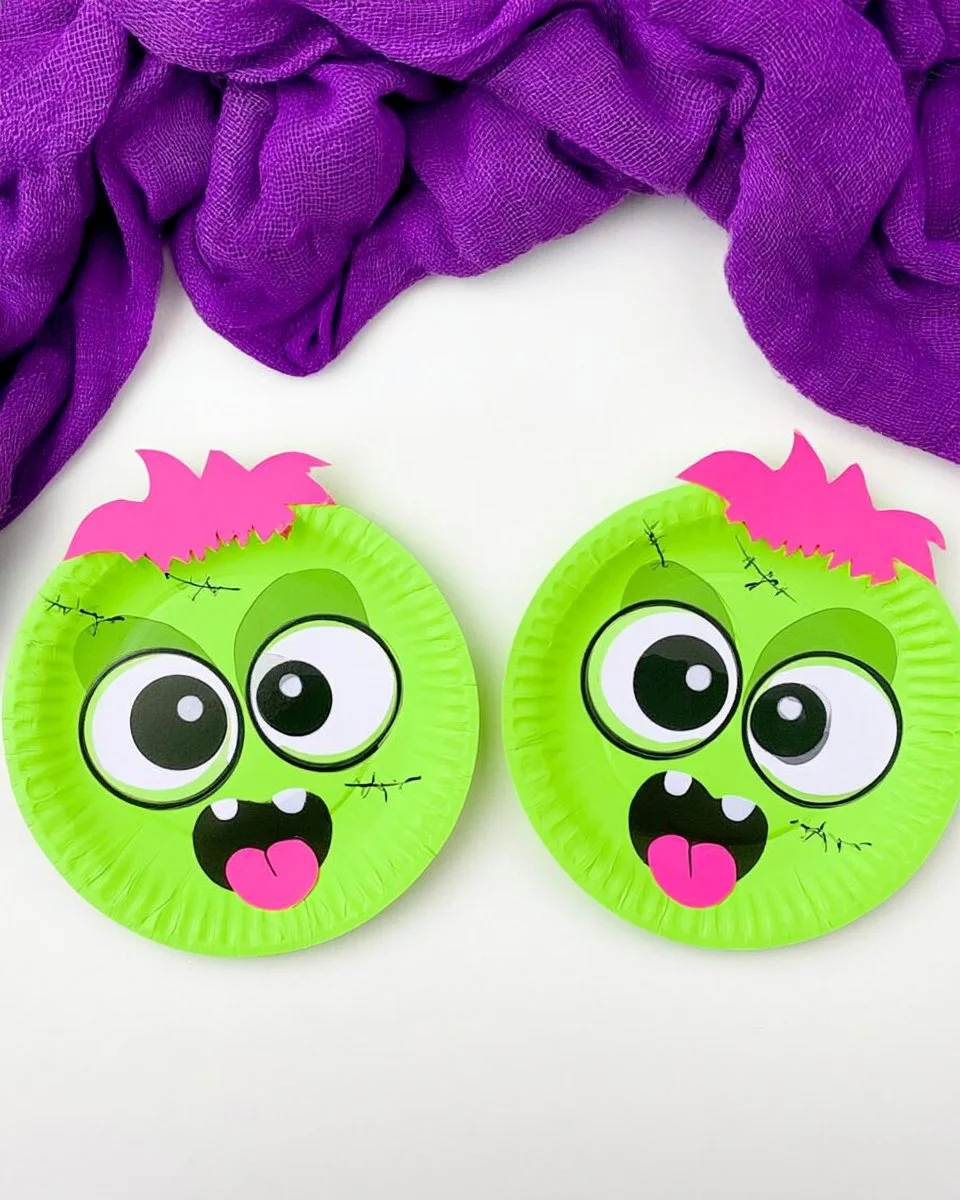
If you’re looking for a fun and engaging craft project to do with kids, the Zombie Paper Plate Craft is a fantastic choice! This easy DIY craft is perfect for Halloween or just for fun. Using simple materials, this beginner-friendly craft invites creativity and is ideal for kids of all ages. Plus, it makes for a great decoration or gift for the holiday season. Let’s dive into this creative DIY project and learn how to make your very own zombie crafts using paper plates!
WHY YOU WILL LOVE THIS Zombie Paper Plate Craft
Creating the Zombie Paper Plate Craft is an enjoyable experience for both kids and adults. Here are some reasons why you’ll love this easy craft:
- Easy for Beginners: This DIY project is straightforward and doesn’t require advanced crafting skills.
- Uses Simple Materials: You can find the materials at home or at your local craft store, making it accessible for everyone.
- Budget-Friendly: This is a cost-effective craft that requires only basic supplies, making it perfect for budget-conscious families.
- Great for Seasonal Decorating: The zombie theme makes it an ideal festive decoration, especially around Halloween.
- Easy to Customize: Each zombie can be unique, allowing kids to express their creativity through colors and designs.
PROJECT DETAILS
Skill Level
Beginner
This craft is perfect for kids and beginners, with simple steps that anyone can follow.
Estimated Time
30-60 minutes
The project takes about 30 to 60 minutes from start to finish, depending on how detailed you want the zombies to be.
Approximate Cost
$5 – $10
This is a budget-friendly DIY project, with costs mainly dependent on the materials you choose to use.
Best For
Kids aged 5 and up
This craft is suitable for children aged five and above, making it a great group activity for classroom parties or family bonding time.
Project Type
Seasonal Craft
This is a creative craft idea that aligns perfectly with Halloween or as a spooky decoration for any time of the year.
TOOLS AND EQUIPMENT NEEDED
Scissors
You will need scissors for cutting shapes and details on the paper plates. A good pair allows for safe and easy cutting.
Glue
Glue (either liquid or glue sticks) is necessary to attach different paper parts to your zombie. It’s user-friendly, especially for kids.
Paintbrush (optional)
If you decide to paint your zombies, a small paintbrush will help with detailed applications.
MATERIALS
Paper Plates
These are the primary base for your zombies. Each plate serves as the head of your zombie.
Green Paint
Green paint is essential for giving your zombie that undead look. Acrylic paint is recommended for its vibrant color.
Black and White Paint
These colors can be used for eyes, mouth details, and any additional features to enhance your zombies.
Craft Paper
Using colored craft paper will allow you to create hair, clothing, or other fun details for your zombie.
Markers
Markers can add fine details and personal touches. They are easy to use and perfect for finishing touches.
Googly Eyes (optional)
Adding googly eyes creates a fun and dynamic look for your zombie. Kids enjoy giving their crafts character with these little accessories.
![Zombie Paper Plate Craft For Kids [Free Template]](https://www.pinterest.com/pin/create/button/?url=https%3A%2F%2Falexandrarecipes.com%2Fzombie-paper-plate-craft-for-kids-free-template%2F&media=https%3A%2F%2Fcdn.contai.io%2Fpublic%2Ffal-ai-generated%2F1786989806_6a834cee2ba1f.png)
HOW TO MAKE Zombie Paper Plate Craft
Step 1: Paint the Paper Plates
Start by painting the front of each paper plate green. This will serve as the base color of your zombie head. Allow time for the plate to dry completely.
Step 2: Create Zombie Features
Once the paint is dry, use black and white paint (or markers) to add eyes and a mouth. For a spooky effect, you can draw jagged teeth!
Step 3: Add Hair
Using craft paper, cut out jagged strips for hair. You can choose any color you like. Glue the hair pieces to the top of the plate.
Step 4: Attach Googly Eyes
If you’re using googly eyes, glue them above the mouth, positioning them for added character. This can bring your zombie to life!
Step 5: Add Accessories
Encourage kids to get creative with accessories! They can use craft paper to create clothes or any unique features they want to add.
Step 6: Display or Gift
Once your zombies are complete, find a place to display them! They can also be used as gifts for friends or family during the spooky season.
TIPS AND TRICKS
- Choosing Materials: Use high-quality paint for better coverage. If you’re using markers, pick ones that are permanent for durability.
- Avoiding Common Mistakes: Ensure paint is completely dry before adding more details to avoid smudging.
- Making the Project Easier: For very young children, pre-cut parts can simplify the process.
- Making the Craft Last Longer: Apply a layer of clear sealant over the paint if you wish to keep the decorations for annual reuse.
- Working Safely: Always supervise young children while using scissors or any crafting tools.
VARIATIONS AND CUSTOMIZATION IDEAS
- Different Colors: Try using different base colors for a fun twist, like purple or blue zombies.
- Seasonal Versions: Create zombies for different holidays, incorporating seasonal colors and accessories.
- Different Sizes: Use larger or smaller plates to create mini or giant zombies.
- Personalized Versions: Kids can paint their names or add fun sayings on the back of their zombies.
![Zombie Paper Plate Craft For Kids [Free Template]](https://cdn.contai.io/public/images/qAr9S26NQCWu1XP0vxL1UjjkGcvyPcMLqDAlssZj.jpg)
Zombie Paper Plate Craft FAQ
How difficult is the Zombie Paper Plate Craft?
This craft is very simple, making it perfect for beginners and kids. The steps are straightforward and easy to follow.
What materials do I need?
You will need paper plates, paint (green, black, white), craft paper, markers, scissors, and optionally, googly eyes.
How long does it take to complete this craft?
The project usually takes about 30 to 60 minutes, depending on how detailed each zombie is.
Can I store the completed zombies?
Yes, once dry, these crafts can be stored in a cool, dry place. They can last a long time if properly stored.
What should I do if my child wants to add more details?
Encourage creativity! Adding more details like shapes, patterns, or accessories can make each zombie unique.
CONCLUSION
The Zombie Paper Plate Craft is an easy, creative, and budget-friendly DIY project that both kids and adults will enjoy. This beginner-friendly craft uses simple materials and is perfect for seasonal decorating or as a handmade gift. Encourage your kids to personalize their creations and watch their imaginations flourish.
Have fun making this easy craft and don’t forget to share your experiences or any unique ideas you come up with. Happy crafting!
PrintZombie Paper Plate Craft
A fun and engaging craft project for kids using simple materials to create unique zombie decorations.
- Prep Time: 10 minutes
- Cook Time: 0 minutes
- Total Time: 60 minutes
- Yield: Varies depending on the number of plates used
- Category: Seasonal Craft
- Method: Crafting
- Cuisine: N/A
- Diet: N/A
Ingredients
- Paper Plates
- Green Paint
- Black and White Paint
- Craft Paper
- Markers
- Googly Eyes (optional)
- Scissors
- Glue
- Paintbrush (optional)
Instructions
- Paint the front of each paper plate green and allow to dry.
- Create eyes and a mouth using black and white paint or markers.
- Add hair using cutout strips of craft paper glued to the top of the plate.
- Attach googly eyes above the mouth for added character.
- Add unique features or clothing with craft paper.
- Display or gift the finished zombies as spooky decorations.
Notes
Supervise young children while using scissors or any crafting tools; pre-cut parts can simplify the process for younger kids.
Nutrition
- Serving Size: 1 completed craft
- Calories: 0
- Sugar: 0g
- Sodium: 0mg
- Fat: 0g
- Saturated Fat: 0g
- Unsaturated Fat: 0g
- Trans Fat: 0g
- Carbohydrates: 0g
- Fiber: 0g
- Protein: 0g
- Cholesterol: 0mg
Keywords: Zombie, Paper Plate Craft, Kids Craft, Halloween, DIY Craft, Seasonal Decorating, Easy Craft