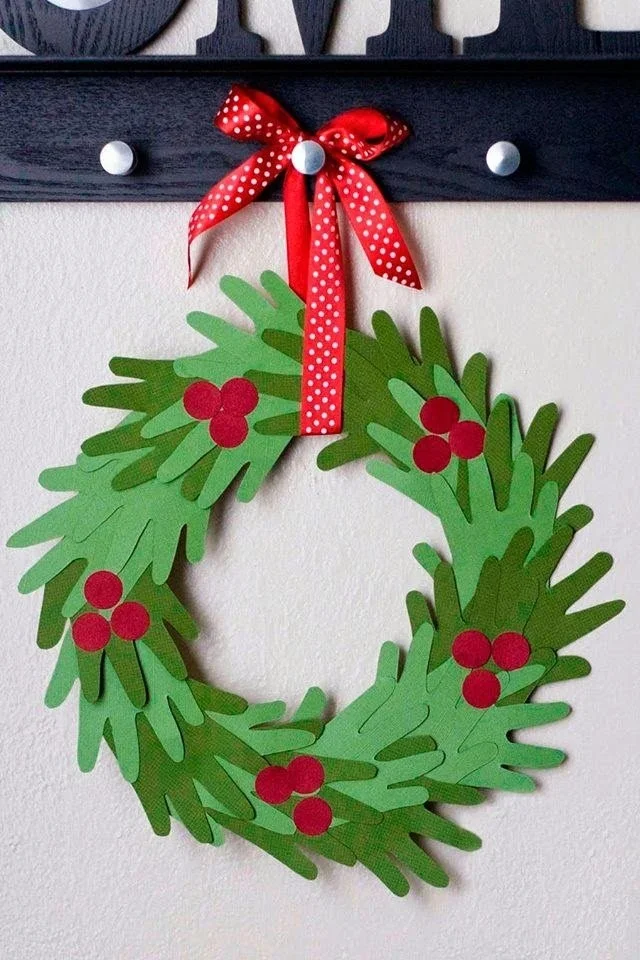
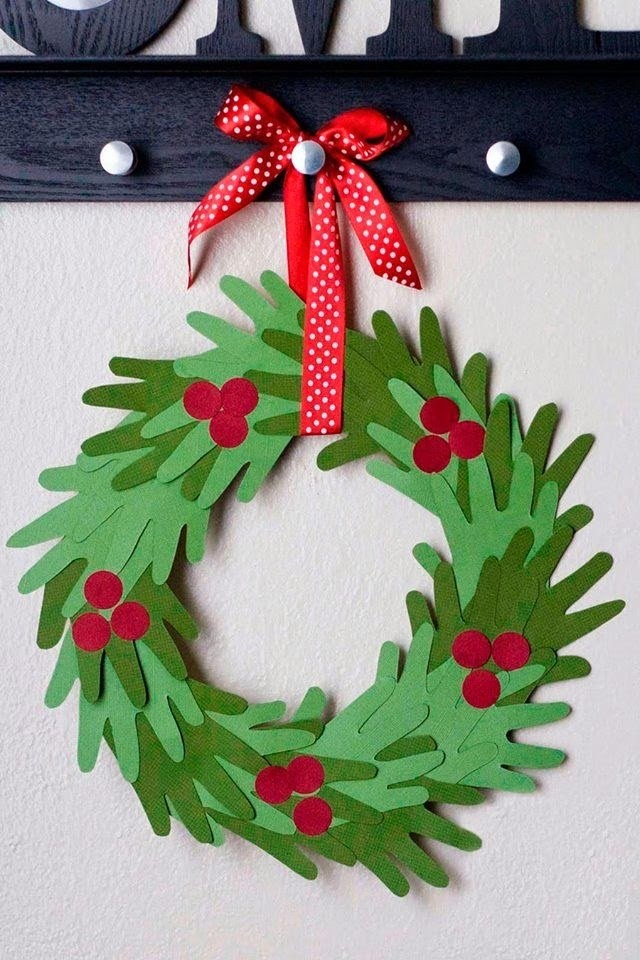
Crafting is a wonderful way to bond and create lasting memories with your children, especially during the festive season. One delightful DIY project to consider is creating a Kids Hand Print Christmas Wreath. This easy craft not only brings holiday cheer but also captures the essence of your child’s growth through their handprints. It’s a simple craft that’s perfect for all ages and requires just a few materials, making it a budget-friendly choice for any family. In this article, we’ll guide you through this creative DIY project step-by-step, ensuring it’s accessible for beginners and enjoyable for everyone involved.
WHY YOU WILL LOVE THIS Kids Hand Print Christmas Wreath
The Kids Hand Print Christmas Wreath is an enjoyable and straightforward DIY project that offers lots of benefits. Here’s why you will love making this project:
- Easy for Beginners: This craft is perfect for kids and adults who are new to crafting, making it a perfect introductory project.
- Uses Simple Materials: The materials required for this easy craft are common items you might already have at home.
- Budget-Friendly: Often made with inexpensive supplies, this wreath won’t break the bank.
- Quick to Make: Most families can complete this craft in under two hours, allowing for a quick holiday activity.
- Great for Home Decor: Once finished, it makes a festive addition to your home during the winter season.
- Great for Gifts: This homemade decor item can be a heartfelt gift for grandparents or friends.
- Easy to Customize: Each wreath can reflect your child’s personality with different colors, patterns, and styles.
PROJECT DETAILS
Skill Level
This project is beginner-friendly, making it suitable for all skill levels, especially for families with young children.
Estimated Time
You can expect to spend about 1 to 2 hours crafting your wreath, including drying time.
Approximate Cost
The cost of materials is around $15 or less, making this a budget-friendly DIY option.
Best For
This craft is great for family bonding, holiday decorations, and handmade gifts.
Project Type
This is a seasonal craft perfect for Christmas, aligning beautifully with holiday festivities.
TOOLS AND EQUIPMENT NEEDED
Scissors
Scissors are essential for cutting out both the handprint templates and the wreath circular form.
Liquid Glue
Liquid glue is used for sticking the handprints and embellishments together, providing a strong bond.
Small Round Circle Punch
This tool helps create uniform “berries” or embellishments from the red cardstock, adding detail to your wreath.
Large Plate
A large plate is used as a template to trace the circular shape of your wreath.
Small Round Bowl
A small round bowl helps define the inner circle of your wreath, giving it depth and structure.
MATERIALS
Chipboard
The sturdy chipboard serves as the base for your handprint wreath, providing durability.
6-8 Green Colored Card Stock
Green card stock is used to represent the foliage of the wreath, giving it a festive look.
Red Card Stock
Use red card stock to create the berry embellishments, adding a lovely contrast against the green.
Ribbon
The ribbon is used to tie around the top of your wreath for hanging, adding a decorative touch.
Scissors
You’ll need scissors to cut out shapes and adhere various components of the wreath.
Liquid Glue
Liquid glue will be used to adhere the handprints and berry embellishments securely.
Small Round Circle Punch
This makes it easy to punch out the small circles (berries) from the red card stock for added decoration.
Large Round Plate
A large plate acts as a template for tracing the outer circle of the wreath.
Small Round Bowl
The small bowl will help create the inner circle, giving your wreath a finished look.
HOW TO MAKE Kids Hand Print Christmas Wreath
Now that you know what materials and tools you’ll need, let’s dive into the step-by-step instructions for creating your Kids Hand Print Christmas Wreath.
Step 1: Create Hand Template
Start by tracing your child’s hand onto the chipboard to make a template. Ensure you get all the fingers and the palm included.
Step 2: Cut Out Hand Template
Using scissors, cut out the hand template carefully. This will serve to create multiple handprints in the later steps.
Step 3: Trace the Wreath Base
Now take a 12-inch green colored cardstock and place it underneath the large plate. Trace around the plate to create a large circle for your wreath.
Step 4: Define the Inner Circle
Next, place the small round bowl in the center of your newly formed wreath and trace around it. This creates an inner circle, making your wreath look more like a traditional ring.
Step 5: Cut Out the Circles
Using your scissors, carefully cut out both the outer and inner circles. You should now have a wreath-shaped card stock.
Step 6: Cut Out the Handprints
Using the hand template, trace and cut out about 20-25 handprints using the remaining colored cardstock (green and any other colors you choose).
Step 7: Assemble the Hands
Using liquid glue, adhere the handprints around the outer edge of your wreath. Make sure they are facing either inwards or outwards for a fuller look.
Step 8: Add Berries
With your small round circle punch, punch out circles from the red cardstock. Glue these “berries” in between the handprints to add visual interest and fun detail.
Step 9: Add Ribbon for Hanging
Finally, take a piece of ribbon, tie it around the top of your wreath, and secure it in place with glue or knotting. This allows you to easily hang your wreath.
Step 10: Personalize
For an added touch, write your child’s name, age, and the date on the back of the wreath. This turns it into a treasured keepsake.

TIPS AND TRICKS
Here are some useful tips to ensure your Kids Hand Print Christmas Wreath turns out beautifully:
- Choosing Materials: Opt for vibrant card stocks to make your wreath pop against your door or wall. A thicker cardstock will also ensure you have a durable decoration.
- Cutting Techniques: If your child is old enough, allow them to help with cutting, teaching them safe cutting practices.
- Avoiding Common Mistakes: Make sure to use liquid glue accurately to avoid messy spills on your project. Consider using a brush to spread the glue evenly.
- Making it Easier: If cutting out multiple handprints is tiring, consider tracing each hand on a folded cardstock so you can cut two at once.
- Saving Money: Look for scrap cardstock or leftover paper from previous projects; this saves money and adds a personal touch.
- Ensuring Durability: If you plan to store your wreath after the season, use a plastic sleeve or tuck it away in a flat storage box to keep it safe from bending.
- Working Safely: Always supervise children when using scissors and glue to ensure they are handling tools safely.
VARIATIONS AND CUSTOMIZATION IDEAS
The Kids Hand Print Christmas Wreath can be personalized in many creative ways:
- Different Colors: Use a mix of colored card stocks beyond green and red, like gold or silver, for a more modern touch.
- Different Sizes: Make mini wreaths as gifts or larger ones for bigger spaces. Adjust the size of the circle used for tracing.
- Seasonal Versions: Adjust the color themes and shapes for other holidays like Valentine’s Day or Halloween by changing handprints to hearts or ghosts.
- Different Patterns: Decorate the wreath with drawings, stickers, or glitter to add flair.
- Personalized Versions: Include family members’ names or photos in the wreath design for special occasions.
- Different Finishes: Consider adding a shiny sealant on the wreath for extra durability, especially if exposed to elements outside.
Kids Hand Print Christmas Wreath FAQ
1. How difficult is this craft?
This craft is beginner-friendly, making it suitable for children and adults of all skill levels. It’s straightforward, requiring basic cutting and gluing techniques.
2. What materials do I need?
You will need chipboard, green and red card stocks, ribbon, liquid glue, scissors, a small round circle punch, a large plate, and a small bowl.
3. How long does it take to make this wreath?
Creating the wreath typically takes about 1 to 2 hours, depending on how involved your child is in each step.
4. How should I store the wreath after making it?
Store the wreath in a flat, dry place away from humidity to maintain its shape. A plastic sleeve or flat cardboard box works well.
5. Can I wash the wreath if it gets dirty?
If the wreath becomes dusty or dirty, carefully wipe it down with a soft cloth. Avoid getting it wet, as this may damage the cardstock and your decorations.
CONCLUSION
The Kids Hand Print Christmas Wreath is an enjoyable, easy DIY project perfect for families looking to add some holiday cheer to their home. This craft is not only simple and budget-friendly but also a wonderful way to capture your child’s growth over the years. With just a few materials and a bit of creativity, you can craft a festive decoration or a heartfelt handmade gift. We encourage you to try this fun seasonal craft and share your experiences, finished projects, or unique customization ideas with others. Happy crafting!
PrintKids Hand Print Christmas Wreath

A simple and enjoyable DIY project to create a vibrant handprint wreath, perfect for holiday decorations and capturing cherished memories with your children.
- Prep Time: 30 minutes
- Cook Time: 90 minutes
- Total Time: 120 minutes
- Yield: 1 wreath 1x
- Category: Craft
- Method: DIY
- Cuisine: N/A
- Diet: N/A
Ingredients
- Chipboard
- 6–8 Green Colored Card Stock
- Red Card Stock
- Ribbon
- Scissors
- Liquid Glue
- Small Round Circle Punch
- Large Round Plate
- Small Round Bowl
Instructions
- Create Hand Template: Trace your child’s hand onto chipboard.
- Cut Out Hand Template: Use scissors to cut out the hand template.
- Trace the Wreath Base: Use a large plate to trace a circle onto green cardstock.
- Define the Inner Circle: Use a small bowl to trace an inner circle.
- Cut Out the Circles: Carefully cut both the outer and inner circles.
- Cut Out the Handprints: Trace and cut out 20-25 handprints using colored cardstock.
- Assemble the Hands: Glue the handprints around the wreath’s edge.
- Add Berries: Punch out circles from red cardstock and glue them among the handprints.
- Add Ribbon for Hanging: Secure a ribbon to the top for hanging.
- Personalize: Write your child’s name and date on the back of the wreath.
Notes
Opt for vibrant colors and thicker card stock for durability. Supervise children when using scissors and glue.
Nutrition
- Serving Size: 1 wreath
- Calories: 150
- Sugar: 0g
- Sodium: 0mg
- Fat: 5g
- Saturated Fat: 1g
- Unsaturated Fat: 4g
- Trans Fat: 0g
- Carbohydrates: 20g
- Fiber: 2g
- Protein: 1g
- Cholesterol: 0mg
Keywords: Christmas craft, kids craft, handprint wreath, holiday decor, DIY project