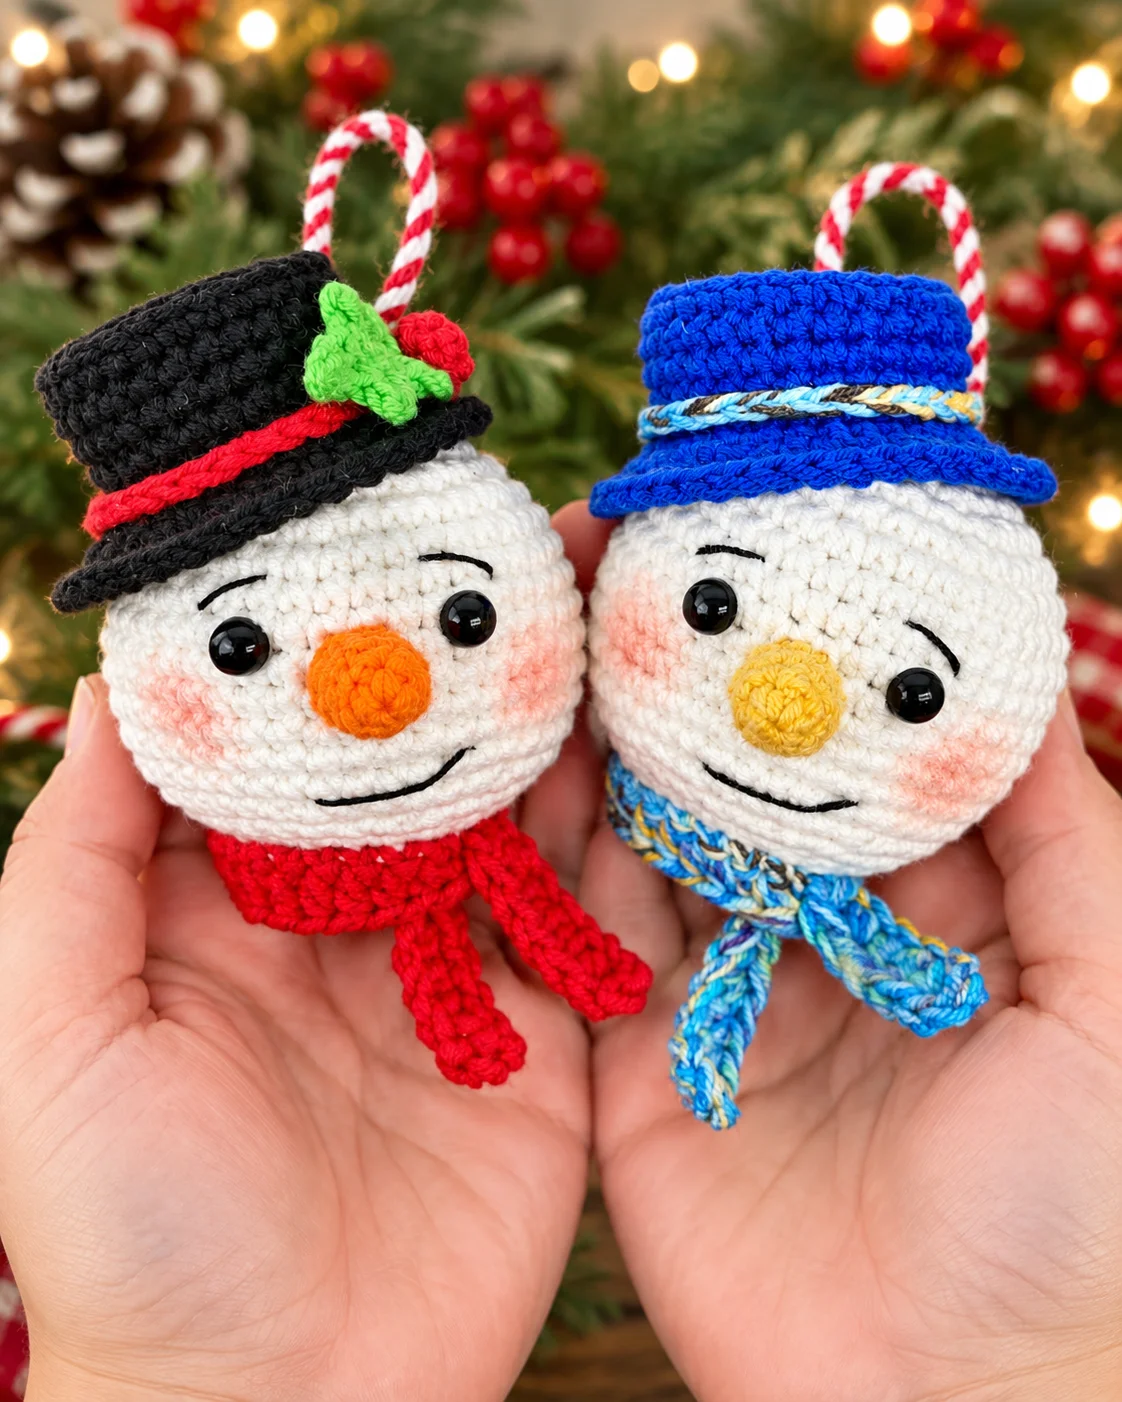
Looking for a cute free snowman ornament crochet pattern to add a handmade touch to your Christmas decorations? This adorable little crochet snowman is a fun holiday amigurumi project that can be hung on your Christmas tree, added to a festive garland, or given as a handmade Christmas gift.
With his tiny top hat, colorful scarf, carrot-style nose, holly decoration, rosy cheeks, and cheerful embroidered smile, this crochet snowman Christmas ornament is full of festive personality.
The finished snowman measures approximately 8.5 cm (3.25″) tall and 6 cm (2.75″) wide when made with Sport weight yarn and a 2.5 mm crochet hook.
This project is suitable for beginner to intermediate crocheters who are comfortable working basic amigurumi stitches, increases, decreases, continuous rounds, and simple sewing.
The complete free crochet snowman ornament pattern is provided below.
How to Crochet a Snowman Ornament
– This snowman Christmas ornament is worked in continuous rounds so no need to slip stitch to join the rounds. This way you will avoid having a visible seem on your crochet toy.
– Use a stitch marker to mark the beginning of each round.
– All stitches are worked in both loops unless stated otherwise.
– Always use a crochet hook at least one size smaller than the size recommended on the yarn label to avoid large gaps and the stuffing showing.
Working in continuous rounds is commonly used for amigurumi because it creates a smooth surface without an obvious joining line. Be sure to move your stitch marker after completing every round so you can easily keep track of where each new round begins.
Before You Start this Snowman Ornament Crochet Pattern
Before beginning your Christmas snowman, prepare your yarn, hook, stuffing, safety eyes, embroidery thread, and sewing supplies.
The pattern includes several small pieces that are crocheted separately and later assembled, including the snowman’s head, top hat, holly leaf, holly berry, scarf, and nose.
Pattern Notes
Difficulty level: beginner to intermediate
Finished size – using 2.5 mm crochet hook (B/1) and Sport weight yarn (4ply #2):
- height: 8.5cm (3.25″)
- width: 6cm (2.75″)
Your final size may vary depending on your yarn choice, crochet hook, and individual tension.
Using thicker yarn will create a larger snowman ornament, while thinner yarn can produce a smaller ornament.
Pattern Gauge
Flat crochet circle 2 inches (5 cm) in diameter:
- when using 2.5 mm hook (B/1) and Sport weight yarn (4ply #2)
- 7 rounds with 42 stitches in the last round
Gauge is especially useful when you want your finished snowman to closely match the dimensions given in the pattern.
Yarn Requirements for the Crochet Snowman Ornament
One of the advantages of this Christmas amigurumi snowman pattern is that it can be made with several different yarn fibers and yarn weights.
Small amounts of yarn are needed for the decorative pieces, making this project a useful way to use leftover yarn from other crochet projects.
Yarn Requirements
This snowman ornament crochet pattern will work great with the below yarns.
- 100% cotton yarn
- 100% acrylic yarn
- blend of cotton/acrylic
- Sport weight yarn (4ply #2)
- Light worsted weight yarn (DK #3)
- Worsted weight yarn (Aran #4)
Yarn I used for this crochet ornament:
- Sport weight yarn (4ply #2)
- 55% cotton and 45% acrylic blend
- white yarn – YarnArt Jeans – color 01 – (50g/160m)
- blue yarn – YarnArt Jeans – color 47 – (50g/160m)
- orange yarn – YarnArt Jeans – color 77 – (50g/160m)
- black yarn – YarnArt Jeans – color 53 – (50g/160m)
- green yarn – YarnArt Jeans – color 60 – (50g/160m)
- red yarn – YarnArt Jeans – color 90 – (50g/160m)
- yellow yarn – YarnArt Jeans – color 35 – (50g/160m)
- variegated yarn – YarnArt Jeans Tropical – color 614 – (50g/160m)
White is used for the snowman itself, while the remaining colors create the hat, scarf, carrot nose, holly leaf, berry, and other festive details.
Yarn Substitutes
If YarnArt Jeans is not easily available where you live, the following yarns can be used as alternatives.
US Suppliers
Sport weight yarn (4ply #2)
- 100% cotton: Schachenmayr Pyramid Cotton
- blend of cotton/acrylic: WeCrochet Comfy
Light worsted weight yarn (DK #3)
- 100% cotton:: WeCrochet Animation DK
- blend of cotton/acrylic: Sirdar Stories DK
Worsted weight yarn (Aran #4)
- 100% acrylic: Universal Yarn Uptown
- 100% acrylic: WeCrochet Brava
UK Suppliers
Sport weight yarn (4ply #2)
- 100% cotton: Scheepjes Catona
- 100% cotton: Paintbox Yarns Cotton
Light worsted weight yarn (DK #3)
- 100% cotton: Paintbox Yarns Cotton DK
- blend of cotton/acrylic: Paintbox Yarns Cotton Mix DK
Worsted weight yarn (Aran #4)
- 100% acrylic: Universal Yarn Uptown
- 100% acrylic: Scheepjes Chunky Monkey
Materials and Equipment
Gather everything you need before beginning your crochet snowman Christmas ornament.
Materials Needed
- black thread embroidery yarn for facial features
- string for a hanging loop
- polyester fibre fill
Crochet Hook Size
- 2.5 mm crochet hook (B-1) for Sport weight yarn (4ply #2)
- 3 mm crochet hook (C-2) for Light worsted weight yarn (DK #3)
- 3.5 mm crochet hook (E-4) for Worsted weight yarn (Aran #4)
- if using a different weight of yarn then refer to the hook size recommendations on the yarn label but go at least one size smaller
Using a slightly smaller crochet hook helps create tight stitches so the polyester filling does not show through your crochet fabric.
Other Equipment Needed
- scissors
- tapestry needle
- stitch marker
- pins with large heads
- 6 mm safety eyes
Pattern Abbreviations
This Christmas snowman ornament pattern is written using US terms.
MR: magic ring/magic circle
CH: chain
ST: stitch
SL ST: slip stitch
SC: single crochet stitch
HDC: half double crochet stitch
INC: increase = two single crochet stitches in the same stitch
INV DEC: invisible decrease
INV DEC in BLO: invisible decrease in back loop only
FLO: crochet into front loop only
BLO: crochet into back loop only
BBO: back bump only
FL ST: front loop stitch
FO: fasten off
INV FO: invisible fasten off
(…..) x 6: repeat the pattern inside the brackets by the given number (in this example, repeat the pattern in the brackets 6 times)
{…}: number shown inside these brackets equals the number of stitches at the end of each round
Special Stitches
The snowman pattern uses two variations of an invisible decrease.
Invisible Decrease
INV DEC: invisible decrease = insert the hook into the front loop of the first stitch (two loops on hook) and immediately insert it again into the front loop of the next stitch (three loops on the hook). Yarn over and draw through the first two loops on the hook (two loops on the hook). Yarn over and draw through the two loops on the hook to finish your invisible decrease
Invisible Decrease in Back Loop Only
INV DEC in BLO: invisible decrease in back loop only = insert your hook into BLO of next ST and then into BLO of the following ST but go in from the back (from behind of the ST). Yarn over and draw through the first two loops on the hook (two loops on the hook). Yarn over and draw through the two loops on the hook to finish your invisible decrease.
Snowman Ornament Crochet Pattern: Step by Step
You can find the free snowman ornament crochet pattern below. I have included lots of photos to make it easier for you to follow the detailed instructions. Some sections of the pattern also include step-by-step video tutorials needed for that specific part of the pattern.
The snowman’s head is crocheted first, followed by the top hat and its decorations. The scarf is attached directly to the unworked front loops of the head before the nose and remaining facial details are added during assembly.
Head
Yarn color: white
Construction: crochet as a ball starting from the top of the head towards the bottom
R1: MR – 6 x SC into the ring {6} – watch this video tutorial on How to crochet a magic ring
R2: INC in each ST around {12}
R3: (SC in next ST, INC) x 6 {18}
R4: SC in next ST, INC, (SC in next 2 STs, INC) x 5, SC in next ST {24}
R5: (SC in next 3 STs, INC) x 6 {30}
R6: SC in next 2 STs, INC, (SC in next 4 STs, INC) x 5, SC in next 2 STs {36}
R7: (SC in next 5 STs, INC) x 6 {42}
If you wish, you can attach a hanging loop to the head at this stage. Use a string or crochet a chain, pull it through the middle of the magic ring and secure it to the inside of the head so it can’t be pulled out. You will then pull the hoop through the hat later on.
R8-R15 (8 rounds): SC in each ST around {42}
You can now place the safety eyes between rounds R10 and R11 leaving 6 stitches in between the eyes.
R16: (SC in next 5 STs, INV DEC) x 6 {36} – watch this video tutorial on How to crochet an invisible decrease
R17: SC in next 2 STs, INV DEC, (SC in next 4 STs, INV DEC) x 5, SC in next 2 STs {30}
R18: (SC in next 3 STs, INV DEC) x 6 {24}
Start stuffing the head
R19: crochet this whole round in BLO if you want your snowman to wear the scarf. Otherwise crochet in both loops as normal – SC in next ST, INV DEC in BLO, (SC in next 2 STs, INV DEC in BLO) x 5, SC in next ST {18}
R20: (SC in next ST, INV DEC) x 6 {12}
R21: SC in each ST around {12}
Stuff well, FO closing the hole using a yarn needle and weave the yarn tail in
Watch this video tutorial on How to close a hole in an Amigurumi piece
Top Hat
The snowman’s miniature top hat adds much of the character to this Christmas ornament. You can use blue yarn for a colorful version or black yarn for a more traditional snowman top hat.
Yarn color: blue or black
Construction: crochet from the top of the hat downwards
R1: MR – 6 x SC into the ring {6}
R2: INC in each ST around {12}
R3: (SC in next ST, INC) x 6 {18}
R4: SC in next ST, INC, (SC in next 2 STs, INC) x 5, SC in next ST {24}
R5: crochet this round loosely because it will be easier to crochet into the BBO in R6 – (SC in next 3 STs, INC) x 6 {30}
INV FO and weave the yarn tail in – watch tis video tutorial on How to fasten off: Invisible Finish
R6: you will crochet this round into BBO – watch this video tutorial on How to single crochet into back bump
- create a slip knot on your hook using the same yarn
- insert your hook into the back bump of the first ST of R5 and SC (this ST will count as your first ST in this round)
- SC all the way round in BBO {30} – use slightly smaller hook if you find it difficult to insert it into the back bump
R7-R10 (4 rounds): SC in each ST around {30}
R11: crochet this round in FLO – SC in next 2 STs, INC, (SC in next 4 STs, INC) x 5, SC in next 2 STs {36}
R12: (SC in next 5 STs, INC) x 6 {42}
R13: SC in each ST around {42}
INV FO and leave a long tail for sewing
You will stuff the hat when sewing it on
Hat Band
Adding the hat band introduces another festive color to your snowman’s top hat.
Yarn color: variegated or red
R1: Chain 30x {30}
Wrap the chain around the hat (just above the brim), sew the ends together and secure it to the hat. Weave yarn ends in.
You may need to adjust the length of the chain depending on your tension and type of yarn used.
Holly Leaf
A miniature crochet holly leaf decorates the snowman’s hat and gives the ornament an extra Christmas touch.
Yarn color: green
Construction: crochet around a foundation chain
Make one
Step 1: crochet a foundation chain – CH 7x
Step 2: crochet first half of the leaf (go through back bump of each CH as well to avoid gaps in the middle of the leaf) – SL ST into 2nd CH from hook (Pic 1), SC in next CH, 2CH PICOT (Pic 2 & 3), SC in next 2 CHs, 2CH PICOT, SC in next CH, SL ST into last CH, 2CH PICOT and SL ST into last CH again (Pic 4)
Step 3: crochet the other half of the leaf into the opposite side of the chain – SC in next CH, CH2 PICOT, SC in next 2 CHs (Pic 5), 2CH PICOT, SC in next CH, SL ST into last CH (Pic 6)
Step 4: FO and leave a long tail for sewing. Weave in the starting tail.

Holly Berry
The small red holly berry is crocheted separately before being sewn beside the green leaf.
Yarn color: red
Make one
R1: MR – 6 x SC into the ring {6}
R2: SC in each ST around {6}
Do not stuff, FO and close the hole using a yarn needle following the same technique you used when closing the head
Leave a long tail for sewing
Crochet Snowman Scarf
The scarf is one of the most distinctive details on this crochet snowman ornament.
Unlike a completely separate scarf, this version is crocheted directly into the unworked front loops on the snowman’s head.
Yarn color: variegated or red
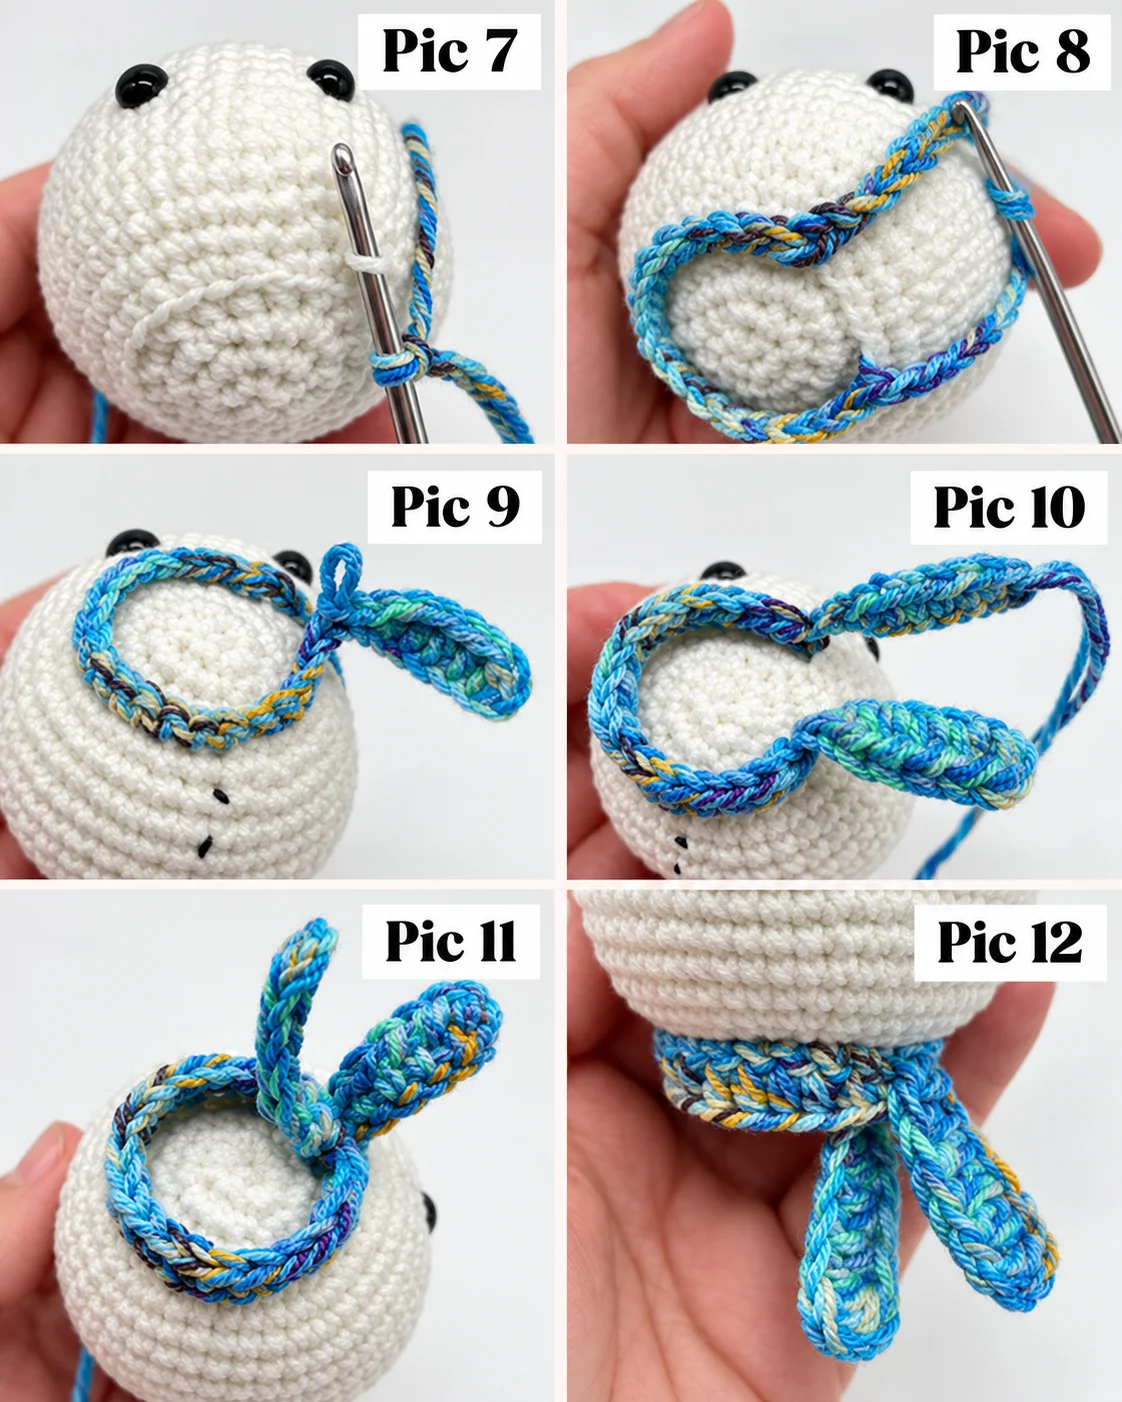
Construction: crochet the scarf into the unworked front loops of R18 of the head
Step1: CH 10x
Step2: Hold the snowman so it’s facing your way and insert your hook into one of the unworked FL STs (below the right eye) – Pic 7 and SC
Step 3: SC in next 20 FL STs – do not crochet into the last 3 FL STs
Step 4: CH 10x – Pic 8
Step 5: HDC in 3rd CH from the hook, HDC in next 4 CHs, SL ST in last 3 CHs – Pic 9
Step 6: you will now crochet into the SC stitches – SL ST in first ST, HDC in 19 STs, SL ST in last ST
Step 7: you will now crochet into the chain again – SL ST in first 3 CHs, HDC in next 6 CHs, CH 2x and SL ST in last CH – Pic 10
Weave both yarn tails in
Tie a knot on the scarf by wrapping the longer end around the shorter end – Pic 11 & 12
Snowman Nose
A small yellow or orange crochet nose gives the snowman his classic carrot-nose appearance.
Yarn color: yellow or orange
R1: MR – 4 x SC into the ring {4}
R2: (SC in next ST, INC) x 2 {6}
R3: (SC in next 2 STs, INC) x 2 {8}
R4: SC in each ST around {8}
INV FO and leave a long tail for sewing
No need to stuff the nose
Snowman Ornament Assembly
Once all the crochet pieces are finished, it is time to assemble your snowman and add the final facial details.
Positioning the pieces with pins before sewing can make it easier to check that everything is centered correctly.
Assembly
– sew the nose on between R10 and R14 of the head
– embroider the eye brows between R8 and R10 of the head, use some black thread embroidery yarn. Watch this video tutorial on How to embroider nostrils on Amigurumi. In this video I embroider nostrils but you can use the same technique for embroidering the eye brows.
– embroider the mouth between R14 and R16 of the head, use some black thread embroidery yarn
– to paint the rose cheeks you can either use a make-up blusher, water paint or a crayon. I used a make-up blusher and just gently tapped the cheeks with the makeup brush
– black hat assembly – sew the holly leaf and berry to the side of the hat. Weave the yarn tails in
– sew the hat to the side of the head while adding some stuffing. You can stitch through the back loop stitches of R10 on the hat. Don’t forget to pull the hanging loop through the hat while sewing it on
How to Use Your Crochet Snowman Ornament
Once finished, your handmade snowman can be used in several ways during the holiday season.
Add the hanging loop and place it directly on your Christmas tree, or make several snowmen in different scarf and hat colors to create a coordinated collection of handmade ornaments.
You could also use the finished snowman as:
- a Christmas gift topper
- a holiday garland decoration
- a winter home decoration
- a handmade stocking stuffer
- a small Christmas gift
- a festive craft fair item
- part of an amigurumi Christmas display
Changing the hat band and scarf colors is an easy way to personalize every snowman while keeping the main pattern exactly the same.
Tips for Making the Best Crochet Snowman Ornament
For a neat amigurumi finish, keep your stitches tight and consistent throughout the project. Because the snowman is stuffed, a smaller hook helps prevent gaps where the filling could become visible.
Add stuffing gradually rather than inserting a large amount at once. This makes it easier to create an even, rounded shape.
When sewing the nose and hat in place, position them with pins before making permanent stitches. Small adjustments can noticeably change your snowman’s expression.
You can also experiment with different yarn colors for the scarf, hat band, and hat while keeping the traditional white snowman body.
Frequently Asked Questions
Is this snowman crochet pattern suitable for beginners?
The pattern is rated beginner to intermediate. It uses common amigurumi techniques including single crochet, increases, invisible decreases, working in continuous rounds, and sewing small pieces together.
What size is the finished crochet snowman ornament?
When using a 2.5 mm crochet hook and Sport weight yarn (4ply #2), the finished ornament measures approximately:
- 8.5 cm (3.25″) high
- 6 cm (2.75″) wide
Can I use worsted weight yarn?
Yes. The pattern can be made using:
- Sport weight yarn (4ply #2)
- Light worsted weight yarn (DK #3)
- Worsted weight yarn (Aran #4)
Remember to adjust your crochet hook according to the yarn weight as specified in the materials section.
Can I make the snowman larger?
Yes. Using thicker yarn and the corresponding hook will produce a larger snowman. Your finished measurements will differ from those listed for Sport weight yarn.
Can I make several snowman ornaments in different colors?
Absolutely. Keep the head white and experiment with blue, black, red, green, yellow, or variegated yarn for the hat, scarf, hat band, holly decorations, and nose.
This is an easy way to create a whole collection of coordinated handmade Christmas ornaments.
Do I need to join each crochet round?
No. The snowman Christmas ornament is worked in continuous rounds, so there is no need to slip stitch to join each round.
Remember to use your stitch marker to mark the beginning of every round.
Final Thoughts on This Free Snowman Ornament Crochet Pattern
A handmade crochet snowman is a charming way to bring amigurumi into your Christmas decorating. The small finished size makes this project manageable, while details such as the top hat, scarf, holly leaf, berry, embroidered smile, and rosy cheeks give the finished ornament plenty of character.
You can follow the pattern using classic Christmas colors or personalize your snowman with your favorite yarn combinations. Make one ornament as a small holiday project or crochet several to decorate an entire Christmas tree.
They can also make thoughtful handmade gifts for friends, family, teachers, neighbors, or anyone who loves crochet and Christmas decorations.
Congratulations on completing your crochet Christmas bauble! I hope this crochet snowman ornament free pattern was clear, simple to follow and a joy to make.
This crochet pattern and image are property of cuddlystitchescraft