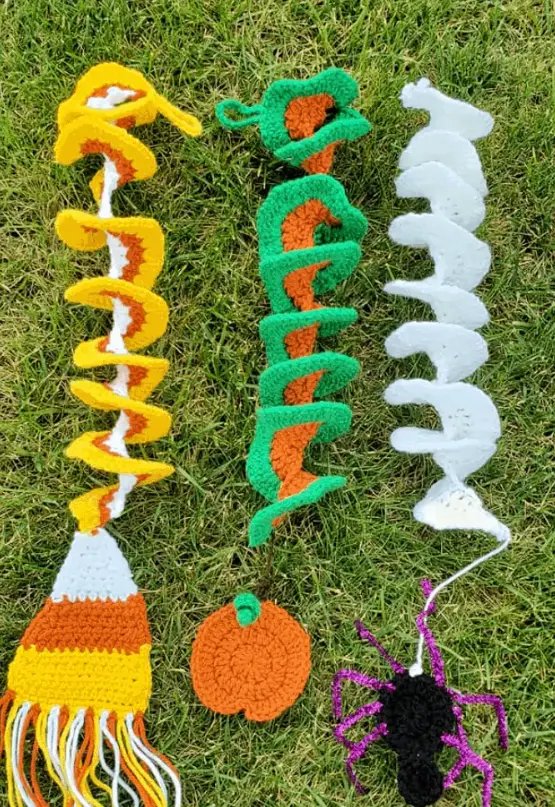
Looking for a fun and easy crochet Halloween decoration? These free crochet Halloween wind spinner patterns are a creative way to decorate your home for the spooky season. With three festive designs to choose from—a pumpkin, a spider, and candy corn—you can make colorful hanging decorations using simple crochet stitches.
These Halloween crochet wind spinners work up quickly and can easily be completed in one evening. They are perfect for decorating your porch, windows, garden, or any space that needs a little Halloween charm.
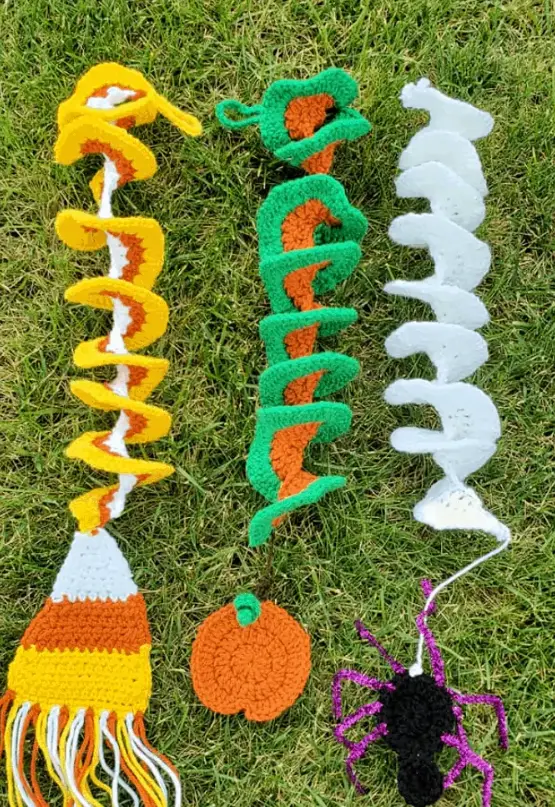
Each design features a spiral-shaped crochet wind spinner and a Halloween-themed decoration. The candy corn version has colorful fringe, the spider hangs from a crocheted spiral like it’s dangling from a web, and the pumpkin features a decorative green vine.
Follow the step-by-step crochet patterns below to make all three Halloween wind spinners.
Crochet Halloween Wind Spinner Pattern Details
| Pattern detail | Information |
|---|---|
| Skill level | Beginner-friendly |
| Yarn weight | Medium worsted weight (#4) |
| Crochet hook | 3.75 mm (F) |
| Gauge | 14 dc × 6 rows = 4 inches |
| Designs | Candy corn, spider, pumpkin |
| Crochet terminology | US terms |
| Estimated time | Approximately one evening per design |
Finished Measurements
Each Halloween wind spinner has a spiral section measuring approximately 19 inches long and 3.5 inches wide.
| Design | Additional measurements |
|---|---|
| Candy Corn | Candy corn: 4 inches wide × 5.5 inches tall. Total spinner length: approximately 30 inches |
| Spider | Spider body, excluding legs: 4 inches long × 2.5 inches wide |
| Pumpkin | Pumpkin: approximately 4 × 4 inches |
The finished measurements may vary slightly depending on your yarn, crochet tension, and how you assemble each decoration.
Materials Needed
Before starting your crochet Halloween wind spinner, gather the following materials:
-
Crochet hook: F hook (3.75 mm).
-
Yarn: Medium worsted weight yarn, size 4. Cotton yarn also works.
-
Recommended yarn: Hobby Lobby I Love This Yarn or Red Heart Super Saver.
-
Yarn colors: Burnt pumpkin (orange), yellow, white, coffee (brown), green, and black.
-
Tapestry needle: For sewing the pieces together and weaving in ends.
-
Pipe cleaners: Three pipe cleaners for the spider design only.
-
Scissors: For cutting yarn and trimming the fringe.
You can use any medium-weight yarn that works well with your hook.
Crochet Abbreviations (US Terms)
Here are the crochet abbreviations used throughout the three Halloween wind spinner patterns.
| Abbreviation | Meaning |
|---|---|
| ch | Chain |
| hk | Hook |
| st(s) | Stitch(es) |
| sc | Single crochet |
| hdc | Half double crochet |
| dc | Double crochet |
| sl st | Slip stitch |
| hdc2tog | Half double crochet 2 together |
| hdc3tog | Half double crochet 3 together |
Gauge: 14 double crochet stitches × 6 rows = 4-inch square.
Pattern tip: You can customize the length of your crochet wind spinner by making a longer or shorter foundation chain. Simply increase or decrease the number of starting chains to achieve your preferred length.
1. Free Candy Corn Crochet Halloween Wind Spinner Pattern
The candy corn crochet wind spinner combines the traditional Halloween colors of white, orange, and yellow to create a bright, festive decoration.
The pattern includes three parts: a colorful spiral, a crocheted candy corn decoration, and coordinating fringe.
Part 1: Crochet the Candy Corn Wind Spinner
Begin by crocheting the main spiral using white, orange, and yellow yarn.
With white yarn, chain 60.
Row 1: Dc in the third ch from the hook and in each stitch across. (58)
Row 2: Switch to orange yarn and ch 2. Work 2 dc in each stitch across.
Row 3: Switch to yellow yarn and ch 2. Work 3 dc in each stitch across.
Continue by chaining 20. Slip stitch into the first chain to create a loop for hanging.
Fasten off and weave in the ends.
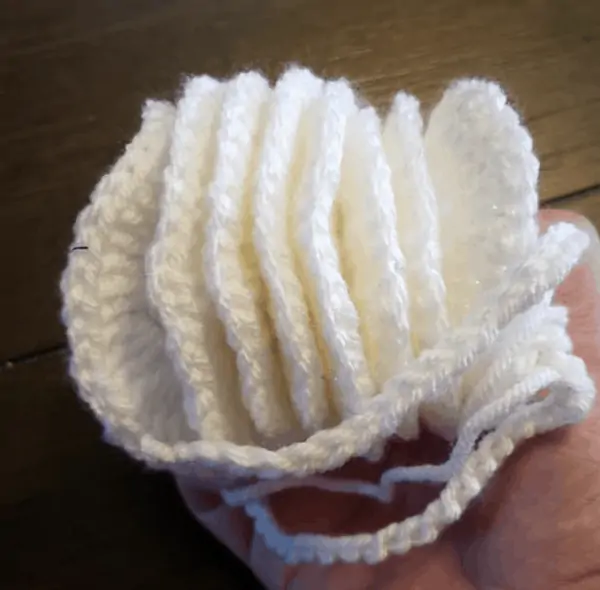
Important: Coil your crochet wind spinner so that the spiral hangs correctly when you display it.

Part 2: Crochet the Candy Corn Decoration
Next, make the candy corn decoration that will hang from the bottom of the wind spinner.
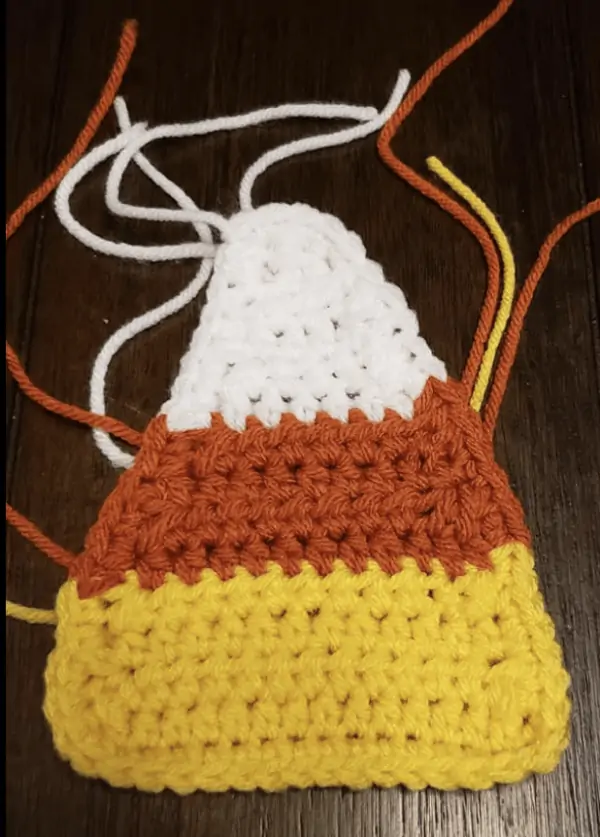
The candy corn is worked in rows, beginning with yellow yarn at the wider base. You will gradually decrease stitches and change colors to create the classic candy corn shape.
Yellow section
With yellow yarn, ch 17.
Row 1: Hdc in the third ch from the hook and in each stitch to the end. (15)
Row 2: Ch 2, turn. Hdc2tog, hdc in the next 11 sts, hdc2tog. (13)
Row 3: Ch 2, turn. Hdc in each stitch across. (13)
Row 4: Ch 2, turn. Hdc2tog, hdc in the next 9 sts, hdc2tog. (11)
Row 5: Ch 2, turn. Hdc in each stitch across. (11)
Orange section
Switch to orange yarn.
Row 6: Ch 2, turn. Hdc in each stitch across. (11)
Row 7: Ch 2, turn. Hdc2tog, hdc in the next 7 sts, hdc2tog. (9)
Row 8: Ch 2, turn. Hdc in each stitch across. (9)
Row 9: Ch 2, turn. Hdc2tog, hdc in the next 5 sts, hdc2tog. (7)
White section
Switch to white yarn.
Row 10: Ch 2, turn. Hdc in each stitch across. (7)
Row 11: Ch 2, turn. Hdc2tog, hdc in the next 3 sts, hdc2tog. (5)
Row 12: Ch 2, turn. Hdc in each stitch across. (5)
Row 13: Ch 2, turn. Hdc2tog, hdc in the next stitch, hdc2tog. (3)
Row 14: Ch 2, turn. Hdc in each stitch across. (3)
Row 15: Ch 2, turn. Hdc3tog. (1)
Fasten off, leaving a long yarn tail for sewing.
Using a tapestry needle, sew the top of the candy corn decoration to the base of the crocheted wind spinner.
Weave in all remaining ends.
Part 3: Add the Candy Corn Fringe
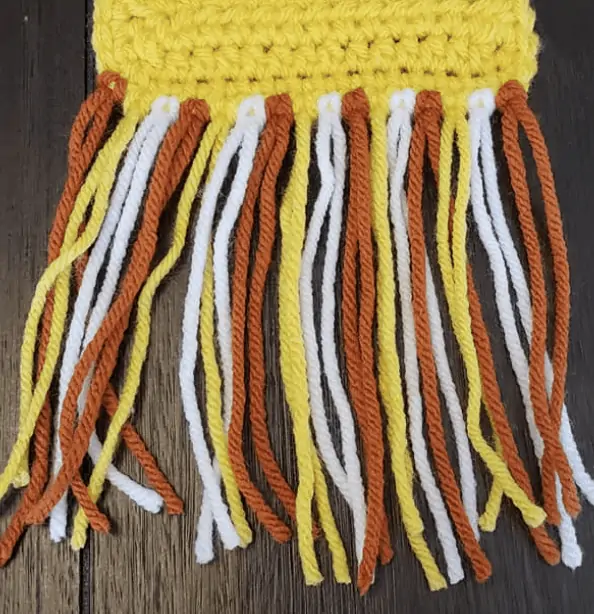
The colorful fringe is the finishing touch for this Halloween crochet wind spinner.
Follow these steps:
-
Cut 15-inch strands of yarn in each of the three colors: yellow, orange, and white.
-
Fold each strand in half.
-
Insert your crochet hook into a stitch along the bottom of the candy corn.
-
Pick up the middle fold of the yarn with your hook.
-
Pull the folded yarn through the stitch.
-
Pull the loose yarn ends through the loop to secure the fringe.
-
Repeat in each stitch across, alternating the colors.
-
Trim the finished fringe to approximately 4–4.5 inches long, or your desired length.
Finishing tip: Before hanging your candy corn wind spinner, coil the spiral into a circle to help it hang properly.
Your candy corn crochet Halloween wind spinner is complete!
2. Free Crochet Spider Wind Spinner Pattern
This crochet spider wind spinner is a fun Halloween decoration featuring a white spiral and a black crocheted spider.
The spider is made from two crocheted circles that form its head and body. Pipe cleaners create the legs, and a strand of yarn suspends the spider from the bottom of the wind spinner.
Part 1: Crochet the Spider Wind Spinner
With white yarn, ch 60.
Row 1: Dc in the third ch from the hook and in each stitch across. (58)
Row 2: Ch 2. Work 2 dc in each stitch across.
Row 3: Ch 2. Work 3 dc in each stitch across.
Continue by chaining 20.
Slip stitch into the first chain and fasten off. This creates the hanging loop for your spider wind spinner.
Weave in the ends.
Part 2: Crochet the Spider Head
Use black yarn to create the spider’s head.
Start with a magic circle and ch 2.
Round 1: Work 10 dc into the magic circle. Sl st to join. (10)
Fasten off and weave in the ends.
Set the spider head aside while you crochet the body.
Part 3: Crochet the Spider Body
With black yarn, make another magic circle and ch 2.
Round 1: Work 10 dc into the magic circle. Sl st to join. (10)
Round 2: Ch 2. Work 2 dc in each stitch around. (20)
Fasten off, leaving a long yarn tail to attach the spider’s head.
Using your tapestry needle, sew the crocheted head onto the spider body.
Weave in any remaining ends.
Part 4: Make the Spider Legs
The spider legs are made from pipe cleaners, allowing you to bend and shape them.
Follow these steps to create all eight legs.
-
Cut eight pieces of pipe cleaner, each measuring approximately 4 inches long. Three full-length pipe cleaners are listed in the materials.
-
Position four pipe cleaners evenly along one side of the spider’s body.
-
Using your fingernails, gently pull apart a crochet stitch where you want to attach the first leg.
-
Insert the pipe cleaner through the stitch.
-
Twist the end of the pipe cleaner to secure it.
-
Repeat this process for the remaining legs, positioning four on each side of the spider’s body.
-
Bend each leg in half to give the spider legs their shape.
Adjust the legs until your spider has the desired appearance.
Part 5: Attach the Spider to the Wind Spinner
Once the spider is complete, attach it to the white wind spinner.
Cut a long piece of white yarn.
Knot one end of the yarn to the bottom of the crochet wind spinner.
Attach the other end to the bottom of the spider so that the spider hangs approximately 5 inches below the wind spinner.
Secure the knots and weave in the ends.
Optional: Twist one of the spider’s legs around the hanging yarn to make it look as though the spider is holding onto its web.
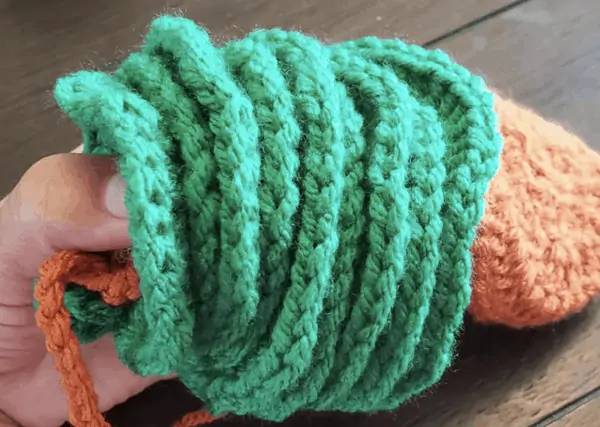
Important: Coil the wind spinner into a circle before hanging it so that the spiral is positioned correctly.
Your Halloween crochet spider wind spinner is now ready to display.
3. Free Crochet Pumpkin Wind Spinner Pattern
The crochet pumpkin wind spinner is an adorable handmade decoration for Halloween and fall.
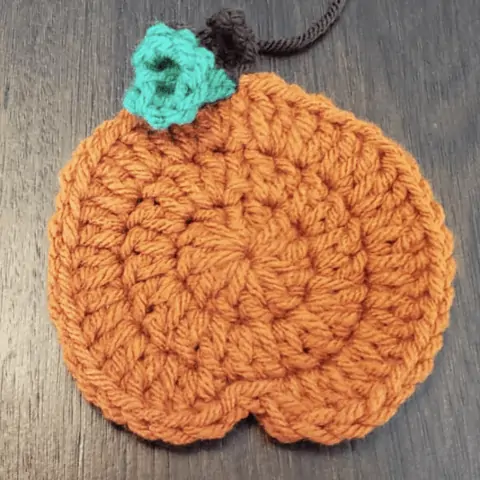
This design features a bright orange spiral with a green border and a small crocheted pumpkin hanging from the bottom. The pumpkin also has a brown stem and a curly green vine for extra detail.
Part 1: Crochet the Pumpkin Wind Spinner
Begin with orange yarn and ch 60.
Row 1: Dc in the third ch from the hook and in each stitch across. (58)
Row 2: Ch 2. Work 2 dc in each stitch across.
Row 3: Change to green yarn and ch 2. Work 3 dc in each stitch across.
Continue by chaining 20.
Slip stitch into the first chain to create the hanging loop.
Fasten off and weave in the ends.
Set the finished wind spinner aside while you work on the pumpkin decoration.
Part 2: Crochet the Pumpkin Decoration
The pumpkin is crocheted in the round using orange yarn.
Begin with a magic circle and ch 2.
Round 1: Work 11 dc into the magic circle. Sl st to join. (11)
Round 2: Work 2 dc in each stitch around. Sl st to join. (22)
Round 3: Ch 2. Work 2 dc in each of the next 10 stitches, sl st in the next 2 stitches, work 2 dc in each of the last 10 stitches, and sl st to join. (42)
Fasten off, leaving a yarn tail to weave in.
You now have the crocheted pumpkin shape.
Part 3: Crochet the Brown Pumpkin Stem
Using brown yarn, ch 3.
Work 1 sc in each of the next 2 stitches.
Sl st into the first stitch and fasten off.
Weave in the end.
Part 4: Crochet the Curly Green Pumpkin Vine
With green yarn, pick up a stitch near the bottom of the stem.
Ch 7.
Work 2 sc in each stitch.
Sl st into the first stitch and fasten off.
Weave in the ends.
The increases will create the curly shape of the pumpkin vine.
Part 5: Attach the Pumpkin to the Wind Spinner
Cut a long piece of brown yarn.
Knot one end of the yarn to the bottom of your crocheted wind spinner.
Attach the other end to the top of the pumpkin so that the pumpkin hangs approximately 2 inches below the spiral.
Secure the knots and weave in the remaining ends.
Gently adjust the pumpkin until it hangs correctly.
Recoil your wind spinner if necessary, then find a suitable place to hang your finished decoration.
Your crochet pumpkin wind spinner is complete!
Helpful Tips for Making Crochet Halloween Wind Spinners
These simple tips will help you achieve the best results when making your Halloween crochet decorations.
1. Choose the Right Yarn
Medium worsted weight yarn (#4) works well for all three patterns. Cotton yarn is another suitable option.
You can experiment with different yarn colors to customize your decorations while keeping the original stitch instructions.
2. Customize the Length of Your Wind Spinner
Each pattern begins with a foundation chain of 60 stitches.
However, you can make your crochet wind spinner longer or shorter by adjusting the number of chains in the foundation row.
Remember that changing the foundation chain will also change the number of stitches you work into the following rows.
3. Shape Your Crochet Spiral Before Hanging
One of the most important finishing steps is coiling your crochet wind spinner correctly.
After completing the spiral, arrange it into a circular coil before hanging it.
If the spiral becomes twisted or loses its shape, simply adjust the coils again.
4. Secure Your Halloween Decorations
Each Halloween-themed decoration is attached differently.
-
Candy corn: Sew the top of the candy corn directly to the base of the wind spinner using a tapestry needle.
-
Spider: Use white yarn to suspend the spider approximately 5 inches below the wind spinner.
-
Pumpkin: Use brown yarn to suspend the pumpkin approximately 2 inches below the wind spinner.
Make sure all knots and attachments are secure before displaying your decorations.
5. Add the Finishing Touches
Small details can make your finished wind spinners stand out.
Trim your candy corn fringe evenly, adjust the spider’s pipe-cleaner legs, and arrange the pumpkin’s curly green vine.
For outdoor displays, choose a sheltered location. Yarn decorations and pipe cleaners may deteriorate if exposed to prolonged rain or harsh weather.
Crochet Halloween Wind Spinner FAQs
Are these crochet Halloween wind spinner patterns suitable for beginners?
Yes. The patterns use basic crochet stitches such as chains, single crochet, half double crochet, and double crochet.
The candy corn pattern also includes half double crochet decreases, while the spider requires some assembly.
Can I use cotton yarn for these crochet wind spinners?
Yes. Cotton yarn works for these patterns. Choose a medium-weight cotton yarn that is compatible with your crochet hook.
How do I make my crochet wind spinner longer?
Increase the number of stitches in your foundation chain. All three original patterns begin with 60 chains, but you can adjust this number to customize the finished length.
Why isn’t my crochet wind spinner hanging correctly?
Your wind spinner may need to be recoiled.
Arrange the crocheted spiral into a circular coil before hanging it. Make sure the hanging loop is positioned at the top and the decorative piece hangs freely from the bottom.
Can I make these crochet wind spinners in different colors?
Absolutely! Although the original designs use traditional Halloween colors, you can choose any color combinations you prefer.
Try different shades of orange and green for your pumpkin or experiment with colorful combinations for the candy corn.
Final Thoughts
These free crochet Halloween wind spinner patterns are a fun way to create handmade seasonal decorations using simple crochet techniques.
Whether you choose the colorful candy corn, spooky hanging spider, or cheerful fall pumpkin, each design adds a festive touch to your Halloween decor.
You can make just one or crochet all three to create a matching Halloween decoration collection.
Pattern accuracy note: The original source labels the second and third spiral rows with a stitch count of 58, but those rows instruct you to make multiple double crochets in each stitch. Starting with 58 stitches, following those increases produces 116 stitches in Row 2 and 348 stitches in Row 3. The instructions above preserve the original increase method rather than changing it.