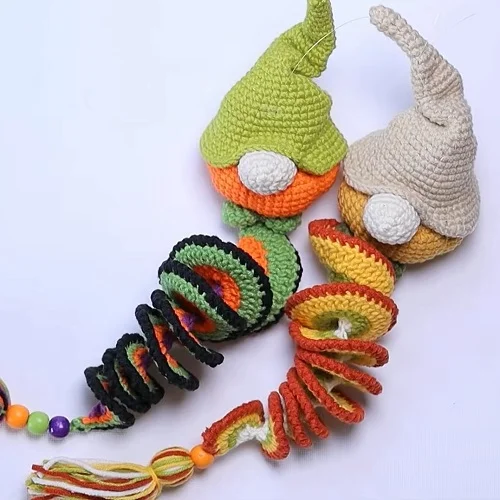
A little pumpkin, a round nose, two tiny green feet, and a wonderfully tall hat make such a sweet autumn combination. This crochet pumpkin gnome is a cheerful fall decoration on its own, and adding a spiral wind spinner gives it an extra playful touch.
The project is made in small, manageable parts using basic crochet stitches. First comes the pumpkin body, followed by the nose, the feet, and the pointed hat. A little stuffing and some simple sewing bring everything together.
You can keep your finished gnome as a standalone crochet pumpkin decoration or make the hanging version for a window or autumn and Halloween display. Both versions have the same lovely little personality.
Pattern note: The written instructions below cover the stitch sequences shown for the gnome. The hat’s displayed numbering skips from round 37 to round 40, so that gap is identified rather than filled with guessed instructions. The spiral wind spinner is a separate pattern.
Step 1: Gather Your Yarn, Hook, and Finishing Supplies
Choose your materials before beginning so you can move easily from one little piece to the next. The demonstrated gnome uses a mustard-yellow pumpkin, dark green feet, a pale skin-tone nose, and a light brown hat.
- Fine yarn in yellow, dark green, a skin-tone shade, and light brown
- A 2 mm crochet hook
- Fiberfill
- Scissors
- A yarn needle
- Fishing line or similar thread if you are making a hanging decoration
The finished examples also show an orange pumpkin with a green hat. The color combinations are part of the fun, but keeping the different components easy to distinguish helps the little gnome details stand out.
Read the pattern in US crochet terms
- ch: chain
- st: stitch
- sc: single crochet
- inc: work 2 single crochet stitches into the same stitch
- dec: single crochet decrease
- sl st: slip stitch
The number in parentheses at the end of an instruction is the stitch total after completing that round. When a sequence is followed by a repeat count, work the entire sequence that many times.
For example, “repeat (sc, inc) 6 times” means one single crochet followed by one increase, repeated six times around. You will finish with 18 stitches.
If you need a handy reference for terminology, the Craft Yarn Council’s crochet abbreviation guide is useful to keep nearby.
The pieces begin with a magic ring and continue in a spiral. Close the ring after the first round, then keep crocheting around rather than joining every round. Keep track of the beginning of each round, especially when the pumpkin reaches its wider section.
Step 2: Crochet the Rounded Pumpkin Body
Begin with yellow yarn and make a magic ring. The pumpkin starts as a small circle, grows through increase rounds, and then develops its rounded sides through eight rounds of plain single crochet.
The increases are distributed around the circle. Some rounds split the single crochet stitches before and after the increase, so read each line carefully rather than assuming every increase round follows exactly the same arrangement.
Increase the pumpkin
- Round 1: Work 6 sc into the magic ring. (6)
- Round 2: Inc in each stitch around. (12)
- Round 3: Repeat (sc, inc) 6 times. (18)
- Round 4: Repeat (sc, inc, sc) 6 times. (24)
- Round 5: Repeat (3 sc, inc) 6 times. (30)
- Round 6: Repeat (2 sc, inc, 2 sc) 6 times. (36)
- Round 7: Repeat (5 sc, inc) 6 times. (42)
- Round 8: Repeat (3 sc, inc, 3 sc) 6 times. (48)
Rounds 9 through 16: Work sc in every stitch around, keeping 48 stitches in each round. Complete eight rounds altogether.
This is the calm, repetitive part of the pumpkin. There are no increases or decreases here. The stitch count stays the same while the fabric grows upward to form the body.
Decrease and stuff the pumpkin
- Round 17: Repeat (3 sc, dec, 3 sc) 6 times. (42)
- Round 18: Repeat (5 sc, dec) 6 times. (36)
- Round 19: Repeat (2 sc, dec, 2 sc) 6 times. (30)
- Round 20: Repeat (3 sc, dec) 6 times. (24)
After round 20, lightly stuff the pumpkin with fiberfill. The opening is still large enough to reach inside and spread the filling around.
Keep the stuffing light because the next step involves pulling yarn tightly to shape the pumpkin. You want a rounded body that can still be gently compressed, not a very firm ball.
- Round 21: Repeat (sc, dec, sc) 6 times. (18)
- Round 22: Repeat (sc, dec) 6 times. (12)
- Round 23: Dec 6 times. (6)
Cut the yarn, leaving a long tail for shaping. Do not trim this tail short. It will do more than secure the end of the crochet: it will create the pumpkin’s characteristic segments.
Step 3: Shape the Pumpkin into Six to Eight Segments
At this point, the body looks like a rounded, slightly flattened ball. The pumpkin shape appears when you use the long yarn tail to pull grooves into the outside.
Thread the tail onto your yarn needle. Pass the needle through the center of the pumpkin, carry the yarn around the outside, and pass through the center again. Pull firmly enough to make a visible indentation.
Repeat this shaping process at different positions around the body to create six to eight segments. Each tightened strand divides the rounded surface into another plump section.
Turn the pumpkin as you work so you can judge the spacing. The grooves do not need to be measured with perfect precision, but spreading them around the body gives a balanced result.
Pull a little at a time and check the shape before tightening further. The goal is a pumpkin with soft, rounded lobes and an indentation through its center. Secure the shaping yarn when you are happy with the result.
This small finishing step changes the whole character of the piece. The crochet itself provides the rounded form, while the tightened yarn gives it that unmistakable pumpkin look.
Step 4: Make and Attach the Gnome’s Nose
Use your skin-tone yarn for the nose. This piece begins much like the pumpkin, but it is smaller and has a short, narrow section before the final closure.
Make a magic ring, then work the following rounds in a spiral:
- Round 1: Work 6 sc into the magic ring. (6)
- Round 2: Inc in each stitch around. (12)
- Round 3: Repeat (sc, inc) 6 times. (18)
- Rounds 4 through 6: Sc in every stitch around for three rounds. (18)
- Round 7: Repeat (sc, dec) 6 times. (12)
- Rounds 8 and 9: Sc in every stitch around for two rounds. (12)
Lightly stuff the nose after round 9. Add enough fiberfill to round out the wider end while keeping the little piece easy to handle.
- Round 10: Dec 6 times. (6)
- Round 11: Fold the opening in half and work 2 sc through both layers. (2)
Cut the yarn and leave a long tail for sewing. Position the nose in the center of the pumpkin’s front and sew it in place.
Think of this as choosing your gnome’s face. Once the nose is attached, you have a clear reference point for the feet below it and the hat above it. Later, the hat will cover the sides of the nose while leaving the rounded front visible.
Step 5: Crochet the Two Green Feet and Join Them
The little green pieces are labeled as legs, but their finished shape looks like a pair of tiny feet tucked beneath the pumpkin. Make two matching pieces with dark green yarn.
For each piece, begin with a magic ring:
- Round 1: Work 6 sc into the magic ring. (6)
- Round 2: Inc in each stitch around. (12)
- Rounds 3 and 4: Sc in every stitch around for two rounds. (12)
Fasten off the first piece and weave in its end. Make the second piece in the same way, but keep the working yarn attached.
Do not stuff these pieces. Keeping them unstuffed gives the pair their small, flatter shape.
Continue from the second piece and crochet the two pieces together, working around their openings as one joined unit. The joining step is demonstrated in the embedded tutorial; it is followed by these two shaping rounds:
- Repeat (sc, dec) 8 times around the joined pieces. (16)
- Dec 8 times. (8)
Cut the yarn, leaving a long tail for sewing. Place the joined feet beneath the nose and check their position before attaching them securely to the pumpkin.
The nose and feet should line up when you look at the gnome from the front. Taking a moment to arrange them now helps the finished character feel neatly put together.
Step 6: Crochet the Tall, Pointed Gnome Hat
Use light brown yarn for the hat. Begin at the narrow tip and gradually widen the cone toward the opening. The early section increases by only two stitches at a time, creating the long point that gives the gnome so much personality.
Make a magic ring and work in a spiral.
Form the narrow tip
- Round 1: Work 6 sc into the magic ring. (6)
- Round 2: Sc around. (6)
- Round 3: Repeat (sc, inc, sc) twice. (8)
- Rounds 4 and 5: Sc around. (8)
- Round 6: Repeat (3 sc, inc) twice. (10)
- Rounds 7 and 8: Sc around. (10)
- Round 9: Repeat (2 sc, inc, 2 sc) twice. (12)
- Rounds 10 and 11: Sc around. (12)
- Round 12: Repeat (5 sc, inc) twice. (14)
- Rounds 13 and 14: Sc around. (14)
- Round 15: Repeat (3 sc, inc, 3 sc) twice. (16)
- Rounds 16 and 17: Sc around. (16)
- Round 18: Repeat (7 sc, inc) twice. (18)
- Rounds 19 and 20: Sc around. (18)
- Round 21: Repeat (4 sc, inc, 4 sc) twice. (20)
- Rounds 22 and 23: Sc around. (20)
Widen the lower hat
- Round 24: Repeat (2 sc, inc, 2 sc) 4 times. (24)
- Round 25: Sc around. (24)
- Round 26: Repeat (5 sc, inc) 4 times. (28)
- Round 27: Sc around. (28)
- Round 28: Repeat (3 sc, inc, 3 sc) 4 times. (32)
- Round 29: Sc around. (32)
- Round 30: Repeat (7 sc, inc) 4 times. (36)
- Round 31: Sc around. (36)
- Round 32: Repeat (4 sc, inc, 4 sc) 4 times. (40)
- Round 33: Sc around. (40)
- Round 34: Repeat (9 sc, inc) 4 times. (44)
- Round 35: Repeat (5 sc, inc, 5 sc) 4 times. (48)
- Round 36: Repeat (7 sc, inc) 6 times. (54)
- Round 37: Repeat (4 sc, inc, 4 sc) 6 times. (60)
Numbering clarification: The next displayed instruction is labeled round 40: repeat (9 sc, inc) 6 times, ending with 66 stitches. Separate instructions for rounds 38 and 39 are not shown. Refer to the hat demonstration around 14:11 to 14:29 before finishing this section; no additional rounds are assumed here.
After the final displayed increase round, cut the yarn and leave a long tail for sewing.
Step 7: Sew on the Hat and Shape Its Playful Point
Place the hat over the pumpkin and arrange its lower edge around the nose. The hat should cover the sides of the nose, with the rounded front peeking out.
Check the front and both sides before sewing. Then use the long yarn tail to attach the hat to the pumpkin, keeping the brim in the position you have chosen.
Once it is attached, shape the top of the hat. Bend the long point into a gentle curve or fold, then use small stitches to hold that shape. The demonstrated finish has a softly bent tip rather than a completely straight cone.
This is a lovely final detail. A slight bend makes the hat feel relaxed and gives the little pumpkin gnome its whimsical expression.
Step 8: Choose a Standalone Pumpkin Gnome or a Wind Spinner
Your pumpkin gnome can stay just as it is. The rounded pumpkin, little nose, green feet, and shaped hat make a complete fall crochet decoration without any additional pieces.
For the hanging version, make the spiral using the separate wind spinner crochet pattern. Follow that pattern for the spiral construction, then combine it with the gnome and use fishing line or similar thread for hanging.
The finished examples pair the gnomes with colorful spirals and tassel-like ends. Choose a combination that suits your autumn display, whether you prefer warm pumpkin colors or stronger Halloween contrasts.
Before displaying your finished piece, check that the nose, feet, hat, and shaped hat tip are securely attached and that the remaining yarn ends are tucked away.
A few simple crochet shapes have become a sweet little seasonal character. Enjoy your pumpkin gnome, whether it sits on its own or adds a cheerful touch to a hanging wind spinner. Happy crocheting!
This Tutorial is Made based on the video : Crochet Pumpkin Gnome Wind Spinner, Easy Fall & Halloween Crochet Tutorial, Free pumpkin crochet