Looking for a fun and festive crochet project to decorate your home this holiday season? This FREE Christmas Wind Spinner Crochet Pattern combines a colorful spiral wind spinner with two adorable Santa-themed crochet baubles.
Using classic Christmas colors of red, white, black, and yellow, you’ll create a long 3-D crochet spiral with a Santa head at the top and Santa body at the bottom. Hang it near a window, on a porch, from a Christmas tree branch, or anywhere you’d like to add a handmade holiday touch.
The spiral construction may look complicated at first, but it is created using simple crochet stitches. The increasing number of stitches causes the project to naturally twist into its beautiful spiral shape.
This project is rated Intermediate, although confident beginners who are familiar with chains, single crochet, double crochet, magic circles, increases, and basic sewing techniques can also give it a try.
What You’ll Learn
In this Christmas crochet tutorial, you’ll learn:
- How to crochet a 3-D continuous spiral using (ch) chain, (sc) single crochet and (dc) double crochet using 3 colors.
- How to crochet a Santa Bauble head.
- How to crochet a Santa Bauble body.
- How to crochet around styrofoam baubles.
- How to assemble the Santa pieces with the crochet wind spinner.
- How to add simple finishing details such as Santa’s belt buckle and face.
The finished project makes a cheerful piece of crochet Christmas decor and can also make a lovely handmade holiday gift.
Materials Needed
To make your Christmas crochet wind spinner, you’ll need:
- Weight 4 or Aran weight yarn, acrylic or cotton, in:
- Red
- White
- Black
- A short strand of yellow
I used Loops & Threads Classic Cotton.
You’ll also need:
- 4 mm crochet hook
- 2 styrofoam baubles measuring 6 cm (2.3 inches), approximately 18 cm (7 inches) in circumference
- A tapestry needle
- A pair of scissors
- Googly eyes, 6 mm safety eyes, stick-on eyes, or a permanent marker
Using different yarn brands is perfectly fine as long as the yarn is approximately the same weight.
Abbreviations
This pattern uses US crochet terminology.
- ch = chain
- sc = single crochet
- dc = double crochet
- mc = magic circle
- st = stitch
- sts = stitches
- fo = fasten off
- sl st = slip stitch
- inc = increase
Skill Level
Intermediate
This project involves working in rows and rounds, increasing stitches, creating a magic circle, joining rounds, changing colors, sewing crochet pieces together, and working around styrofoam baubles.
Gauge
Gauge:
16 dc and 6 rows with a 4 mm crochet hook = 4 inches (10 cm).
Gauge doesn’t need to be absolutely perfect for this decorative crochet project, but it can affect the final dimensions.
If your wind spinner looks narrower than you anticipated, try using a thicker yarn or add another row or two to make the spiral wider.
If you’d like your wind spinner to be longer, simply increase the number of stitches in your beginning chain.
Finished Size
The finished Christmas wind spinner measures approximately:
57 cm (22.5 inches) long when hanging.
The Santa bauble embellishments measure approximately:
21 cm (8 inches) in circumference.
Your exact measurements may vary slightly depending on the yarn, hook, and individual crochet tension.
Yardage
Approximate yarn requirements are:
Wind Spinner Body: 35 m (38 yards)
Baubles: 20 m (22 yards) each
Only a very short amount of yellow yarn is needed to create Santa’s belt buckle.
Pattern Notes
Before beginning your Christmas wind spinner, keep these notes in mind:
- You can make the pattern larger or smaller by changing the yarn type and/or crochet hook size.
- Numbers at the end of each row or round in brackets indicate the final number of stitches in that row or round.
- Ch 2 at the beginning of a round does not count as a stitch in the baubles.
- When you see instructions written as [text] x 6, repeat everything inside the brackets six times.
- This crochet pattern uses US crochet terms.
- Leave the instructed yarn tails because several of them will later be used to assemble the wind spinner.
Crochet Christmas Wind Spinner Pattern Instructions
We will make this project in several sections:
- Crochet the spiral wind spinner.
- Crochet the top half of Santa’s head.
- Crochet the bottom half of Santa’s head.
- Assemble the Santa head bauble.
- Crochet both halves of Santa’s body.
- Add Santa’s belt buckle.
- Attach the baubles to the wind spinner.
- Finish and secure all remaining yarn ends.
Wind Spinner
The wind spinner begins as a simple chain and rows of crochet stitches. Increasing dramatically in the following rows causes the fabric to naturally twist into a spiral.

Row 1
With black yarn, tie a slip knot onto your hook.
Ch 51. (51)
Row 2
Sc into the second chain from your hook.
Sc into each stitch along.
(50)
Leave a 4-inch tail, cut your yarn, and fasten off.
Row 3
Starting from the top of your wind spinner, where you now have two yarn tails, attach your red yarn.
Ch 2.
For the wind spinner section, this ch 2 counts as the first dc.
Dc into the same stitch.
You now have 2 dc in the first stitch.
Work:
2 dc into each stitch to the end of the row.
(100)
Leave a 4-inch tail, cut your yarn, and fasten off.
Your crochet piece should already begin developing its spiral shape.
Row 4
Attach the white yarn to the first stitch of Row 3 at the top of your wind spinner.
Ch 2.
The ch 2 counts as the first dc.
Dc into the same stitch.
You now have 2 dc in the first stitch.
Continue working:
2 dc into each stitch to the end of the row.
(200)
Leave a 4-inch tail, cut your yarn, and fasten off.
At this stage, the dramatic increases should create the full 3-D spiral appearance of your Christmas wind spinner.
Set the spinner aside while you crochet the Santa baubles.
Bauble 1: Santa Head – Top Half
For this section, you’ll crochet the top half of Santa’s head and hat.
Important: Ch 2 at the beginning of these rounds does not count as a stitch.
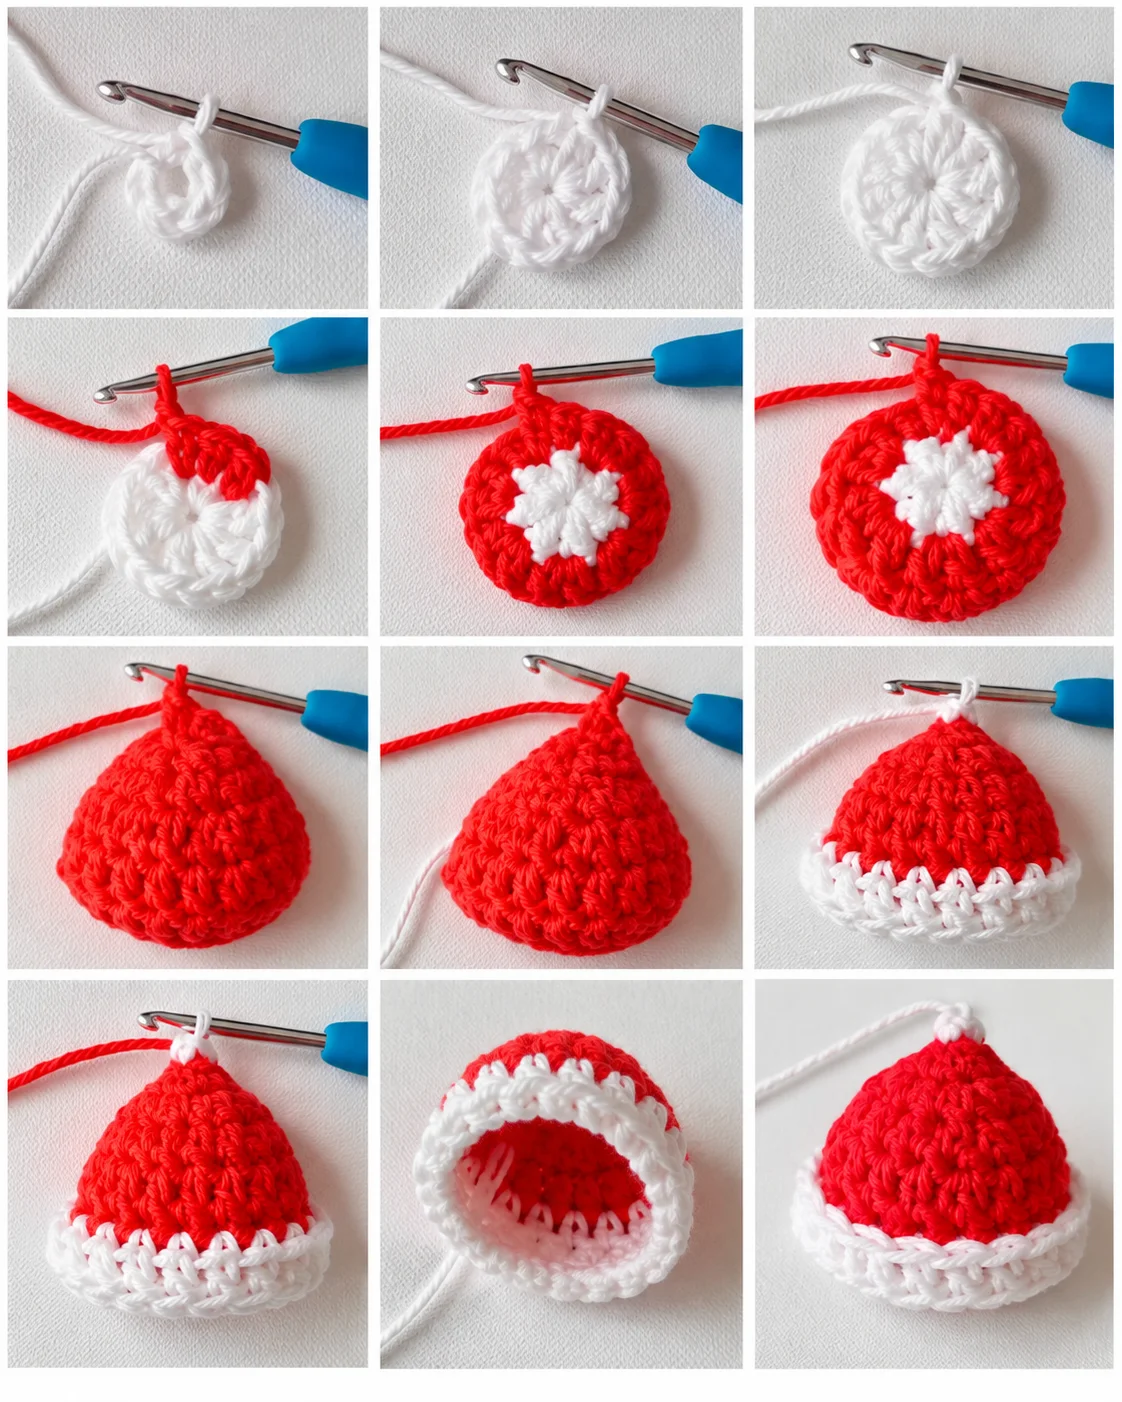
Round 1
Using white yarn, work a magic circle.
Ch 2.
Work:
6 dc into the MC.
Pull your magic circle closed.
Sl st into the first dc to join.
(6)
Do not cut the yarn.
Round 2
Join red yarn.
Ch 2.
Work:
2 dc into each stitch around.
Sl st to join.
(12)
Round 3
Ch 2.
Work:
[inc, dc into next st] x 6.
Sl st to join.
(18)
Round 4
Ch 2.
Work:
[inc, dc into next 2 sts] x 6.
Sl st to join.
(24)
Leave a 4-inch tail, cut the red yarn, and fasten off.
Round 5
Rejoin the white yarn loosely.
Ch 2.
Dc around.
Sl st to join.
(24)
Ch 2 and turn.
The inside of the bauble should now be facing you.
Round 6
Dc around.
Sl st to join.
(24)
Leave a 4-inch tail, cut the white yarn, and fasten off.
Fold Round 6 over Round 5.
Insert your styrofoam bauble to check the size.
Bauble 1: Santa Head – Bottom Half
Next, you’ll crochet the bottom section of Santa’s head.
Again, ch 2 at the beginning of each round does not count as a stitch.
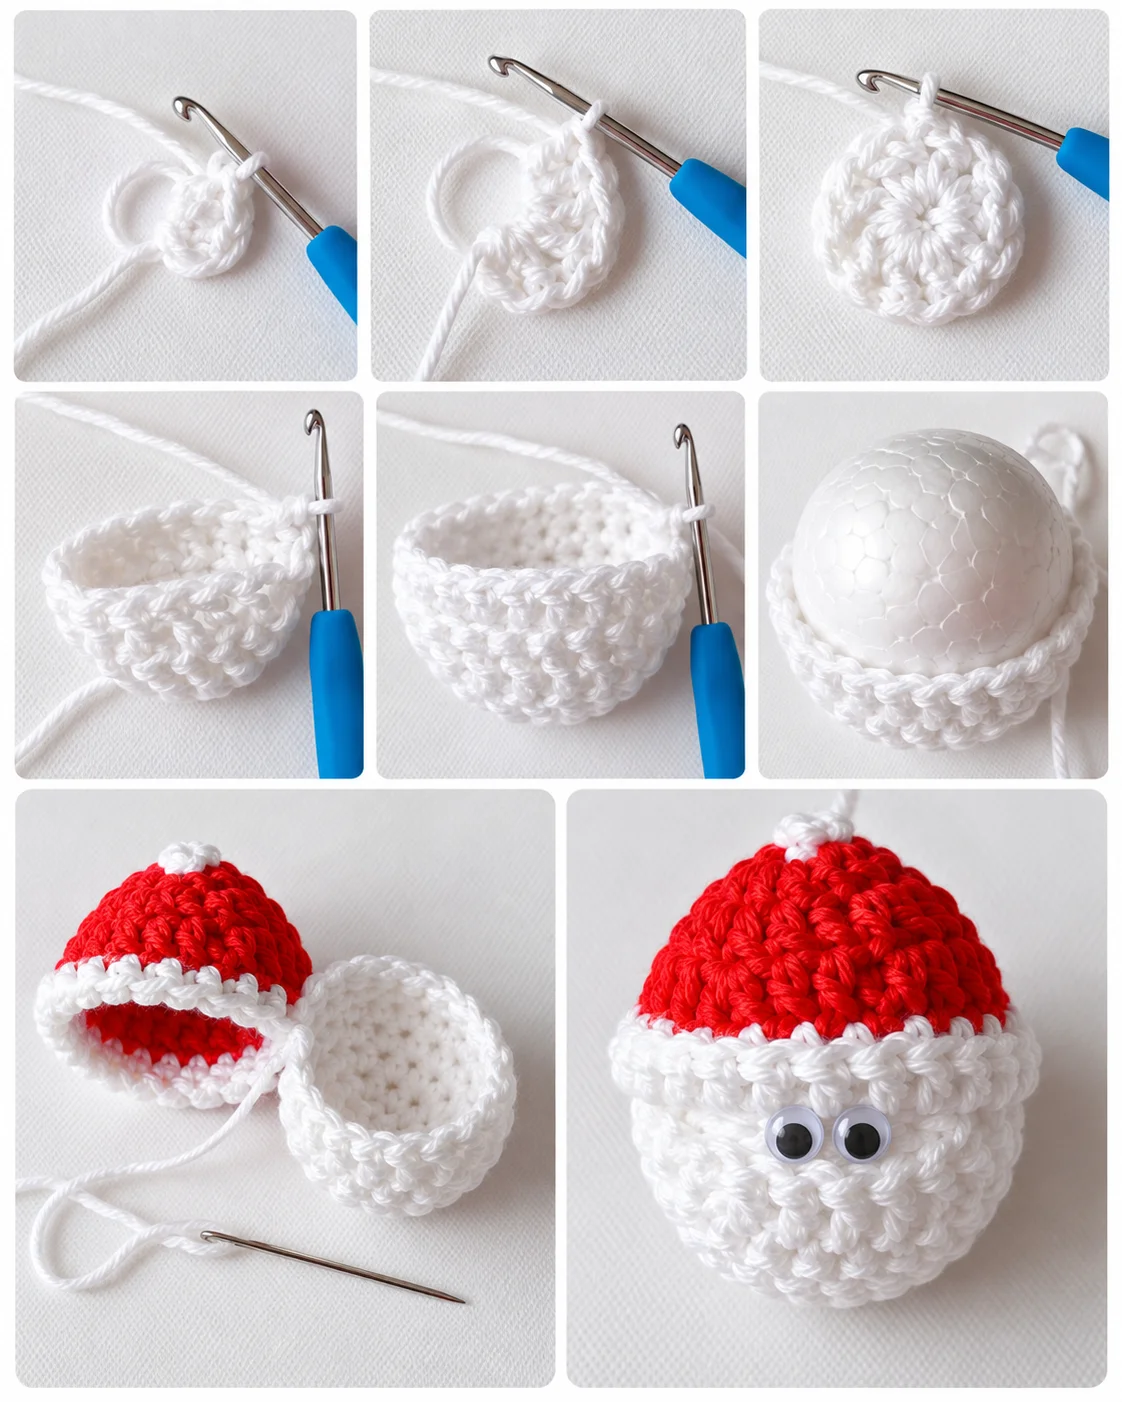
Round 1
Using white yarn, work a magic circle.
Ch 2.
Work:
6 dc into the MC.
Pull your MC closed.
Sl st into the first dc to join.
(6)
Round 2
Work:
2 dc into each stitch around.
Sl st to join.
(12)
Round 3
Ch 2.
Work:
[inc, dc into next st] x 6.
Sl st to join.
(18)
Round 4
Ch 2.
Work:
[inc, dc into next 2 sts] x 6.
Sl st to join.
(24)
Check that your styrofoam bauble fits snugly inside your crocheted pieces.
Assembling the Santa Head Bauble
Read this entire section before you begin sewing.
Thread the white yarn tail onto your tapestry or darning needle.
Place the top and bottom sections of the Santa bauble next to each other so the stitches where you fastened off are aligned.
Whip stitch the top and bottom halves together.
Stitch through:
- Both loops of each stitch from Round 4 of the bottom half.
- One loop of each stitch between Rounds 5 and 6 of the top half.
Do not pull your stitches too tightly.
Whip stitch approximately 10 stitches, then insert your styrofoam bauble to check the size.
Continue stitching around until only 8 stitches remain open.
Secure the last stitch by stitching into it a couple more times.
Next, bring your needle through the bauble and out through the beginning magic circle at the top of Santa’s hat.
You can use the remaining yarn strand to hang the bauble.
Weave in the other end.
Adding Santa’s Eyes
Add two eyes to Santa’s face.
You can use:
- Googly eyes
- Stick-on eyes
- 6 mm safety eyes
- A permanent marker
If using safety eyes, attach them to the styrofoam ball through the remaining opening before completely closing the bauble.
If you don’t have decorative eyes available, simply draw two small dots using a permanent marker.
Bauble 2: Santa Body
You will crochet two matching pieces to form Santa’s body.
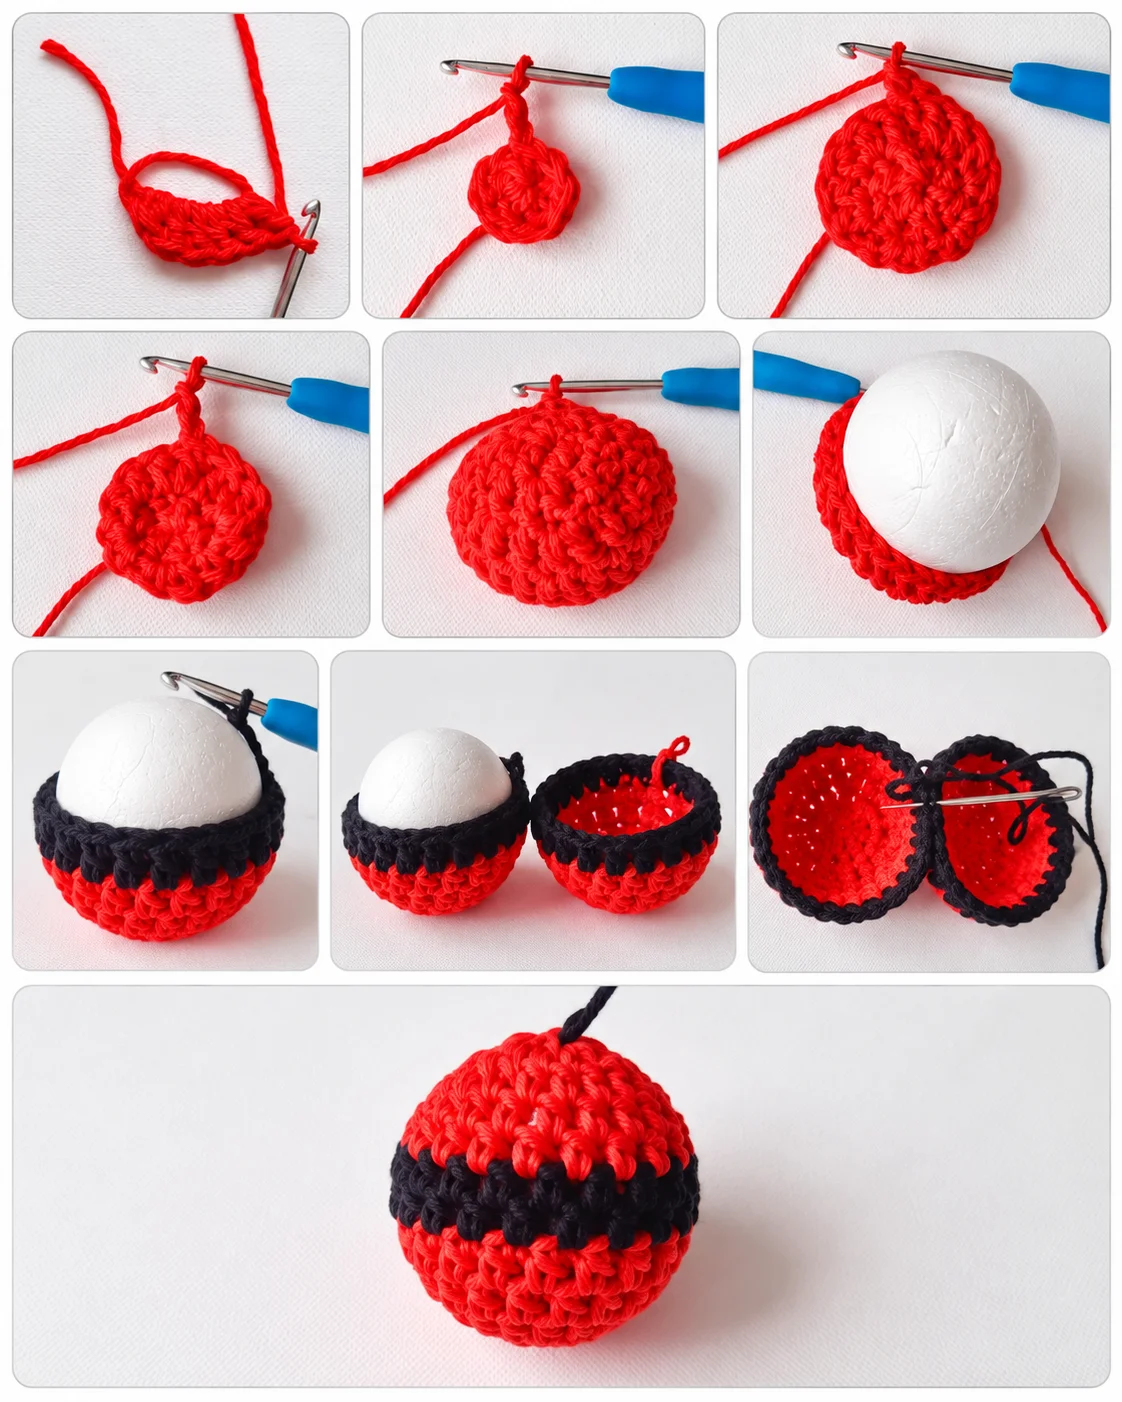
First Half
Round 1
With red yarn, work a magic circle.
Ch 2.
Work:
6 dc into the MC.
Pull your magic circle closed.
Sl st into the first dc to join.
(6)
Round 2
Ch 2.
Work:
2 dc into each stitch around.
Sl st to join.
(12)
Round 3
Ch 2.
Work:
[inc, dc into next st] x 6.
Sl st to join.
(18)
Round 4
Ch 2.
Work:
[inc, dc into next 2 sts] x 6.
Sl st to join.
(24)
Leave a 4-inch tail, cut your yarn, and fasten off.
Check that your styrofoam bauble fits snugly inside your crocheted piece.
Round 5
Attach black yarn.
Ch 2.
Dc around.
(24)
Leave a 10-inch yarn tail, cut your yarn, and fasten off.
This black section creates Santa’s belt.
Second Half
Repeat Rounds 1–5 for the bottom half of Bauble 2.
Leave a 4-inch tail, cut your yarn, and fasten off.
Joining the Santa Body
Thread the 10-inch black yarn tail onto your darning needle.
Hold the top and bottom halves together with the openings facing each other.
Whip stitch the pieces together.
Stitch through:
- Both loops of each stitch of Round 5 on the top half.
- Both loops of each stitch of Round 4 on the bottom half.
Stitch approximately 10 stitches, then insert your styrofoam bauble to check the size.
Continue stitching around until the entire bauble is enclosed.
Weave in your yarn end by stitching back and forth a couple of times through the black Santa belt.
Next, bring your yarn through the bauble and out through the beginning magic circle at the top.
Use the remaining black strand to hang your bauble.
Crochet Santa Belt Buckle
Santa’s body wouldn’t be complete without his classic belt buckle.
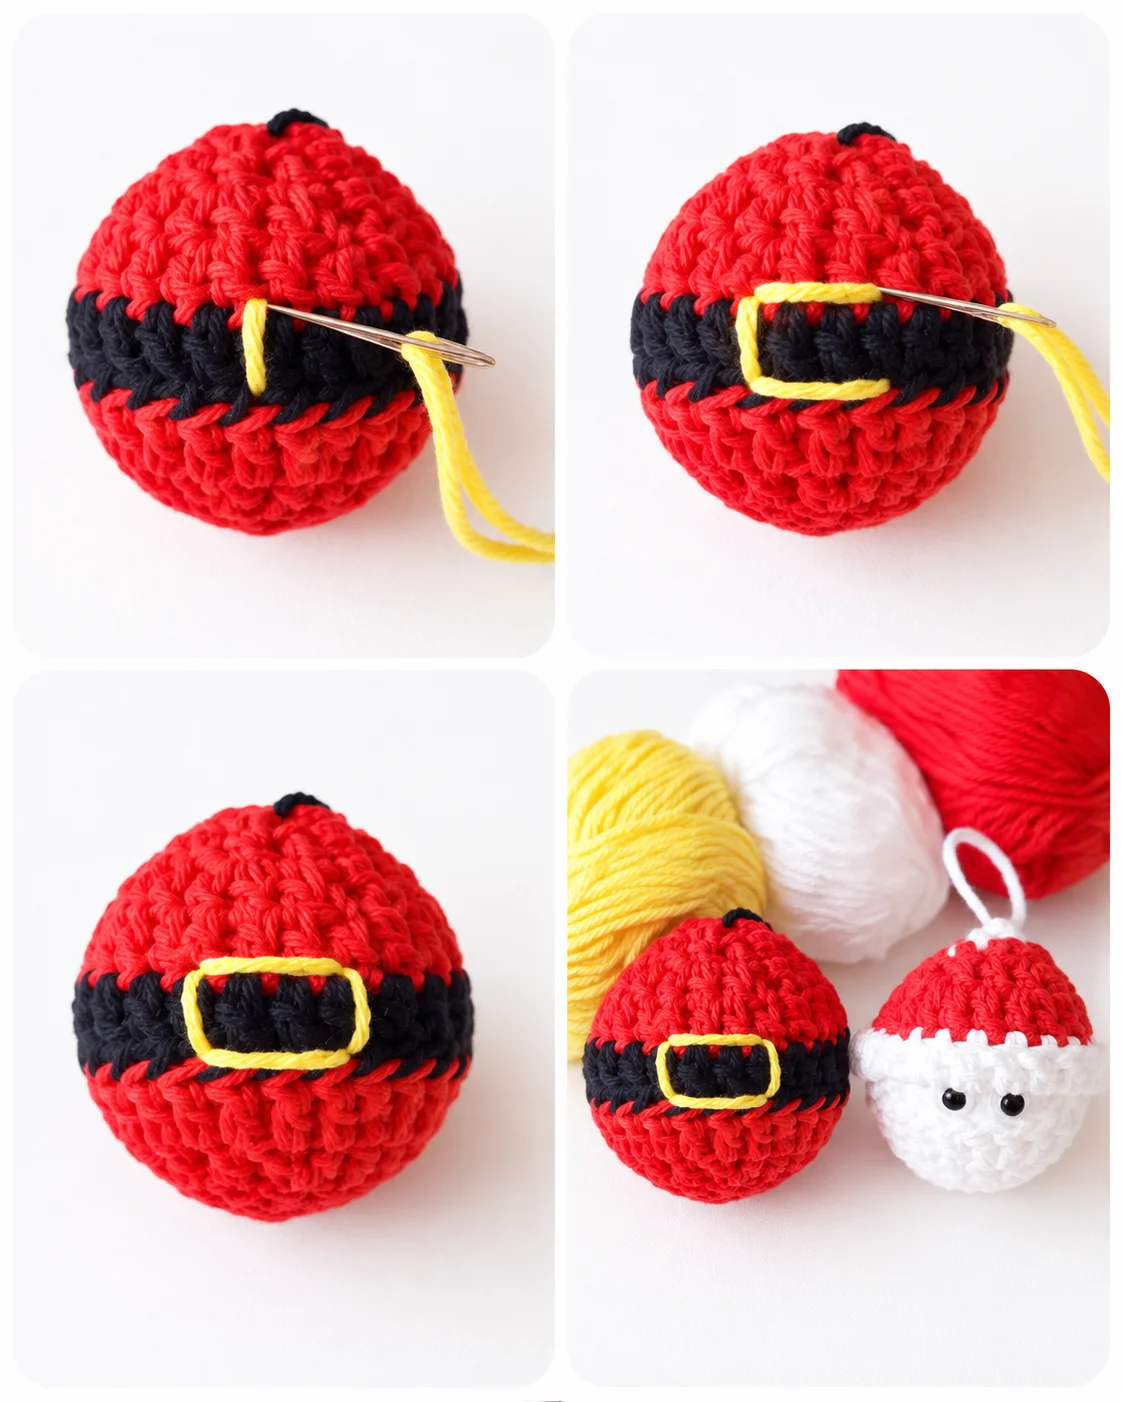
Cut a 10-inch strand of yellow yarn.
Thread your darning needle.
Sew the yellow yarn into a rectangular buckle shape at the front center of Santa’s black belt.
The buckle should measure approximately:
- 3 stitches wide
- The full height of the black section, approximately 2 rows
Once you’re happy with the buckle shape, tie a double knot to secure it.
Hide the yarn tails inside the bauble stitches.
Assembling Your Christmas Wind Spinner
Now it’s time to bring all the pieces together.
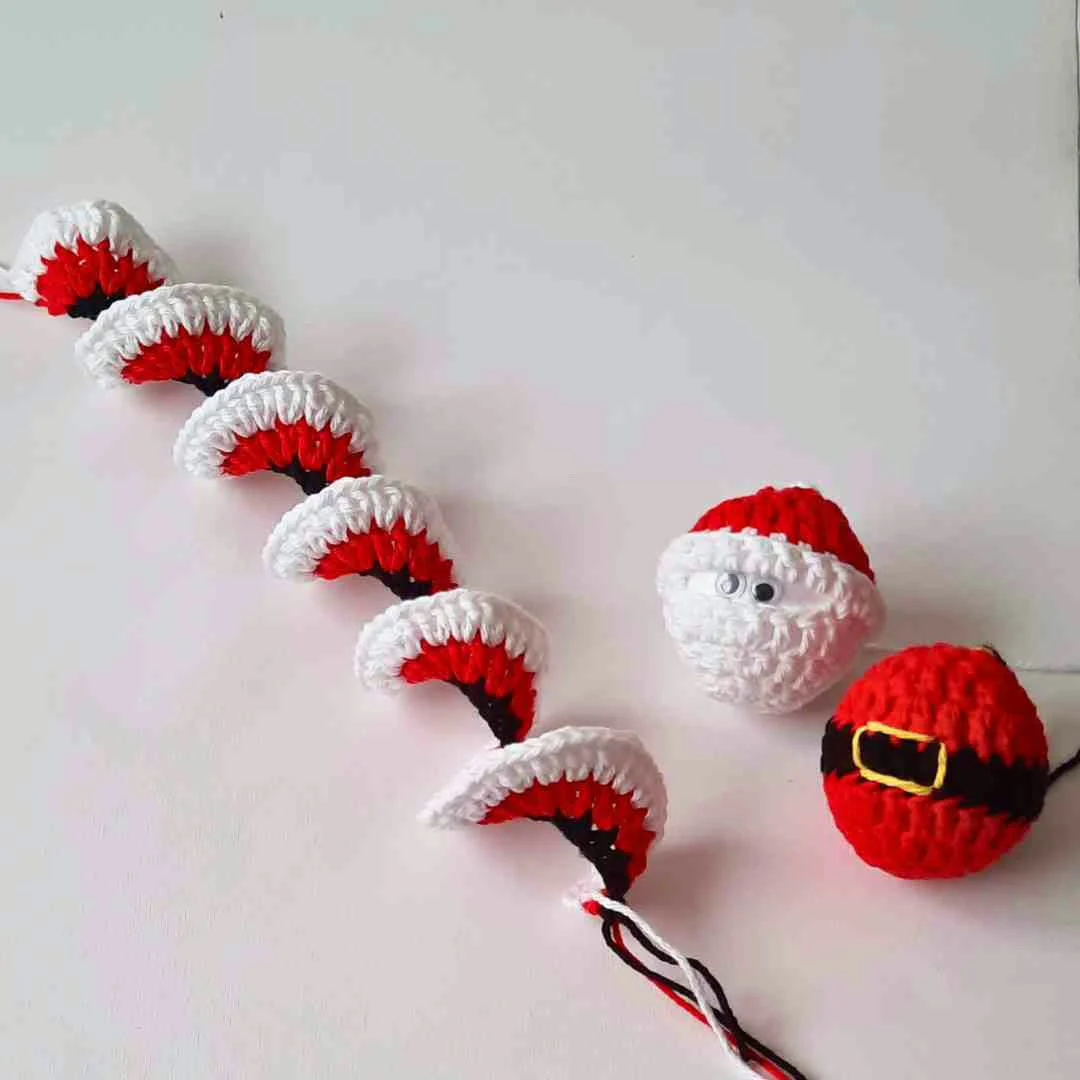
Attach Santa’s Body
Thread your darning needle with the black yarn tail left at the bottom of your wind spinner.
Stitch the wind spinner to the top of Bauble 2, Santa’s body.
Secure it with a couple of stitches.
Attach Santa’s Head
Thread your darning needle with the white yarn tail at the top of your wind spinner.
Sew it securely to the bottom of Bauble 1, Santa’s head.
Alternative Assembly
You can also choose to hang both Santa baubles at the bottom of the wind spinner if you prefer that appearance.
Feel free to experiment with the arrangement and choose the style that works best with your Christmas decorations.
Finishing Touches
You’re almost finished!
Create the Hanging Loop
Leave the white yarn tail at the top of Santa’s head.
Use this strand to hang your completed Christmas wind spinner.
Tie a knot to form a wide ring that can easily hang from a hook, branch, window fixture, or other suitable place.
Weave In the Ends
Using your darning needle, carefully weave in all remaining yarn ends.
Make sure the ends are securely hidden to prevent your crochet project from unraveling.
Trim off any excess yarn.
Your handmade Christmas Wind Spinner Crochet Pattern is now complete!
How to Customize Your Christmas Crochet Wind Spinner
One of the fun things about this crochet Christmas decoration is how easily it can be customized.
For a longer spinner, increase the number of chains in your starting chain.
For a wider spiral, use thicker yarn, a larger crochet hook, or add another crochet row.
You could also experiment with different Christmas color combinations such as:
- Red, green, and white
- Green, white, and gold
- Red, white, and gold
- Silver, white, and blue
- Burgundy, cream, and gold
The Santa design can also be adapted into other Christmas characters if you’re comfortable experimenting with colors and embellishments.
Where to Hang Your Crochet Christmas Wind Spinner
The completed spinner can make a fun addition to many areas of your holiday decor.
Try hanging it:
- Near a window
- On a covered porch
- From a Christmas tree
- In an entryway
- From a ceiling hook
- Near your Christmas craft display
- In a child’s holiday-themed room
- Alongside other handmade crochet ornaments
It can also make a charming handmade Christmas gift for friends and family who appreciate crochet decorations.
Frequently Asked Questions
Is this Christmas wind spinner crochet pattern free?
Yes. You can follow the complete free Christmas wind spinner crochet pattern above to make the spiral wind spinner, Santa head, Santa body, belt, and final assembly.
What crochet skill level is needed?
The pattern is rated Intermediate.
You’ll need to know or be comfortable learning chains, single crochet, double crochet, magic circles, increases, slip stitches, color changes, and basic sewing.
What yarn should I use?
The pattern uses Weight 4 or Aran weight yarn.
Both cotton and acrylic yarn can work. The original project was made using Loops & Threads Classic Cotton.
What size crochet hook do I need?
A 4 mm crochet hook is used for this pattern.
How long is the finished crochet wind spinner?
The finished project measures approximately 57 cm or 22.5 inches long when hanging.
Can I make the spinner longer?
Yes.
Simply add additional chains to the beginning chain before starting the remaining wind spinner rows.
What if my wind spinner is too narrow?
If the finished spinner looks narrower than you’d like, try using thicker yarn or adding another crochet row or two.
What size baubles do I need?
You’ll need two styrofoam baubles approximately:
6 cm (2.3 inches) in diameter and 18 cm (7 inches) in circumference.
Do I need googly eyes?
No.
You can use googly eyes, stick-on eyes, 6 mm safety eyes, or simply draw Santa’s eyes using a permanent marker.
Final Thoughts
This FREE Christmas Wind Spinner Crochet Pattern is a festive way to combine a classic crochet spiral with adorable Santa decorations.
The combination of red, white, and black yarn gives the spinner an instantly recognizable Christmas look, while the Santa head, body, belt, and buckle add plenty of handmade character.
Whether you hang it near a window, display it with your Christmas decorations, or make one as a holiday gift, this crochet wind spinner is a fun project to add to your seasonal crochet list.
Grab your yarn, crochet hook, and two styrofoam baubles and enjoy creating your own handmade Santa Christmas wind spinner.
Happy crocheting and Merry Christmas! 🎅🧶🎄
Photos Pattern credit: startcrochet.com