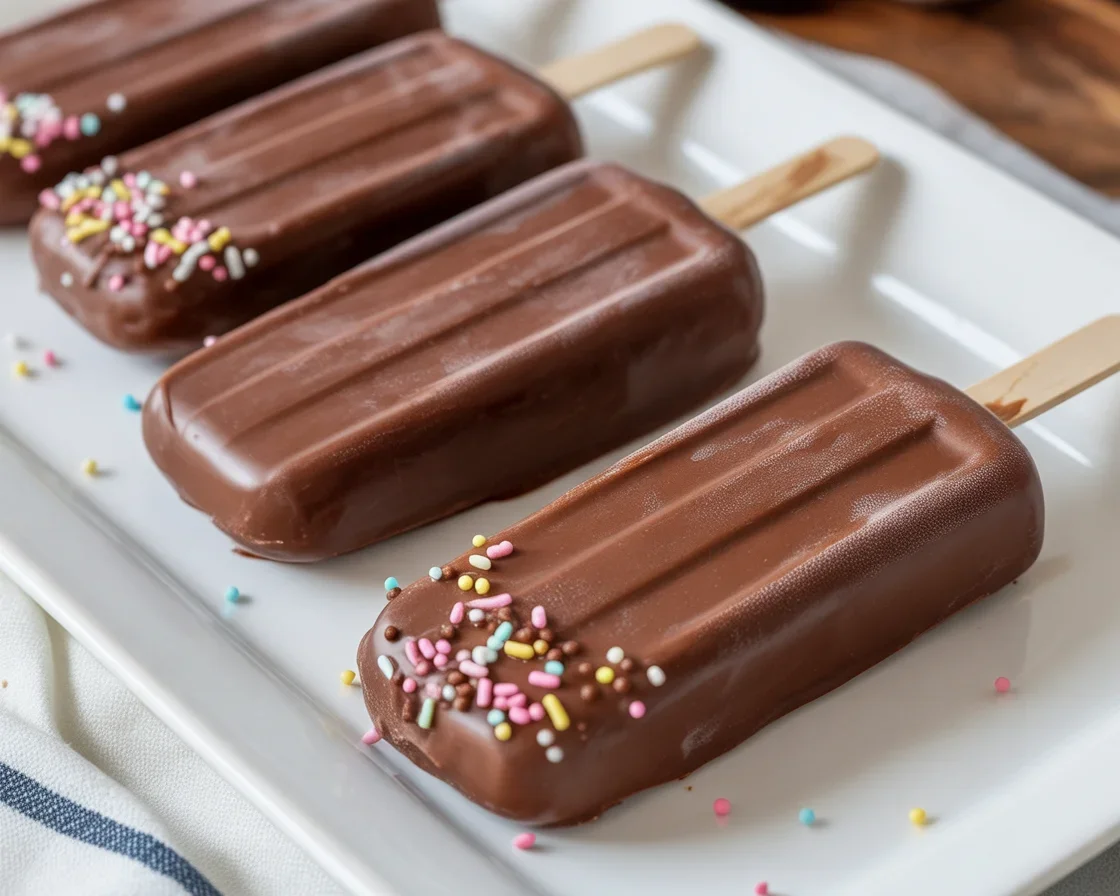
Chocolate Fudge Popsicles make me think of that moment when the heat gets aggressive and you’re just one cranky meltdown away from sticking your head in the freezer. Let’s face it, who wants another plain old ice pop? Now, if you’ve already tried ideas like those banana berry buttermilk popsicles or even the ultra-creamy blueberry cream popsicles, but nothing’s quite hit the “chocolate emergency” spot—here’s your new fix. We’re talking chocolate so creamy, so over-the-top, you might never buy boxed ones again. No complicated steps or fancy equipment. Just pure, cold comfort right from your own fridge.
Why You’ll Love This Recipe
First off, they taste outrageous. Not “good for homemade” but like a five-star restaurant froze up their best chocolate dessert and handed it to you on a stick. You know, sometimes you grab something chocolaty and it’s…meh? These are not that. The texture alone is wild: smooth, almost like a frozen mousse (not brick-hard!). They’re also easy to make—like, laughably easy. I messed up once and my batch still came out tasty. Kids go nuts for them, adults call dibs. And don’t even get me started on how much more affordable they are compared to store-bought. Okay, I will—one box at the store versus making a dozen at home for the price of a fancy coffee. Sold!
Essential Ingredients for Success
I always recommend keeping it simple and honest. These popsicles need just a handful of basic things, and the results? Unreal. You’ll need:
- Cocoa powder (I like Dutch process, but anything works).
- Sugar (granulated is fine, coconut sugar for a deeper vibe).
- Cornstarch or arrowroot—trust me, it matters. This gives the fudge pops their signature thick-and-creamy texture.
- Whole milk (dairy-free will work too, but maybe try oat for the creamiest result).
- Butter and a touch of vanilla extract for that homemade fudge flavor.
You stir all that up on the stove, but nothing fussy. The smell alone will have the neighbors showing up “just to say hi.” I’m not kidding, we caught my brother hovering by the door more than once. If you want to level-up, try a pinch of sea salt.
Step-by-Step Instructions
Let’s get straight to it. Whisk your sugar, cocoa power, and cornstarch together in a saucepan—for real, do this before adding in any liquid or you’ll be fighting lumps. Add milk slowly and keep whisking. Then heat it on medium, stirring non-stop. It thickens fast! Once it’s pudding-like, pull it off the heat, toss in the butter and vanilla, stir till glossy. Try not to eat half before it’s even frozen. Pour the mixture into molds (or paper cups, works 100%). Sticks in. Freeze till set. About 4-6 hours, but honestly I check every hour like an overexcited kid.
Creative Variations
Okay, here’s where things get zippy. You like mix-ins? I do.
Sometimes I swirl a spoonful of peanut butter right into the pops before freezing—total game changer. Chopped hazelnuts, totally indulgent. For something wild, I sprinkle a touch of cayenne or cinnamon for a grown-up twist. Oh, and mini chocolate chips—yep, double chocolate never hurt.
Of course, if you like fruity twists, try this trick: swirl in a dollop of strawberry puree before freezing, giving a nod to the flavor combo in this chunky chocolate-covered strawberry smoothie recipe.
Pro Tips for Perfect Results
I’ve ruined a batch or two, so learn from my mistakes, okay?
| Tip | Why It Matters | My Experience |
|---|---|---|
| Whisk dry first | Prevents lumps (don’t skip!) | Not doing this made one batch…not pretty |
| Keep stirring | Even heating, no burnt cocoa | I got distracted, and trust me—scraping burnt chocolate isn’t fun |
| Chill before freezing | Stops ice crystals | Once, I rushed it, and the texture was off. Chilling’s worth it |
| Popsicle mold matters | Some stick, some release clean—more fun to eat when they look nice | Paper cups are fine in a pinch, but proper molds = fewer disasters |
Now, go wild. Oh, and run hot water around the mold for a second or two to get the popsicles to pop out easier!
Storage and Meal Prep Benefits
You know what’s amazing? Chocolate Fudge Popsicles keep for weeks. I stash a whole batch in a big zip bag and just grab one when that chocolate itch strikes. No more sad, empty freezer emergencies. You can even wrap ’em individually in wax paper for lunch boxes—my kids think they’re gold. Prep a bunch on the weekend, and your summer dessert game is settled. They barely take up room, too, which is shocking considering how fast they vanish.
“My family polishes off a double batch in less than a week. The texture blows store-bought away! I even caught my teenager posting about them on TikTok. Life is good.” — Pam, loyal popsicle hoarder
Nutritional Benefits
Hold up, you might be thinking—“Isn’t this just dessert?” Okay, yeah, it’s a treat. But these Chocolate Fudge Popsicles are actually lighter than you’d expect. Since you make them at home, you control the sugar. Sometimes I swap half the sugar for honey, or use unsweetened almond milk for fewer calories. No weird additives, no gums or mystery “flavors.” Real food, real taste. Sneak in a little protein powder if you’re feeling stealthy (promise, the kids won’t notice). Compared to some ice creams, you’re making a much smarter choice for a sweet fix!
Common Questions
Can I use non-dairy milk?
Absolutely! Oat and coconut are especially good if you want that creamy vibe.
My popsicles got icy, not creamy. What happened?
Did you chill the fudge base first and use enough cornstarch? These two steps keep them from turning icy.
How do I get the popsicles out of the mold without breaking them?
Run warm (not hot) water on the outside of the mold for about 10 seconds and give a gentle wiggle.
Can I cut the sugar?
Totally! Just know that sugar affects the freezing texture—go too low and they may be a bit icier, but flavors will still shine.
What if I don’t have a popsicle mold?
Paper cups work. Just remember to cover with foil and stick the popsicle stick through to keep it upright.
Ready to Freeze Your Mind? Try These!
There you have it, friends. These chocolate fudge popsicles are as easy as they are magical. Plus, you can play around, so they never get boring. For more tasty summer ideas, check out the tips in How to Make Easy Homemade Fudge Pops — Homemade … and dive into freezing lessons from trusted sources like The Kitchn. Need a pro-level tip on chocolate pairings? The experts at this chocolate strawberry pairing guide absolutely nail it, too. Go ahead, unleash your inner popsicle wizard this weekend—trust me, your taste buds will write you thank-you notes.

Chocolate Fudge Popsicles
Deliciously creamy chocolate fudge popsicles that are easy to make and perfect for hot days.
- Prep Time: 10 minutes
- Cook Time: 10 minutes
- Total Time: 420 minutes
- Yield: 12 servings 1x
- Category: Dessert
- Method: Freezing
- Cuisine: American
- Diet: Vegetarian
Ingredients
- 1/2 cup cocoa powder
- 1/2 cup granulated sugar
- 2 tablespoons cornstarch
- 2 cups whole milk (or dairy-free alternative)
- 2 tablespoons butter
- 1 teaspoon vanilla extract
- Pinch of sea salt (optional)
Instructions
- In a saucepan, whisk together sugar, cocoa powder, and cornstarch.
- Slowly add milk while whisking to prevent lumps.
- Heat the mixture on medium, stirring constantly until it thickens to a pudding-like consistency.
- Remove from heat, add butter and vanilla, and stir until glossy.
- Pour the mixture into popsicle molds or paper cups, insert sticks, and freeze until set (about 4-6 hours).
Notes
Experiment with mix-ins like peanut butter or mini chocolate chips, or swirl in strawberry puree for a fruity twist. To release popsicles easily, run warm water around the mold before removing.
Nutrition
- Serving Size: 1 popsicle
- Calories: 150
- Sugar: 10g
- Sodium: 45mg
- Fat: 6g
- Saturated Fat: 4g
- Unsaturated Fat: 2g
- Trans Fat: 0g
- Carbohydrates: 21g
- Fiber: 1g
- Protein: 3g
- Cholesterol: 10mg
Keywords: chocolate popsicles, summer dessert, homemade treats