There’s something absolutely magical about the combination of zingy lemon and sweet, juicy raspberries. When these flavors come together in a creamy cheesecake, it’s truly a match made in dessert heaven! As a busy mom who loves to bake but doesn’t always have time for complicated recipes, these Mini Lemon & Raspberry Cheesecakes have become my secret weapon for potlucks, family gatherings, and those moments when I just need a little something sweet.
I first made these adorable individual cheesecakes for my daughter’s birthday party, and the guests couldn’t get enough of them. What I love most is how these mini desserts look so impressive and taste like they took hours to make, but they’re actually incredibly simple. Plus, being no-bake means no fussing with water baths or worrying about cracks on top! If you’re a fan of lemon desserts, you might also enjoy my Lemon Posset (Easiest Dessert Ever!) recipe.
Why You’ll Love These Mini Lemon & Raspberry Cheesecakes
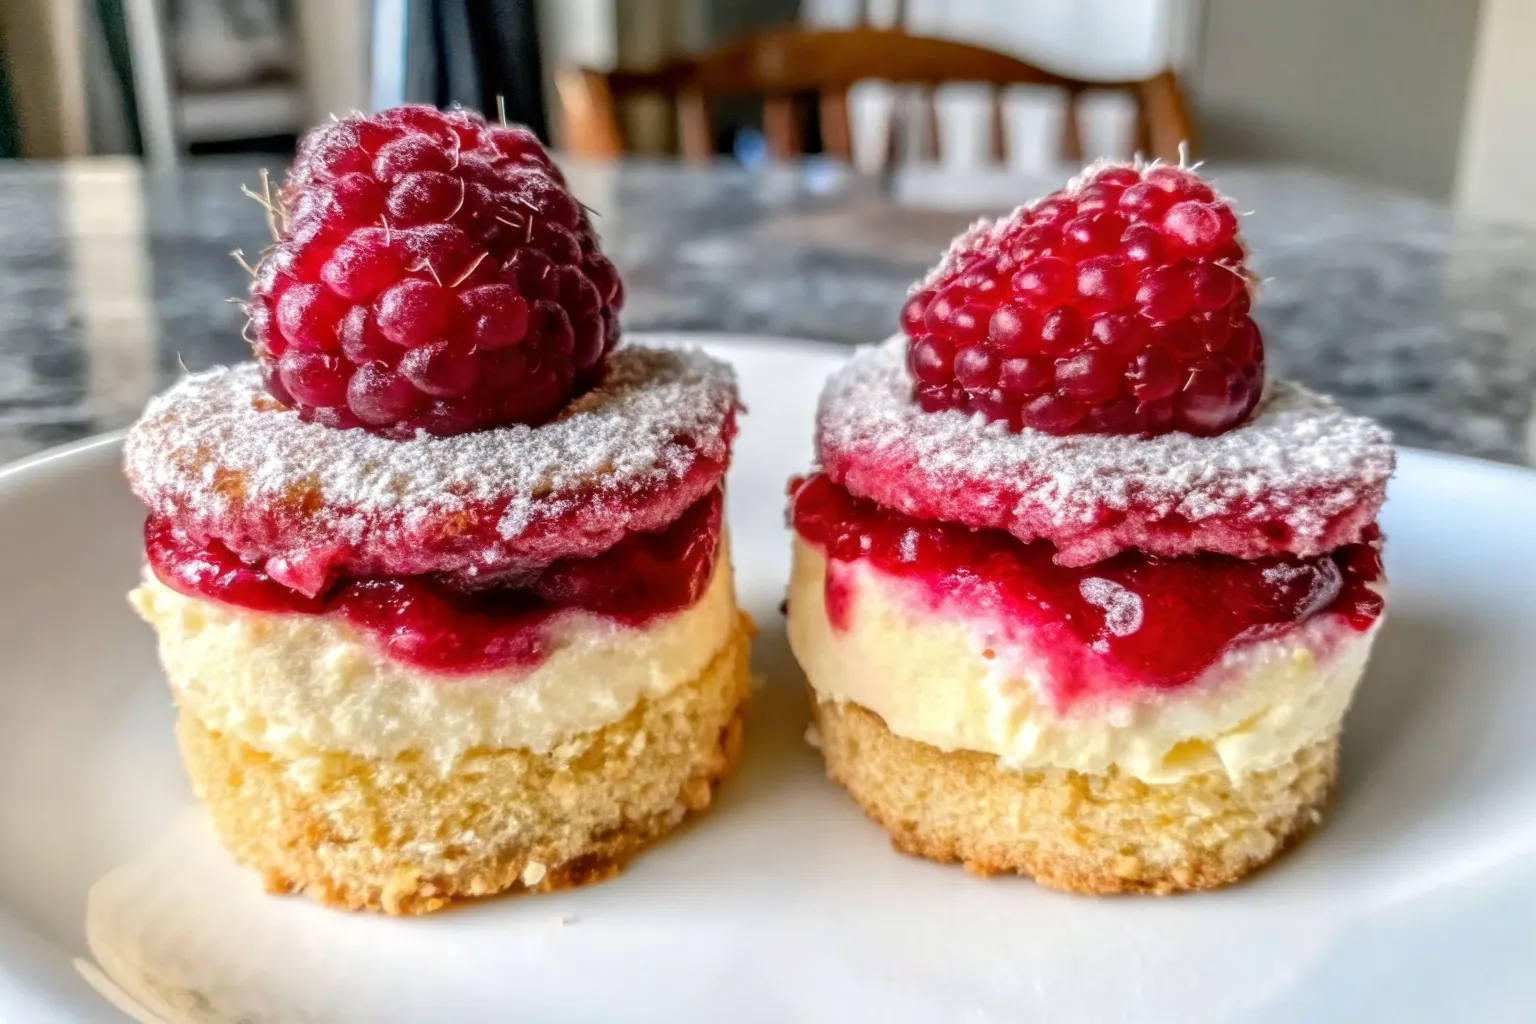
What makes these mini cheesecakes so special? Let me count the ways! First, the contrast between the buttery biscuit base, the creamy lemon-infused filling studded with fresh raspberries, and the light whipped cream topping creates the perfect balance of textures in every bite.
The individual portions make them perfect for serving at parties – no messy cutting or serving issues! They’re also make-ahead friendly, which is always a win in my book. I often prepare these the day before a gathering, and they’re even better after they’ve had time to set properly overnight.
Another thing I adore about this recipe is its versatility. While I’m sharing my favorite lemon and raspberry version today, you can easily switch up the flavors based on what’s in season or what you’re craving. Lime and blueberry make a delicious alternative, or try orange extract with dark chocolate shavings for a different twist! And if you’re looking for a more substantial dessert with similar flavors, my Lemon Bar Cheesecake Recipe combines two classic desserts into one showstopper.
Ingredients You’ll Need for Mini Lemon & Raspberry Cheesecakes
One of the beautiful things about this recipe is that it uses simple, easy-to-find ingredients. Here’s what you’ll need:
For the Biscuit Base:
- 200g digestive biscuits (graham crackers work perfectly too!)
- 100g unsalted butter, melted
The base is so simple but so important! The digestives provide that perfect crumbly texture that contrasts beautifully with the creamy filling. I’ve tried using other biscuits, but digestives really do give the best flavor and texture. The butter needs to be fully melted to ensure everything binds together properly.
For the Cheesecake Filling:
- 300g full-fat soft cream cheese or mascarpone (at room temperature)
- 50g icing sugar
- 150ml double cream
- 1 tsp lemon extract OR zest and juice of half a lemon
- 200g fresh raspberries
Using full-fat cream cheese is non-negotiable here! The lower-fat versions simply won’t set properly and can leave you with a runny filling. I personally prefer using mascarpone for an extra indulgent texture, but regular cream cheese works beautifully too.
When it comes to the lemon flavoring, both extract and fresh lemon work well. If you have fresh lemons on hand, the zest adds these lovely little flecks throughout the cheesecake and provides a more authentic flavor. However, lemon extract is my go-to when I need a quick solution!
For the Decoration:
- 125ml double cream
- 1 tbsp icing sugar
- Lemon zest
- 150g fresh raspberries
- Freeze-dried raspberries (optional but adds a beautiful pop of color and intense flavor)
The decoration is where you can really let your creativity shine! Sometimes I arrange the raspberries in a pretty pattern, other times I just scatter them casually for a more rustic look. The freeze-dried raspberries are my secret weapon for adding both visual appeal and a concentrated burst of flavor.
Step-by-Step Instructions for Perfect Mini Cheesecakes
Making these mini lemon and raspberry cheesecakes is surprisingly simple. Let me walk you through the process step by step:
Preparing the Biscuit Bases
- If you’re using a food processor, blitz the digestive biscuits until they form fine crumbs. If you don’t have a processor, no worries! Just place the biscuits in a ziplock bag and crush them with a rolling pin. It’s a great way to release any pent-up frustrations too!
- Mix the biscuit crumbs with the melted butter until everything is well combined. The mixture should hold together when pressed between your fingers.
- If you’re using a mini cake tin or mold, you might want to line it with strips of parchment paper to make removal easier later. I learned this the hard way after struggling to get my first batch out intact!
- Divide the biscuit mixture evenly between your 12 mini cake molds. I use a measuring tablespoon to ensure they’re all the same size.
- Press down firmly with the back of a spoon to create a compact base. Getting this right makes all the difference when it comes to serving – a loose base will crumble as soon as someone takes a bite!
Creating the Cheesecake Filling
This is where the magic happens! The filling is creamy, tangy, and studded with juicy raspberries:
- In a large bowl, whisk together the room temperature cream cheese, icing sugar, and lemon extract (or lemon zest and juice) until completely smooth. Don’t skip bringing the cream cheese to room temperature – cold cream cheese will give you lumpy results!
- Now you have two options for incorporating the cream. You can either whip the double cream separately to stiff peaks and then fold it gently into the cream cheese mixture, or add the cream directly to the cream cheese mixture and whip everything together until thick. Both methods work well, but I find the first option gives a slightly lighter texture.
- Once your mixture is thick and holds its shape (if you lift some up with your whisk, it should leave a trail), gently fold in the fresh raspberries. I like to crush some of them slightly as I fold, creating beautiful pink streaks throughout the mixture.
- Use a spoon or piping bag to divide the filling evenly between your prepared bases. Smooth the tops with the back of a spoon.
- Place your mini cheesecakes in the refrigerator for at least 3-4 hours to set. If you’re in a rush, the freezer will speed things up – they’ll need about 2-3 hours there.
Decorating Your Cheesecakes
This is the fun part! Once your cheesecakes are completely set:
- Carefully remove them from the molds. If you’ve lined with parchment, gently pull the strips to help lift them out.
- Whip the cream with the tablespoon of icing sugar until it’s thick enough to pipe but still soft enough to look appetizing. I like to stop just before it gets to stiff peaks.
- Transfer the whipped cream to a piping bag fitted with your favorite nozzle (a star tip creates a lovely effect) and pipe a swirl on top of each cheesecake.
- Now for the final touches! Sprinkle over some freshly grated lemon zest, add fresh raspberries, and scatter some freeze-dried raspberries for an extra pop of color and flavor.
The first time I made these, I went a bit overboard with the decoration and they looked more like mini works of art than desserts! My kids now love helping with this step – though I do have to watch that more raspberries end up on the cheesecakes than in their mouths!
Tips for Mini Cheesecake Success
Over the years, I’ve learned a few tricks that make these mini cheesecakes foolproof:
- If using a metal tin, warming it slightly with a hot cloth wrapped around the outside will help release the cheesecakes more easily.
- For the smoothest filling, make sure all refrigerated ingredients (cream cheese, cream) are at room temperature before you start.
- Don’t rush the setting time! It’s tempting to dig in early, but patience really pays off here.
- If you’re taking these to an event, keep them chilled until the last possible moment. They’re best served cold and will start to soften if left at room temperature for too long.
- For a make-ahead option, you can freeze these fully assembled for up to a month! Just thaw in the refrigerator overnight before serving.
Variations to Try with Your Mini Cheesecakes
While the lemon and raspberry combination is absolutely divine, don’t be afraid to experiment with different flavors:
Lime & Blueberry Mini Cheesecakes
Substitute lime zest and juice for the lemon, and swap the raspberries for fresh blueberries. The color contrast is stunning!
Orange & Dark Chocolate Mini Cheesecakes
Use orange extract or fresh orange zest in the filling, and fold in some chopped dark chocolate instead of raspberries. Top with chocolate shavings for an elegant finish.
Strawberry & Vanilla Mini Cheesecakes
Skip the lemon and add a teaspoon of vanilla extract instead. Use chopped strawberries in the filling and for decoration. A drizzle of white chocolate on top takes these to another level!
Storage and Make-Ahead Tips
These mini cheesecakes are perfect for planning ahead:
- Once made, they’ll keep in the refrigerator for up to 3 days. Store them in an airtight container to prevent them from absorbing other flavors from your fridge.
- If you want to make them even further in advance, they freeze beautifully! Freeze them without the fresh fruit decoration, well-wrapped, for up to a month. Defrost overnight in the refrigerator and add the fresh toppings just before serving.
- For a dinner party, I often make the bases and filling the day before, then just decorate them an hour or two before guests arrive. If you enjoy these mini treats, you might also love my Mini Easter Cheesecakes – they use the same technique but with festive decorations!
Serving Suggestions for Your Mini Cheesecakes
These little beauties are versatile enough to suit any occasion:
- For a special brunch, serve them alongside fresh fruit and coffee.
- At a summer garden party, they’re perfect with a glass of prosecco or a fruity cocktail.
- For a dessert table, arrange them on a tiered stand interspersed with fresh flowers for a stunning display.
- As an afternoon tea treat, they pair beautifully with a pot of Earl Grey or fruit tea.
I’ve even served these at a baby shower, tinted slightly pink and blue, and they were the star of the dessert table!

Why These Mini Cheesecakes Will Become Your Go-To Dessert
There’s something about individual desserts that makes people feel special. Every time I serve these mini lemon and raspberry cheesecakes, I watch as my guests’ eyes light up with delight. They’re impressed by how pretty they look, then even more impressed by how delicious they taste!
What I love most about this recipe is how it manages to be both simple and sophisticated at the same time. The bright, tangy lemon pairs perfectly with the sweet-tart raspberries, and the creamy cheesecake filling is just the right level of sweetness.
These mini cheesecakes have become my signature dessert, the one friends and family request for birthdays, holidays, and special gatherings. There’s something so satisfying about having a repertoire of reliable, impressive recipes that you can turn to again and again.
Whether you’re an experienced baker or just starting out, these mini lemon and raspberry cheesecakes are guaranteed to become a favorite in your household too. They’re proof that sometimes the simplest recipes are the most beloved!
So grab your ingredients, set aside a little time for these beauties to chill, and prepare to impress everyone who takes a bite! And don’t forget to snap a photo of your creation before they all disappear – these mini cheesecakes are definitely Pinterest-worthy!
I’d love to see your versions of these mini lemon and raspberry cheesecakes! Tag me in your photos on Pinterest and share your own creative twists on this recipe.
Happy baking, friends!
PrintMini Lemon & Raspberry Cheesecakes
Creamy, zesty, and sweet no-bake mini cheesecakes bursting with lemon flavor and fresh raspberries – the ultimate easy make-ahead dessert for any occasion.
- Prep Time: 25 minutes
- Cook Time: 0 minutes
- Total Time: 25 minutes + chilling
- Yield: 12 mini cheesecakes 1x
- Category: Dessert
- Method: No-Bake
- Cuisine: American
- Diet: Vegetarian
Ingredients
- For the base:
- 200g digestive biscuits (or graham crackers)
- 100g unsalted butter, melted
- For the filling:
- 300g full-fat soft cream cheese or mascarpone (room temp)
- 50g icing sugar
- 150ml double cream
- 1 tsp lemon extract or zest and juice of 1/2 lemon
- 200g fresh raspberries
- For decoration:
- 125ml double cream
- 1 tbsp icing sugar
- Lemon zest
- 150g fresh raspberries
- Freeze-dried raspberries (optional)
Instructions
- Crush digestive biscuits into fine crumbs using a food processor or rolling pin.
- Mix crumbs with melted butter until fully combined.
- Divide evenly between 12 mini molds or tins and press down firmly to form a base.
- Whisk cream cheese, icing sugar, and lemon extract/zest and juice until smooth.
- Whip double cream to stiff peaks separately, then gently fold into cream cheese mixture.
- Fold in fresh raspberries, crushing a few slightly for color.
- Spoon or pipe filling onto the bases and smooth the tops.
- Chill in fridge for 3–4 hours or freeze for 2 hours to set.
- Remove from molds carefully once set.
- Whip remaining cream with icing sugar until soft peaks form and pipe on top.
- Garnish with lemon zest, fresh raspberries, and optional freeze-dried raspberry pieces.
Notes
Use full-fat cream cheese or mascarpone for best texture. Let ingredients come to room temperature for smoother filling. Make ahead and decorate just before serving. Can be frozen (undecorated) for up to a month.
Nutrition
- Serving Size: 1 mini cheesecake
- Calories: 210
- Sugar: 10g
- Sodium: 100mg
- Fat: 15g
- Saturated Fat: 9g
- Unsaturated Fat: 4g
- Trans Fat: 0g
- Carbohydrates: 15g
- Fiber: 1g
- Protein: 3g
- Cholesterol: 45mg
Keywords: mini cheesecakes, lemon cheesecake, raspberry dessert, no bake cheesecake, easy cheesecake recipe