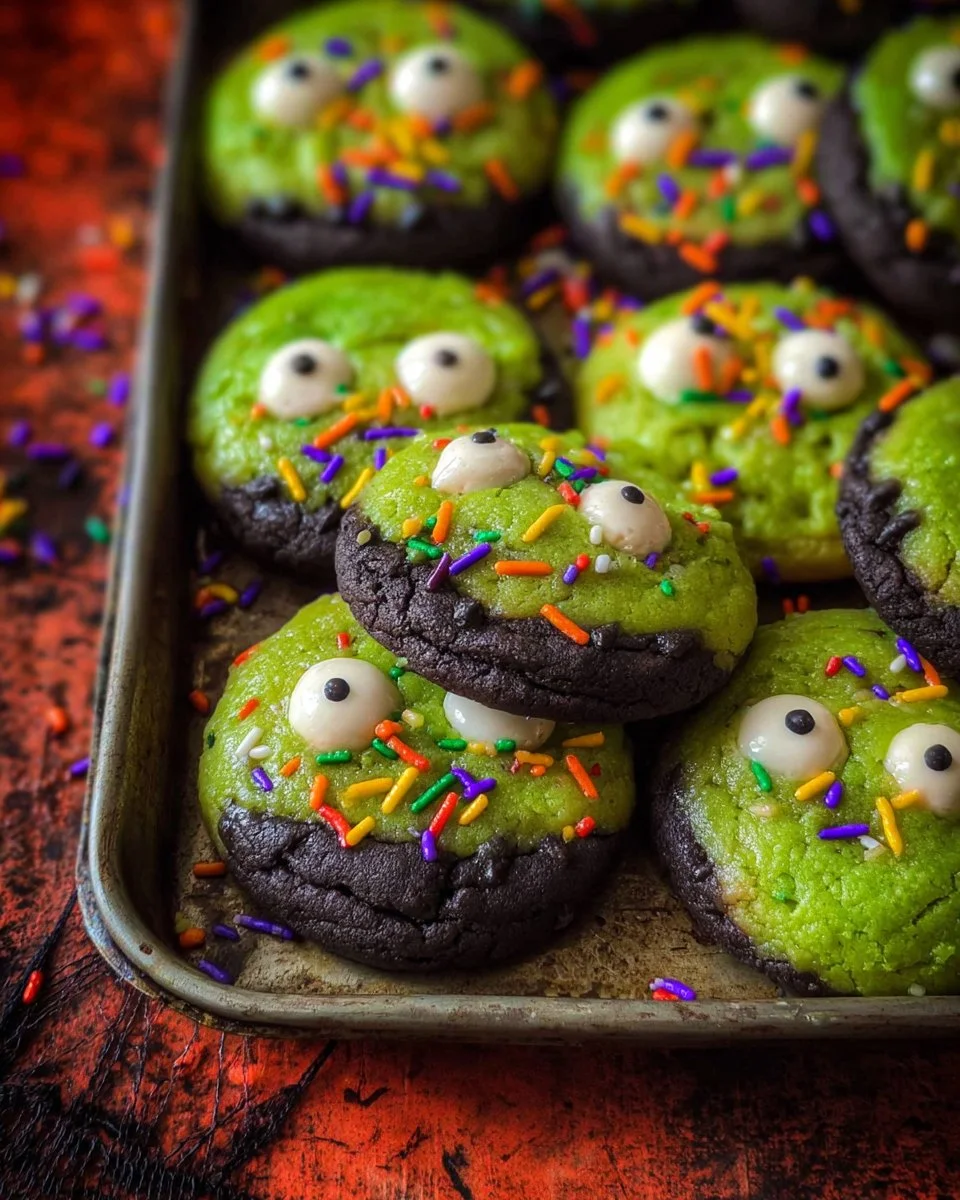
Halloween is a time for creativity and fun, especially when it comes to food. Slime Filled Halloween Cookies are the perfect treat for this spooky season. These cookies bring together delicious chocolate cookie dough and a creamy, vibrant green filling that looks just like slime. Not only do they taste great, but they also add a playful element to your Halloween celebrations. Kids and adults alike will love the surprise of gooey filling when they take a bite. Making these cookies is a fun activity that can involve the whole family. So, let’s dive into why you should make Slime Filled Halloween Cookies.
Firstly, they are visually striking and sure to impress anyone who sees them. The combination of dark chocolate cookie and bright green slime filling creates an irresistible treat that embodies the spirit of Halloween. Moreover, creating these cookies is a delightful kitchen project that you can share with friends or family. Baking together can create wonderful memories and leave everyone with a sense of accomplishment when the cookies are done.
Additionally, these cookies are customizable. You can add different sprinkles or decorations to make them unique. They could be made with orange or purple filling, aligning with more Halloween themes. Lastly, they are perfect for gatherings or parties, serving as both a delicious snack and a conversation starter.
HOW TO MAKE Slime Filled Halloween Cookies
Making Slime Filled Halloween Cookies is an enjoyable experience. Follow these straightforward steps to bring your spooky creations to life.
Ingredients:
- 4 ounces cream cheese, softened
- 2 cups confectioners’ sugar
- 1 and 1/2 tablespoons all-purpose flour
- 1 teaspoon vanilla extract
- Neon green food coloring
- 1/2 cup salted butter, room temperature
- 1/2 cup light brown sugar, packed
- 1/2 cup granulated sugar
- 1 large egg, room temperature
- 1 tablespoon milk
- 1 teaspoon baking soda
- 2 teaspoons vanilla extract
- 1/4 cup dark chocolate cocoa powder or black cocoa powder
- Black gel food coloring
- 1 and 2/3 cups all-purpose flour
- Halloween sprinkles
DIRECTIONS:
- Make the Filling:
- In a medium bowl, combine the softened cream cheese, confectioners’ sugar, all-purpose flour, vanilla extract, and enough neon green food coloring to reach your desired shade of green.
- Once mixed, scoop out 1 and 1/2 teaspoons of the filling and place them onto a parchment-lined baking sheet.
- Freeze these filling scoops for at least 2 hours. This step is crucial because it helps them maintain their shape when baked inside the cookies.
- Prepare the Cookie Dough:
- In a large mixing bowl, beat together the room temperature butter, light brown sugar, and granulated sugar until the mixture is creamy.
- Next, mix in the large egg, milk, vanilla extract, and black gel food coloring until everything is well combined.
- In a separate bowl, whisk together the baking soda, dark chocolate cocoa powder, and the all-purpose flour.
- Gradually combine the dry ingredients with the wet ingredients. Mix until everything is combined and become a dough.
- Cover the dough and chill it in the refrigerator for at least 2 hours. Chilling helps enhance the flavors and makes it easier to handle the dough.
- Bake the Cookies:
- Preheat your oven to 350°F (175°C) while the dough is chilling.
- Once the dough is chilled, roll it into small balls. Flatten each ball slightly.
- Place one frozen cream cheese ball in the center of each flattened cookie dough piece.
- Roll out more dough to cover the filling completely, sealing the edges so the gooey center doesn’t leak out during baking.
- After forming the cookies, sprinkle Halloween-themed sprinkles on top if desired.
- Chill the formed cookies for an additional 30 minutes to ensure they hold their shape during baking.
- Bake the cookies in the preheated oven for 12-15 minutes, or until they appear firm around the edges.
- Let the cookies cool on the baking sheet for 10 minutes before transferring them to a wire rack to cool completely.
HOW TO SERVE Slime Filled Halloween Cookies
Serving Slime Filled Halloween Cookies is part of the fun. These cookies can be displayed on platters or individual cake stands. For an added festive touch, consider using Halloween-themed plates or napkins. You can also serve them warm or allow them to cool completely.
When you present these cookies, encourage your guests to take a big bite and enjoy the gooey green filling that surprises them from within. They make for great party treats, and kids often love to share how their cookies ooze with slime when bitten into. Pair them with milk, hot chocolate, or a fun Halloween punch for a complete treat experience. These cookies can also be part of a dessert table during Halloween events or school parties.
HOW TO STORE Slime Filled Halloween Cookies
To keep your Slime Filled Halloween Cookies fresh, it is important to store them properly. Here are some simple steps to help you store your cookies.
- Cool Completely: Ensure that the cookies are completely cooled to room temperature before storing. This prevents moisture buildup, which can lead to soggy cookies.
- Use Airtight Containers: Place the cookies in an airtight container. Layer them with parchment paper if you have stacked them. This helps maintain the crispy edges and the gooey filling.
- Refrigerate for Longer Freshness: If you want to keep the cookies for more than a few days, consider refrigerating them. They can last up to a week in the fridge. Just be sure to let them come to room temperature before serving.
- Freezing for Later: If you want to save them for a later date, these cookies can also be frozen. Place them in a freezer-safe bag or container, separating layers with parchment paper. They can stay frozen for up to 3 months. When ready to eat, thaw them in the refrigerator overnight.
By following these storage tips, you will help preserve the flavor and texture of your Slime Filled Halloween Cookies, ensuring they stay delicious for every spooky occasion.
TIPS TO MAKE Slime Filled Halloween Cookies
Baking Slime Filled Halloween Cookies can be a delightful experience, but here are a few tips to ensure your cookies turn out perfectly:
- Use Softened Cream Cheese: Make sure your cream cheese is softened to room temperature for easy mixing. It will help you achieve a smooth filling without lumps.
- Chill the Dough: Don’t skip the chilling steps! Chilling the dough makes it easier to handle and helps prevent the cookies from spreading too much while baking.
- Adjust the Color: Feel free to adjust the amount of food coloring in the filling to achieve your desired neon shade. The more you add, the brighter your filling will be.
- Seal the Edges: Ensure that you seal the edges of the cookies well after adding the filling. This will help keep the gooey center from leaking during baking.
- Experiment with Sprinkles: Get creative with the sprinkles! You can use various Halloween-themed sprinkles to enhance the festive look of your cookies. Orange, black, or even edible glitter can add extra appeal.
- Don’t Overbake: Keep an eye on your cookies while they’re in the oven. You want them to be set around the edges but still soft in the middle. Over-baking can cause them to lose their gooey filling.
By keeping these tips in mind, you’ll make every batch of Slime Filled Halloween Cookies a guaranteed hit!
VARIATIONS
While the traditional Slime Filled Halloween Cookies are delicious as they are, there are several fun variations you can try:
- Different Color Fillings: Instead of using neon green food coloring for the filling, consider different colors. Orange, purple, or even a mix of colors can fit the Halloween theme beautifully.
- Add Flavorings: You can give the cream cheese filling a twist by adding flavor. A splash of almond or mint extract can make for a delightful surprise.
- Chocolate Chip Cookies: Instead of chocolate cookie dough, use a classic vanilla cookie dough and add chocolate chips to it. The green filling will create a fun contrast.
- Monster Eyes: Top your cookies with candy eyes or other decorative elements to make them look like little monsters, making them even more fun for Halloween parties.
- Gluten-Free Version: For a gluten-free option, swap the all-purpose flour with a gluten-free flour blend while making sure your other ingredients are also gluten-free.
By trying out these variations, you can customize your Slime Filled Halloween Cookies to suit different tastes and preferences!
FAQs
1. Can I make the filling ahead of time?
Yes, you can prepare the filling a day or two in advance. Just make sure to keep it covered and refrigerated until you are ready to use it.
2. What if I don’t have black gel food coloring?
If you don’t have black gel food coloring, you can create a similar color by using a mix of brown and red food coloring. Alternatively, you can use dark cocoa to enhance the brownie-like appearance of the dough.
3. How can I tell when the cookies are done baking?
The cookies should be set around the edges and slightly soft in the center. They will continue to cook a little after being taken out of the oven. If they have a slight shine in the center, they are likely perfect.
Making Slime Filled Halloween Cookies is a fantastic way to celebrate the spooky season! Enjoy your baking and the fun festivities that come with sharing these delightful treats.
PrintSlime Filled Halloween Cookies
Delicious chocolate cookies filled with a creamy, vibrant green filling that looks just like slime, perfect for Halloween.
- Prep Time: 120 minutes
- Cook Time: 15 minutes
- Total Time: 135 minutes
- Yield: 24 cookies 1x
- Category: Dessert
- Method: Baking
- Cuisine: American
- Diet: Vegetarian
Ingredients
- 4 ounces cream cheese, softened
- 2 cups confectioners’ sugar
- 1 and 1/2 tablespoons all-purpose flour
- 1 teaspoon vanilla extract
- Neon green food coloring
- 1/2 cup salted butter, room temperature
- 1/2 cup light brown sugar, packed
- 1/2 cup granulated sugar
- 1 large egg, room temperature
- 1 tablespoon milk
- 1 teaspoon baking soda
- 2 teaspoons vanilla extract
- 1/4 cup dark chocolate cocoa powder or black cocoa powder
- Black gel food coloring
- 1 and 2/3 cups all-purpose flour
- Halloween sprinkles
Instructions
- Make the Filling: In a medium bowl, combine cream cheese, confectioners’ sugar, all-purpose flour, vanilla extract, and neon green food coloring. Scoop 1 and 1/2 teaspoons of the filling onto a parchment-lined baking sheet and freeze for at least 2 hours.
- Prepare the Cookie Dough: Beat together room temperature butter, light brown sugar, and granulated sugar until creamy. Mix in egg, milk, vanilla extract, and black gel food coloring. In a separate bowl, whisk together baking soda, dark chocolate cocoa powder, and all-purpose flour. Gradually combine dry ingredients with wet until a dough forms. Cover and chill for at least 2 hours.
- Bake the Cookies: Preheat oven to 350°F (175°C). Roll chilled dough into balls, flatten slightly, and place a frozen cream cheese ball in the center. Seal edges around the filling and sprinkle with Halloween-themed sprinkles if desired. Chill cookies for an additional 30 minutes. Bake for 12-15 minutes or until firm around the edges. Cool on a wire rack.
Notes
For added fun, customize the filling color and decorations with various Halloween-themed sprinkles.
Nutrition
- Serving Size: 1 cookie
- Calories: 200
- Sugar: 15g
- Sodium: 150mg
- Fat: 8g
- Saturated Fat: 4g
- Unsaturated Fat: 3g
- Trans Fat: 0g
- Carbohydrates: 32g
- Fiber: 1g
- Protein: 2g
- Cholesterol: 20mg
Keywords: Halloween cookies, spooky treats, slime cookies, chocolate cookies, festive baking


