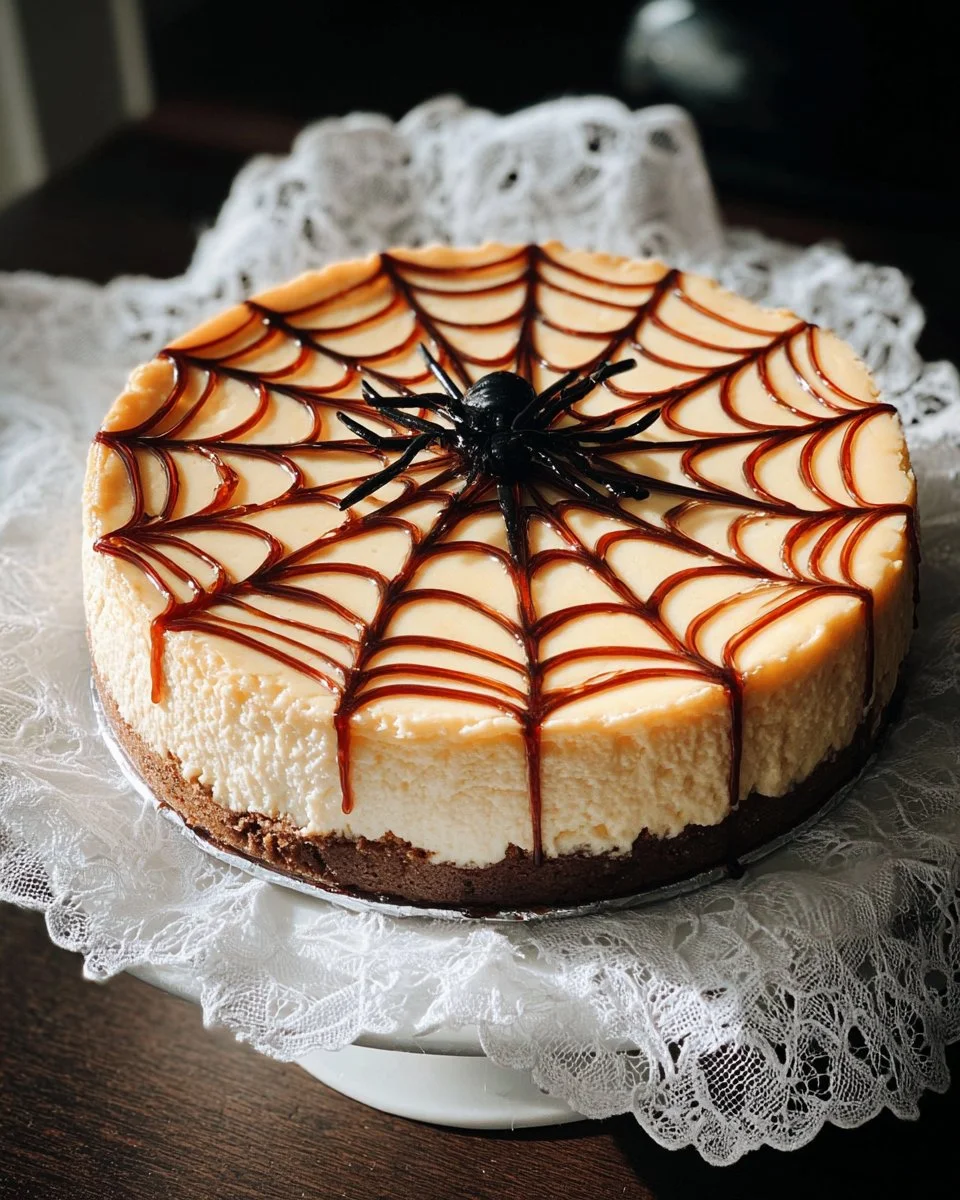
Spiderweb Cheesecake is not just a dessert; it’s a statement piece for any gathering or celebration, especially around Halloween. This cheesecake is creamy, rich, and has a delightful crunch from the chocolate cookie crust. The dark chocolate spiderweb on top adds a fun and spooky touch that makes it a hit with both kids and adults alike. It’s an impressive dessert that looks complicated but is surprisingly easy to create. By choosing this recipe, you are combining great flavors with a fun presentation that makes dessert time a little more exciting.
HOW TO MAKE Spiderweb Cheesecake
Ingredients :
- 2 cups chocolate cookie crumbs
- 1/4 cup melted butter
- 24 oz cream cheese, softened
- 1 cup sugar
- 3 large eggs
- 1 tsp vanilla extract
- 1/4 cup sour cream
- 1/2 cup dark chocolate chips, melted
DIRECTIONS :
- Preheat the oven to 325°F (160°C). Grease a 9-inch springform pan.
- Prepare the crust: In a bowl, combine the chocolate cookie crumbs and melted butter until well mixed. Press this mixture firmly into the bottom of the springform pan to create a solid crust.
- Make the cheesecake batter: In a large bowl, beat the softened cream cheese and sugar together until smooth and creamy. Add the eggs one at a time, mixing well after each addition. Then, add the vanilla extract and sour cream, mixing until everything is fully incorporated.
- Assemble the cheesecake: Pour the cheesecake batter over the cookie crust in the pan. Smooth the top with a spatula.
- Bake the cheesecake: Place the pan in the oven and bake for 45-50 minutes. The edges should be set, but the center can still be slightly jiggly.
- Cool the cheesecake: Once baked, remove it from the oven and let it cool completely on a wire rack. After it’s cool, refrigerate the cheesecake for at least 4 hours, or overnight for best results.
- Decorate with the spiderweb: Once chilled, melt the dark chocolate chips until smooth. Use a piping bag or a ziplock bag with a corner snipped off to pipe the melted chocolate onto the top of the cheesecake in a spiderweb design. Start with a circle in the center and create lines that radiate outward. Use a toothpick to drag lines outward for a web effect.
- Slice and serve: Your creepy yet delicious Spiderweb Cheesecake is ready to slice and serve!

HOW TO SERVE Spiderweb Cheesecake
Spiderweb Cheesecake is best served chilled. After slicing, you can garnish each piece with extra chocolate shavings or berries if desired. Serve it on a festive platter to enhance the Halloween theme. You might want to pair it with whipped cream or a scoop of vanilla ice cream for an extra treat. This dessert will delight anyone who craves something sweet and spooky!
HOW TO STORE Spiderweb Cheesecake
To store your Spiderweb Cheesecake, make sure it is well-covered to maintain freshness. You can use plastic wrap or store it in an airtight container in the refrigerator. The cheesecake should last for up to one week in the fridge. If you want to keep it for longer, consider freezing it. Wrap it tightly in plastic wrap and then in aluminum foil. When you’re ready to enjoy it, simply thaw it overnight in the refrigerator.
TIPS TO MAKE Spiderweb Cheesecake
- Use high-quality cream cheese: This will make your cheesecake smooth and creamy. Avoid low-fat cream cheese as it can change the texture.
- Don’t overmix: When adding eggs and other ingredients, mix just until combined to avoid a dense cheesecake.
- Check for doneness: The center should remain slightly jiggly; overbaking can lead to cracks and a dry texture.
- Cool properly: Let the cheesecake cool gradually to room temperature before refrigerating it; this helps avoid cracks.
- Experiment with toppings: Feel free to add gummy spiders or chocolate decorations for an added spooky effect!
VARIATIONS
- Flavored Cheesecake: Consider adding pumpkin puree for a pumpkin-flavored spiderweb cheesecake or peppermint extract for a minty twist.
- Different crusts: Swap chocolate cookie crumbs for graham crackers, Oreos, or even a nut-based crust for variety.
- Fruit toppings: You can garnish the top with seasonal fruits like cranberries, strawberries, or your choice of berries to balance the richness.
FAQs
Can I make this cheesecake ahead of time?
Yes! Spiderweb Cheesecake can be made a day or two in advance. Just keep it refrigerated until you are ready to serve.
What can I use if I don’t have a springform pan?
You can use an 8 or 9-inch round cake pan, but ensure to line it with parchment paper for easy removal.
How can I make it gluten-free?
Use gluten-free chocolate cookies for the crust to make this cheesecake gluten-free.
By following these simple steps, you will create a stunning Spiderweb Cheesecake that will impress all your guests and bring a smile to everyone’s face. Enjoy the process of making this delightful dessert that is both tasty and visually appealing!
PrintSpiderweb Cheesecake
A creamy and rich cheesecake with a chocolate cookie crust and a spooky dark chocolate spiderweb on top, perfect for Halloween.
- Prep Time: 15 minutes
- Cook Time: 50 minutes
- Total Time: 265 minutes
- Yield: 8 servings 1x
- Category: Dessert
- Method: Baking
- Cuisine: American
- Diet: Vegetarian
Ingredients
- 2 cups chocolate cookie crumbs
- 1/4 cup melted butter
- 24 oz cream cheese, softened
- 1 cup sugar
- 3 large eggs
- 1 tsp vanilla extract
- 1/4 cup sour cream
- 1/2 cup dark chocolate chips, melted
Instructions
- Preheat the oven to 325°F (160°C) and grease a 9-inch springform pan.
- In a bowl, combine chocolate cookie crumbs and melted butter until well mixed, then press into the bottom of the springform pan.
- Beat cream cheese and sugar together until smooth, then add eggs one at a time, mixing well. Add vanilla extract and sour cream, mixing until incorporated.
- Pour the cheesecake batter over the crust and smooth the top.
- Bake for 45-50 minutes until the edges are set and the center is slightly jiggly.
- Let cool completely on a wire rack, then refrigerate for at least 4 hours or overnight.
- Melt dark chocolate chips and pipe onto the cheesecake in a spiderweb design. Use a toothpick to create web effects.
- Slice and serve chilled.
Notes
Serve with extra chocolate shavings or berries on a festive platter. Pair with whipped cream or vanilla ice cream for extra delight.
Nutrition
- Serving Size: 1 slice
- Calories: 450
- Sugar: 30g
- Sodium: 300mg
- Fat: 28g
- Saturated Fat: 14g
- Unsaturated Fat: 10g
- Trans Fat: 0g
- Carbohydrates: 40g
- Fiber: 2g
- Protein: 8g
- Cholesterol: 150mg
Keywords: cheesecake, Halloween dessert, creamy dessert, chocolate dessert
1 thought on “Spiderweb Cheesecake”
Comments are closed.