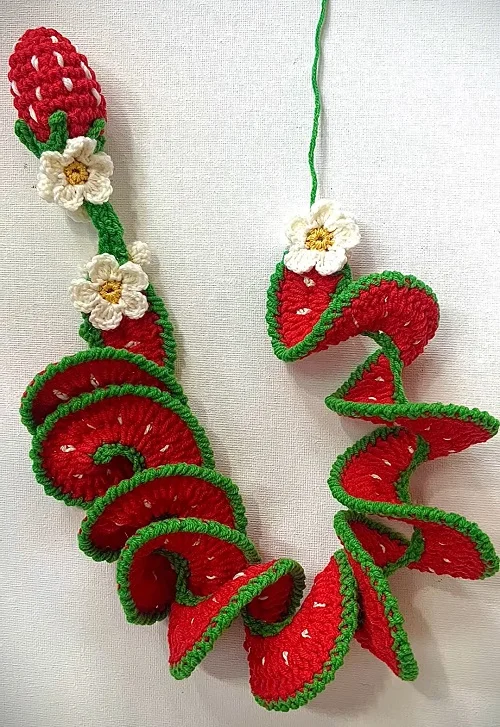
Strawberry season has given me another crochet idea: a windspinner with a red spiral, little white dots, a green border, and sweet strawberry blossoms. And because a strawberry decoration really ought to have a strawberry, there is a little stuffed berry hanging at the bottom, too.
The spiral comes from putting plenty of stitches into a narrow foundation. It starts curling almost immediately. A firm yarn, slightly tighter crochet, and a sturdy edging help it keep its shape. Then comes the enjoyable part: flowers, seeds, and perhaps a little sparkle. You can make it as playful as you like.
What You’ll Learn
- Three half double crochets in each foundation stitch create the windspinner’s curling shape.
- A white chain row partly covered with red double crochet creates little strawberry seed dots.
- Firm yarn, tighter stitches, and a crab stitch border help the spiral keep its structure.
- Five-petaled blossoms and a stuffed strawberry pendant complete the summer decoration.
Table of Contents
- Materials and Stitch Notes
- 1. Crochet the Green Foundation
- 2. Add the First Red Row and Form the Spiral
- 3. Make the White Strawberry Dots
- 4. Cover the White Row with Red Double Crochet
- 5. Choose a Picot or Crab Stitch Border
- 6. Crochet the Strawberry Blossoms
- 7. Crochet the Stuffed Strawberry Pendant
- 8. Make the Green Stem and Leafy Cap
- 9. Attach the Flowers and Finish the Windspinner
Materials and Stitch Notes
For the main windspinner, I use yarn with a length of 120 meters per 50 grams. The flower yarn is a little thinner, and I use a smaller hook for those delicate blossoms.
- Red yarn for the spiral and stuffed strawberry.
- Green yarn for the foundation, border, and strawberry stem.
- White yarn for the dots and flower petals.
- Thinner yellow yarn for the flower centers, with thinner white yarn for the petals.
- A crochet hook suited to the main yarn and a smaller hook for the flowers.
- Scissors, a yarn needle, and stuffing.
- Optional decorative gems and glue.
- Optional small stone or marble to add weight inside the strawberry.
All stitch names below use US crochet terminology. You will use chains, single crochet, half double crochet, double crochet, slip stitches, a magic ring, and either picots or crab stitch. Crab stitch is reverse single crochet.
No exact hook size is specified here. The important thing is the fabric: choose a yarn with some body and work a little more firmly than you might for a soft, draping project. Very floppy yarn does not give this windspinner the same stability.
Two habits that make the work neater
For the main colored rows, return to the original starting end and keep the attractive front side facing you. These are separate passes along the strip, rather than ordinary rows worked back and forth.
I also crochet over yarn tails whenever possible. Lay the tail along the stitches you are about to work and enclose it as you go. It can be a little fiddly, but it saves sewing in ends afterward. If you forget one, do not worry. You can still draw it through the back of the work with a needle.
1. Crochet the Green Foundation
- With green yarn, make a foundation chain of 90 chains.
- Work back along the chain, making one single crochet into each foundation chain.
- Near the end, crochet over the starting tail to secure it within the row.
- Fasten off the green yarn, leaving the finishing tail available to crochet over in the next row.
You now have a narrow green strip. It looks quite modest at this stage, but it is the backbone of the whole spiral.
2. Add the First Red Row and Form the Spiral
Return to the beginning of the green strip with the front facing you. Join red yarn in the first single crochet.
I use the working yarn and the starting tail together for the first joining chain, then make another chain to bring the work up to half double crochet height. Complete the first group at that starting stitch, then continue with three half double crochets into every green single crochet. Keep the starting tail enclosed as you work.
The red edge is much wider than the green foundation, so it begins to curl. That is exactly what we want. There simply is not enough room for all those broad stitches to lie flat.

Continue all the way to the other end and fasten off.
Help the curls turn in one direction
Sometimes a section decides to twist the other way. The spiral may not correct itself, so give it a little help.
Gently rotate the awkward section until its curl follows the same direction as the neighboring curls. Work along the whole strip, right to the end. You do not need to undo the crochet simply because a section has flipped. Often it only needs turning into place.
Keep the stitches reasonably firm. The broad red surface is the part that catches the breeze, and it needs enough structure to hold its shape.
3. Make the White Strawberry Dots
The white details are worked as a separate row and partly covered by the next red row. What remains visible looks like little strawberry seeds. Sweet, isn’t it?
- Return to the starting tip, keeping the front facing you.
- Join white yarn, using the tail together with the working yarn for the first securing stitch if you like.
- Chain two.
- Work a single crochet at the next three-stitch interval along the red half double crochet row.
- Repeat the two-chain sections and single crochet anchors along the strip, spacing the anchors by the groups of three red half double crochets.
- After the last single crochet, fasten off by pulling the yarn through the final loop.
The curled fabric makes counting a little fiddly. Open out the section in your hands so you can identify the red stitch groups rather than guessing where the next anchor belongs.
4. Cover the White Row with Red Double Crochet
Start again at the original end with red yarn. Lay the white starting tail along the work so it can be enclosed by the new stitches.
Join into the red row beneath the white detail and make three starting chains for double crochet height.
The aim is to make four red double crochets over each original group of three half double crochets, covering the white chain sections while leaving the small white anchor points visible.
You can work one double crochet into each of the three red stitches and put an extra double crochet into the middle stitch. However, the first stitch can become rather hidden under the white yarn. I find this alternative easier:
- Work two double crochets into the gap between the first and second red half double crochets.
- Work two double crochets into the gap between the second and third red half double crochets.
- Repeat these two pairs along the strip.
That gives you the same four-stitch group without struggling to enter the obscured stitch. As you work, the white chain sections disappear beneath the red fabric and the little white dots remain.
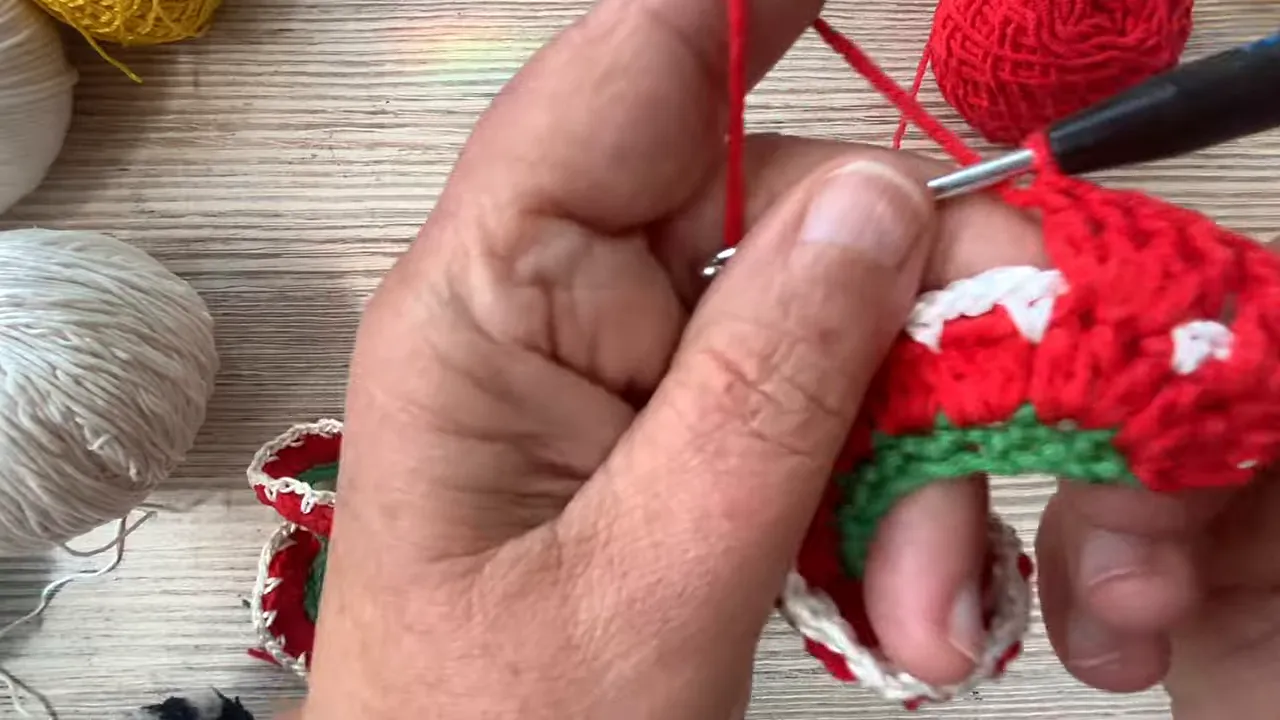
Continue to the opposite end and fasten off. It is looking wonderfully strawberry-like now.
5. Choose a Picot or Crab Stitch Border
There are two lovely ways to finish the outside edge. Green emphasizes the strawberry colors, while white makes a pretty contrast. I chose green crab stitch for the finished windspinner, especially because the white flowers will add more white later.
Begin the edging at the green foundation end and work single crochets up the short end to reach the broad outer edge. Leave some yarn available where the pendant will eventually attach.
Option A: A little picot edge
For a decorative picot border, work along the outer edge in single crochet:
- Single crochet into the next three stitches, working an extra single crochet into the third stitch.
- Make a two-chain picot on that extra single crochet, closing it back into its base.
- Repeat along the edge.
Each repeat produces four single crochets, with the picot on the fourth. If you prefer a slightly larger point, use three chains for the picot instead of two.
Option B: A firm crab stitch edge
Work crab stitch along the broad outer edge. Keep it fairly firm, but not so tight that it is difficult to work.
This gives a substantial, neatly twisted border and helps the edge look straighter rather than wavy. For a windspinner, that extra stability is very useful.
At the far end, finish by working single crochets down the short end. Leave the remaining yarn tail attached for now. It may be useful for the finishing or hanging arrangement.
6. Crochet the Strawberry Blossoms
Make as many flowers as you fancy. I attached six to my finished windspinner. Use thinner yarn and a smaller hook so the flowers remain delicate beside the larger spiral.
The yellow center
- Make a magic ring with yellow yarn.
- Work 10 single crochets into the ring.
- Pull the ring closed tightly.
- Work a securing single crochet into the first single crochet, incorporating the starting tail.
- Cut the yarn and draw it through to finish.
Lay the yellow tails along the next round and crochet over them as well as you can. This takes a little practice, but it is a useful habit.
The five white petals
Join white yarn into a yellow center stitch, preferably just before the finishing knot. Work the first petal into that same stitch:
- Chain three.
- Work two double crochets.
- Chain two.
- Slip stitch back into the same yellow stitch.
Skip the next yellow stitch. Slip stitch into the following yellow stitch and make another petal with the same sequence: chain three, two double crochets, chain two, slip stitch into the same stitch.
Continue around, placing a petal in every second yellow stitch. The 10-stitch center gives you five petals. Finish with a slip stitch at the beginning and leave a tail for attachment.
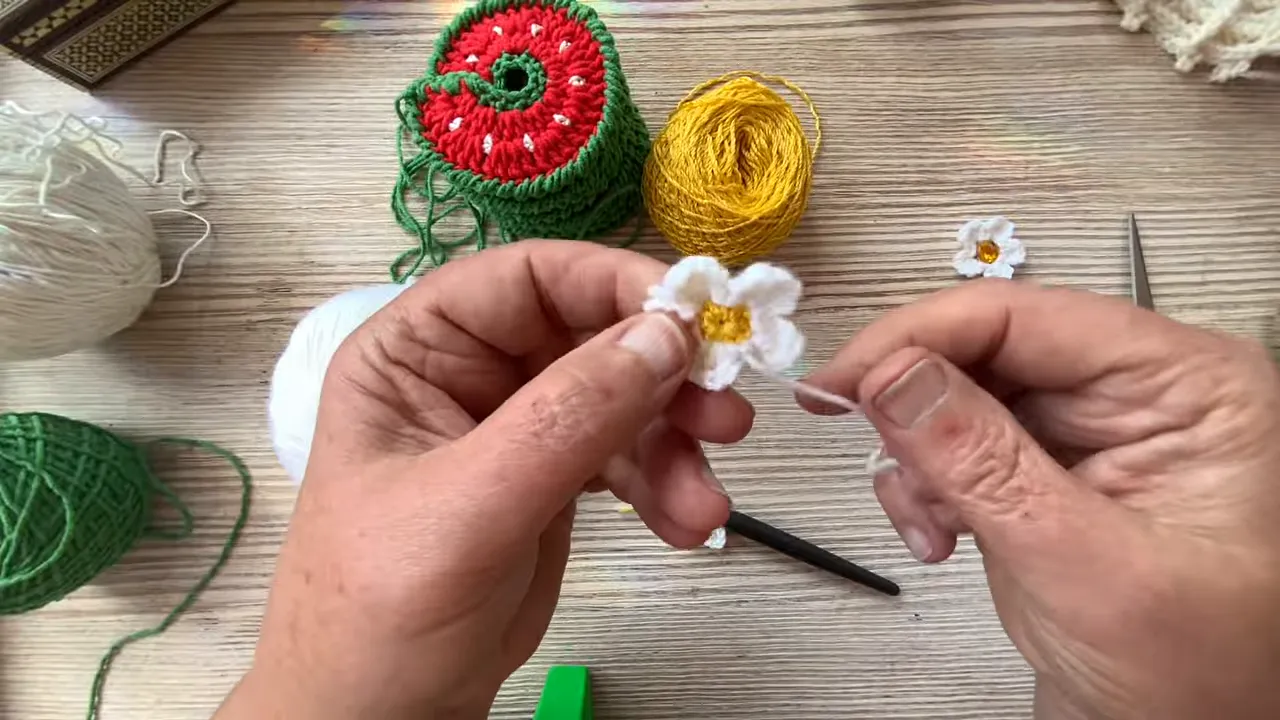
If you have a little yellow decorative gem tucked away among your craft supplies, you can glue it into the flower center. I do enjoy saving such things. You never know what they might be useful for!
7. Crochet the Stuffed Strawberry Pendant
The strawberry is worked from the pointed bottom upward in a continuous spiral. Its size is adjustable, so this is a shape-based method rather than a pattern with one fixed final stitch count.
Start with a narrow point
- With red yarn, make a magic ring.
- Work seven single crochets into the ring.
- Pull the ring closed very tightly.
- Continue into the first stitch, securing the starting tail as you work.
- Work 15 single crochets continuously around, without increasing.
This small, narrow section gives the bottom of the strawberry a more pronounced point. Turn the work outward as needed so you can reach the stitches comfortably.
Increase to the width you like
Make an increase by working two single crochets into one stitch. Then repeat:
Single crochet into the next three stitches, then work two single crochets into the next stitch.
In other words, increase in every fourth stitch. Continue until the strawberry is as wide as you want it. About 10 increase repeats or more gives you room to build the berry, depending on your chosen size.
Add height without more increases
Once the width looks right, continue in single crochet without increasing. Work at least 60 single crochets in total around the spiral to build height. These are individual stitches, not 60 rounds.
For my larger strawberry, I worked 80 single crochets and had also made more increases beforehand. You can adjust both parts together: more width first, then enough plain crochet to give the berry a pleasing proportion.
Reduce the opening and stuff the berry
Work one decrease round, repeating:
Single crochet the next two stitches together, then single crochet into the following stitch.
Continue around the opening, finish with a slip stitch, and cut the yarn, leaving enough for closing.
Fill the strawberry with stuffing. If you would like the pendant to be a little heavier, you can place a small stone or marble inside with the stuffing. It is optional.
Thread the red tail onto a yarn needle, pass it through the remaining stitches around the opening, and pull them together. Secure with a finishing knot. Leave the red tail attached for now, as it may help when fastening the berry to its green cap.
Add the strawberry seeds
You have two choices for the little seeds:
- Glue on small white decorative gems for a sparkling strawberry.
- Embroider short white stitches for a more natural-looking berry.
Although I considered a glittery version, I chose embroidered white dots for the finished pendant.
8. Make the Green Stem and Leafy Cap
First check the hanging direction of the windspinner. I want the attractive side of the spiral facing upward, so the strawberry attachment belongs at the lower end.
Join green yarn to the retained tail at that end. I use a compact joining knot, then crochet over the loose ends to keep the attachment tidy.
A sturdy little stem
- Make an attached foundation strip of 10 single crochets.
- Work back along it with nine single crochets.
- Crochet over the joining tails where possible and trim the remaining excess once secured.
- Add a slip stitch at the connection to the spinner for extra stability.
- Work back down the stem with slip stitches over the single crochets.
The extra slip stitch pass helps this narrow section become firmer and straighter. A little reinforcement is a good thing here.
The cup beneath the leaves
At the free end of the stem, chain two. Work half double crochets around the end, placing as many as fit comfortably to form a small cup. I worked 10 half double crochets.
Join with a slip stitch into the top starting chain. This little cup gives you a place to attach the top of the stuffed strawberry.
The pointed green leaves
Change direction and work pointed projections around the cup:
- Slip stitch into a cup stitch.
- Chain four.
- Work back along the chain with slip stitches.
- Slip stitch into the next cup stitch to secure the point.
- Move to the next stitch and repeat around the cup.
You can make an occasional point a little longer by using five chains instead of four. Try it and see which shape you like. The small green rays give the pendant its unmistakable strawberry top.
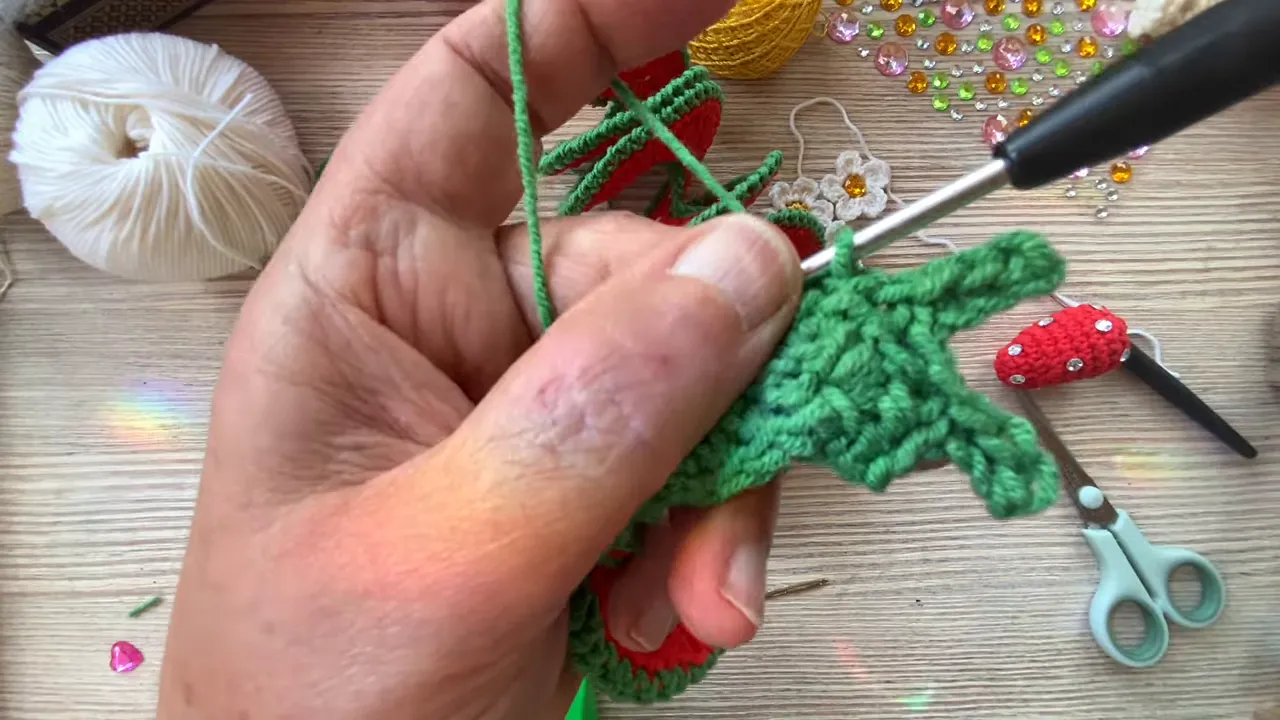
Fasten the stuffed strawberry securely beneath the green cup, with the leafy points spreading over its top.
9. Attach the Flowers and Finish the Windspinner
Arrange the blossoms wherever they please you along the spiral and the lower attachment. I sewed six flowers onto mine. You can also attach them with a hot glue gun.
Secure any remaining loose tails, then check the spiral once more. Gently turn any reversed section until the curls all follow one direction. Keep a suitable yarn tail at the upper end for hanging.
If you choose to stiffen the finished crochet with a commercial product, follow the manufacturer’s instructions and hazard warnings on the bottle.
Now the red spiral, green edging, white seeds, little blossoms, and dangling berry all belong together. It is such a cheerful strawberry decoration, and the firm crab stitch border gives it a lovely finish. I hope making yours brings you just as much pleasure.
Article Made based on WINDSPINNER STRAWBERRY