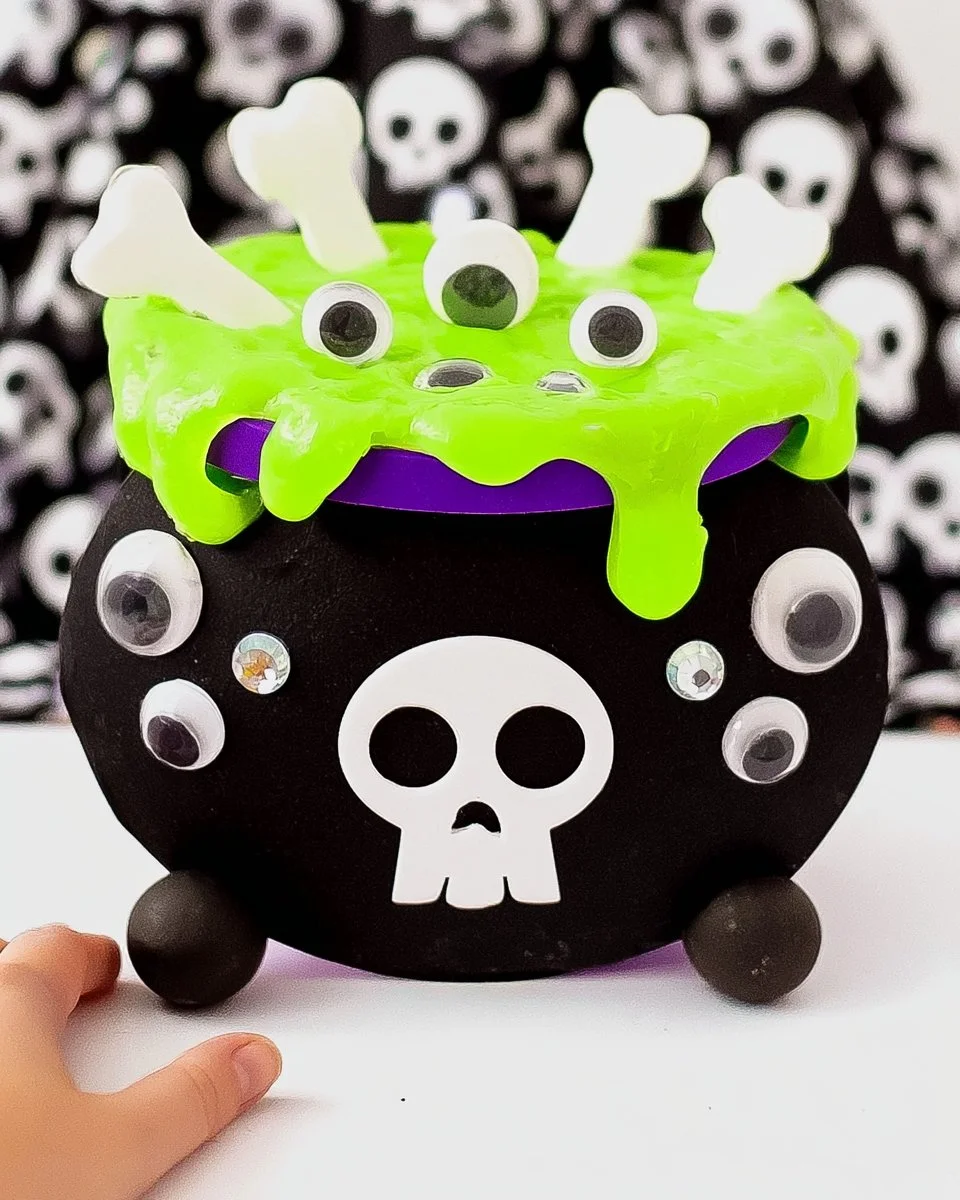
Paper Plate Witches Brew Craft for Kids [Free PDF Template] is a delightful and easy DIY project that brings a touch of magic to your home or classroom. This creative DIY idea is not only a fun way for kids to express their artistic skills but also a budget-friendly craft that can be made using simple materials readily available around the house. Whether you’re looking for an engaging Halloween activity or a creative way to decorate for a fall party, this paper plate craft will enchant young imaginations and bring smiles to all involved.
WHY YOU WILL LOVE THIS Paper Plate Witches Brew Craft
This Paper Plate Witches Brew Craft is perfect for young crafters for several reasons:
- Easy for Beginners: This craft is designed for kids of all ages, making it a fantastic beginner-friendly craft that anyone can tackle.
- Uses Simple Materials: Most items needed for this craft can be found at home or in your local craft store, making it an accessible project.
- Budget-friendly: Creating this project won’t break the bank, allowing you to enjoy crafting without a hefty price tag.
- Quick to Make: This project can be completed in under an hour, making it ideal for busy families or classroom activities.
- Great for Home Decor: The final piece can be used as a festive decoration for Halloween or fall-themed events.
- Creative Customization: Kids can customize their Witches Brew craft in unique ways, allowing their creativity to shine.
PROJECT DETAILS
Skill Level
This craft is suitable for kids of all ages, making it an ideal beginner-friendly craft. Even young children can participate with the help of an adult.
Estimated Time
Plan for about 30 to 60 minutes to complete this simple craft project from start to finish, including drying time for glue.
Approximate Cost
This budget-friendly DIY can be created for less than $10, depending on the materials you already have at home.
Best For
This craft is perfect for Halloween gatherings, school projects, or simply a rainy day activity at home.
Project Type
This is a seasonal craft, specifically designed for Halloween, but can be adapted for other occasions through creative customizations.
TOOLS AND EQUIPMENT NEEDED
Scissors
Used for cutting the paper plates and any additional decorations you may want to add.
Glue (White Elmer’s Glue or Craft Glue)
This is essential for securing various materials together, helping to create a sturdy final piece.
Paintbrush (optional)
If you choose to use paint instead of markers, a paintbrush is necessary for applying color.
MATERIALS
Paper Plates
The foundation of your craft, serving as a canvas for your witches brew creation.
Green and Black Paint or Markers
These colors will help you to create the “witches brew,” giving it a mystical look.
Glitter (optional)
Adding a sprinkle of glitter can give your witches brew a magical sparkle!
Stickers or Foam Shapes
These can be used as fun decorations to personalize each craft, enhancing creativity.
Googly Eyes
These will add a whimsical touch to your craft, making it more playful and fun for children.
Pipe Cleaners
These can be used to mimic bubbling effects on the craft, adding depth and movement.
Craft Foam (optional)
Great for making additional decorations like shapes, faces, or creepy elements to enhance the craft.
![Paper Plate Witches Brew Craft For Kids [Free PDF Template]](https://www.pinterest.com/pin/create/button/?url=https%3A%2F%2Falexandrarecipes.com%2Fpaper-plate-witches-brew-craft-for-kids-free-pdf-template%2F&media=https%3A%2F%2Fcdn.contai.io%2Fpublic%2Ffal-ai-generated%2F1786989762_6a834cc27485d.png)
HOW TO MAKE Paper Plate Witches Brew Craft
Creating your Paper Plate Witches Brew Craft is a straightforward process. Follow these steps for a delightful crafting experience!
Step 1: Prepare the Paper Plate
Begin with your paper plate. Flip it upside down so you can paint or draw on the base side. This will help your design stand out.
Step 2: Create the Brew
Using green paint or markers, create a swirling “brew” effect on the paper plate. Make sure to leave some areas blank to add in other embellishments later.
Step 3: Add Bubbles
With your optional paint or markers, create large, round shapes to represent bubbles coming from the brew. You can also use craft foam to cut out bubble shapes and glue them around the “brew.”
Step 4: Decorate with Stickers or Foam Shapes
Now that your “brew” is complete, it’s time to add stickers or foam shapes. Placing these around the edges of the plate will add more visual interest to the craft.
Step 5: Attach Googly Eyes
For a fun and silly touch, glue googly eyes on various bubbles or areas of the brew. This will make it appear as if your potion has a personality!
Step 6: Final Touches
If you’d like a magical effect, sprinkle glitter over the painted areas while the paint is still wet. This helps to ensure that the glitter adheres properly. Allow the entire piece to dry completely.
Step 7: Display Your Craft
Once your Paper Plate Witches Brew Craft is dry, find a suitable spot to display it for Halloween decor. It could also make a wonderful festive centerpiece at parties.
TIPS AND TRICKS
- Choosing Materials: When selecting paper plates, consider sturdier options if you plan to add heavy decorations.
- Cutting and Gluing: Cut pieces carefully and assist younger children while they are using scissors.
- Avoiding Common Mistakes: Be mindful not to overload on glue; less is more for quicker drying times and neater results.
- Making the Project Easier: Use pre-cut foam shapes for bubble effects to save time and effort.
- Getting a Better Finish: Be generous with colors and try layering different shades for depth.
- Saving Money: Use recycled materials like old craft supplies to minimize costs.
- Making the Craft Last Longer: If you want this craft to last the season, consider coating it with a layer of clear sealant spray once it’s completely dry. This will protect it from moisture and damage.
- Working Safely: Always supervise young children during crafting, especially when using scissors or small items like googly eyes.
VARIATIONS AND CUSTOMIZATION IDEAS
- Different Colors: Try using purple or orange alongside the green for a more vibrant witches brew.
- Different Sizes: Use larger or smaller plates to create different potion sizes.
- Different Materials: Incorporate glow-in-the-dark paints or stickers for a spooky nighttime effect!
- Seasonal Versions: Adapt this craft for other holidays by using different colors and themed decorations, like hearts for Valentine’s Day or leaves for Thanksgiving.
- Different Patterns: Consider adding a swirling pattern behind the brew to make it more dynamic.
- Personalized Versions: Add names or special messages to your craft to make it a unique handmade gift.
![Paper Plate Witches Brew Craft For Kids [Free PDF Template]](https://cdn.contai.io/public/images/qdKsgAVCWPVwG74mpm2vcykrQTDnR2tkLM5syyQ6.jpg)
Paper Plate Witches Brew Craft FAQ
Q1: Is this craft difficult to make?
No, this craft is very simple and is suitable for both kids and beginners. The instructions are clear and easy to follow, making it a fun project for all ages.
Q2: What materials do I need to get started?
You will need paper plates, paints or markers, glue, and any additional decorations you’d like to use (like googly eyes or stickers).
Q3: How long does this craft take to complete?
It typically takes around 30 to 60 minutes, including drying time, to fully complete this easy DIY project.
Q4: How should I store my witches brew craft?
Once finished and dry, store your craft in a cool, dry place. If you want it to last longer, consider storing it in a plastic bag or container to protect it from dust.
Q5: Can I customize this craft for other holidays?
Absolutely! You can change the color scheme and decoration theme to make this craft suitable for various holidays and celebrations.
CONCLUSION
The Paper Plate Witches Brew Craft is an easy and engaging project that children will love. Using simple materials and quick steps, it offers a budget-friendly way to spark creativity and celebrate the Halloween season. This beginner-friendly craft provides an opportunity for kids to express their artistic flair while creating something delightful for home decor or as seasonal gifts. We encourage you to try this project and share your finished craft or customization ideas! Happy crafting!
PrintPaper Plate Witches Brew Craft
A delightful and easy DIY paper plate craft for kids, perfect for Halloween or fall-themed events that sparks creativity and is budget-friendly.
- Prep Time: 10 minutes
- Cook Time: 0 minutes
- Total Time: 30 minutes
- Yield: 1 craft
- Category: Craft
- Method: DIY
- Cuisine: Seasonal
- Diet: N/A
Ingredients
- Paper Plates
- Green and Black Paint or Markers
- Glue (White Elmer’s Glue or Craft Glue)
- Glitter (optional)
- Stickers or Foam Shapes
- Googly Eyes
- Pipe Cleaners
- Craft Foam (optional)
Instructions
- Prepare the Paper Plate
- Create the Brew
- Add Bubbles
- Decorate with Stickers or Foam Shapes
- Attach Googly Eyes
- Final Touches
- Display Your Craft
Notes
Consider using sturdier paper plates for heavy decorations and supervise young children during crafting.
Nutrition
- Serving Size: 1 craft
- Calories: 0
- Sugar: 0g
- Sodium: 0mg
- Fat: 0g
- Saturated Fat: 0g
- Unsaturated Fat: 0g
- Trans Fat: 0g
- Carbohydrates: 0g
- Fiber: 0g
- Protein: 0g
- Cholesterol: 0mg
Keywords: Halloween craft, kids craft, DIY craft, paper plate craft, fall activity