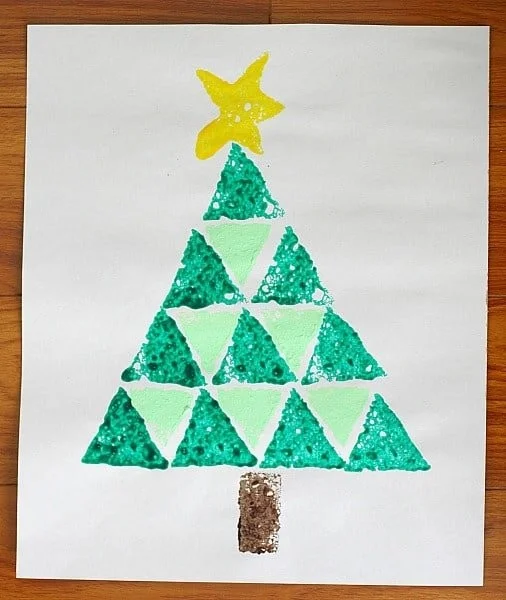
Get ready to bring some festive cheer into your home with an easy DIY project that is both fun and engaging: Shape Christmas Tree Sponge Painting. This creative DIY idea allows you to craft beautiful Christmas trees using sponges, paint, and a bit of imagination. Suitable for kids and adults alike, this easy craft not only serves as a wonderful holiday decoration but also as a fantastic homemade gift option. Let’s dive into the fun world of sponge painting and create some delightful holiday crafts together!
WHY YOU WILL LOVE THIS Shape Christmas Tree Sponge Painting
You will definitely enjoy making Shape Christmas Tree Sponge Painting for many reasons:
- Easy for Beginners: This is a straightforward craft that is perfect for beginners. No advanced skills are needed, making it accessible for anyone.
- Uses Simple Materials: The materials required for this project are commonly found or easy to obtain, so you won’t need to break the bank.
- Budget-Friendly: It’s an affordable way to create beautiful holiday decor, making it ideal for those looking for budget-friendly crafts.
- Quick to Make: The project can be completed in under an hour, making it great for last-minute holiday decorating.
- Great for Home Decor: The finished paintings can be displayed as festive decor in your home.
- Ideal for Gifts: The completed crafts can be personalized and turned into heartfelt handmade gifts for friends and family.
- Easily Customizable: You can adjust colors and shapes to suit your taste, allowing for endless creativity.
This shape Christmas tree sponge painting is an enjoyable and fulfilling activity that brings the spirit of the holidays right into your home.
PROJECT DETAILS
Skill Level
Beginner-friendly. This craft is easy to follow and perfect for all skill levels.
Estimated Time
Approximately 30 minutes to 1 hour for completion, depending on drying time and additional decoration.
Approximate Cost
Around $10 or less, depending on what supplies you already have at home.
Best For
Anyone looking for easy crafts for adults and children, especially during the holiday season.
Project Type
Seasonal crafts and DIY home decor created from simple materials, ideal for personal use or gifting.
TOOLS AND EQUIPMENT NEEDED
Scissors
Scissors are needed to cut the sponges into various shapes for your painting. Ensure they are safe for use by kids if they’re involved.
Paper Plates
You will use paper plates to hold your paint. They are disposable and make cleanup easy.
MATERIALS
White Construction Paper (12 in. x 18 in.)
This will serve as the canvas for your sponge paintings. It’s sturdy enough to hold paint without warping.
Green Paint
Green paint is essential for creating the tree shapes. Feel free to use different shades of green for variety.
Brown Paint
Brown paint will be used for the tree trunk, providing a realistic touch to your holiday trees.
Yellow Paint
Yellow paint is used for the star on top of the tree, adding a cheerful and bright finish.
Sponges
Sponges will be cut into shapes for stamping. You can use regular kitchen sponges or craft sponges depending on availability.
Optional: Circle Punch
This tool can be helpful if you want perfectly uniform ornaments for the tree.
Assortment of Colored Paper
Colored paper adds an extra dimension to your project, allowing you to create lovely ornamentation.
Glue
Glue will be required to attach any additional embellishments after your main painting is dried.
HOW TO MAKE Shape Christmas Tree Sponge Painting
Step 1: Cut Your Sponges into Various Shapes
Start by cutting your sponges into different shapes, including triangles (for the tree), rectangles (for the trunk), circles (for ornaments), and stars (for the tree top). Aim for each shape to be about 1.5 to 2 inches tall. This variety will give your tree a fun and unique look.
Step 2: Prepare Your Paints
Squirt green paint onto one paper plate to act as your tree paint. Next, squirt brown paint onto another plate for the trunk, and yellow paint onto a separate plate for the star. This organization makes it easy to access each type of paint while you work.
Step 3: Set Up Your Workspace
Place the white construction paper vertically on the table. This orientation gives your tree a towering look, perfect for getting into the holiday spirit.
Step 4: Begin Stamping Your Tree
Help your child or yourself choose a shape for the base of the tree from your sponge collection. Start at the bottom of the paper and begin stamping the green shape. Make sure to leave enough space at the bottom for the trunk — about 2 inches.
Step 5: Build the Tree Layer by Layer
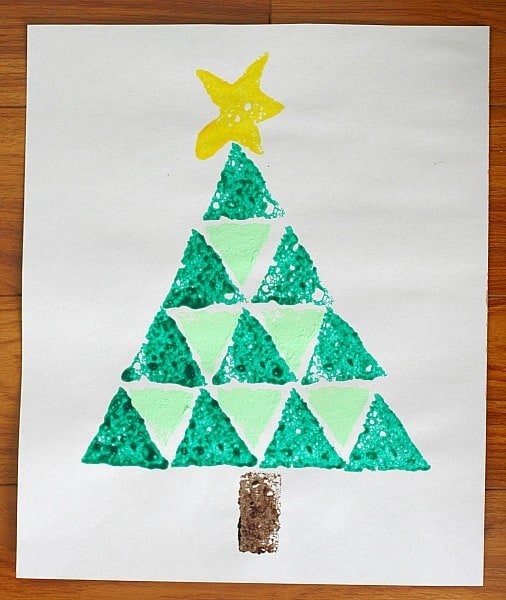
Continue stamping shapes in rows above the previous row. The smaller the shape, the higher up it should go. Finish your tree with a single shape at the top, giving it a nice, finished look.
Step 6: Add the Tree Trunk and Star
Using the rectangular sponge, stamp a brown trunk beneath the bottom layer of your tree. Next, take the star-shaped sponge and stamp it with yellow paint at the top of your tree.
Step 7: Optional Finishing Touches
After your tree has dried, feel free to add additional decorations! You can use a circle punch to add colored circles as ornaments or glue on sequins, tissue paper balls, or pom-poms to embellish your tree further.

TIPS AND TRICKS
- Choose Quality Materials: Using good-quality sponges will help make more defined shapes when stamping.
- Practice on Scrap Paper: Before stamping on your construction paper, practice on scrap paper to get a feel for the sponge and paint.
- Apply the Right Amount of Paint: Don’t overload the sponge with paint; too much can create messy prints.
- Avoid Common Mistakes: Make sure the sponges are not too wet, as this can make the colors bleed into each other.
- Get Creative with Patterns: You can experiment with using multiple sponges together for added textures and patterns on your tree.
- Store Carefully: Keep your sponges stored flat and dry after use to ensure they maintain their shape for future crafts.
- Involve Family: This is a fun project to do together, creating memories while crafting!
VARIATIONS AND CUSTOMIZATION IDEAS
- Different Colors: Experiment with different colors for your Christmas tree beyond standard greens. Try blues, purples, or even metallics for a modern twist.
- Larger Trees: Use bigger pieces of construction paper or canvas to create larger holiday trees.
- Themed Trees: Create themed trees such as a rustic tree with browns, whites, and earthy tones.
- Seasonal Versions: Change the shapes, using hearts for Valentine’s Day or pumpkins for Halloween.
- Personalized Touches: Add names or messages at the bottom of the paper as a personalized greeting card or gift.
- Use Different Materials: Consider using fabric scraps, felt, or other materials for added texture and depth to your trees.
- Additional Patterns: Incorporate shapes like snowflakes, or gift boxes by creating additional stamps from your sponges.
Shape Christmas Tree Sponge Painting FAQ
Q1: How difficult is this project for beginners?
This project is quite easy and perfect for beginners. It requires minimal skills and only basic painting techniques.
Q2: What materials do I need to start this project?
You will need white construction paper, sponges, green, brown, and yellow paints, scissors, and paper plates. Optional materials can enhance the project, but they are not necessary.
Q3: How should I store the finished craft?
Let your artwork dry completely before displaying it. It can be hung or propped against a wall for home decor. If you want to store it, place it flat in a protective sleeve or folder.
Q4: Can I clean the sponges for future use?
Yes, you can wash the sponges with soap and water to remove the paint. Make sure to let them dry completely before storing.
Q5: How long does it take to make this craft?
The total time can vary, but you should expect to spend around 30 minutes to 1 hour, including drying time.
CONCLUSION
Shape Christmas Tree Sponge Painting is an easy, beginner-friendly craft that brings festive joy to your home decor and makes a thoughtful handmade gift. With simple materials and a quick process, anyone can create beautiful holiday art. This budget-friendly DIY project can be customized and adapted to suit your personal style. So gather your supplies, invite some friends or family, and start crafting! Don’t forget to share your experience and finished projects; we’d love to see how you customize your trees!
PrintShape Christmas Tree Sponge Painting
A creative and fun DIY project for crafting beautiful Christmas tree decorations using sponges, paint, and imagination.
- Prep Time: 15 minutes
- Cook Time: 30 minutes
- Total Time: 45 minutes
- Yield: Multiple decorations
- Category: Craft
- Method: DIY
- Cuisine: N/A
- Diet: N/A
Ingredients
- White Construction Paper (12 in. x 18 in.)
- Green Paint
- Brown Paint
- Yellow Paint
- Sponges
- Scissors
- Paper Plates
- Assortment of Colored Paper
- Glue
Instructions
- Cut your sponges into various shapes.
- Prepare your paints on paper plates.
- Set up your workspace with the construction paper.
- Begin stamping your tree from the bottom.
- Build the tree layer by layer.
- Add the tree trunk and star.
- Optional: Add finishing touches after drying.
Notes
This craft is beginner-friendly and requires minimal skills. It’s also great for family bonding and makes for heartfelt gifts.
Nutrition
- Serving Size: 1 craft
- Calories: N/A
- Sugar: N/A
- Sodium: N/A
- Fat: N/A
- Saturated Fat: N/A
- Unsaturated Fat: N/A
- Trans Fat: N/A
- Carbohydrates: N/A
- Fiber: N/A
- Protein: N/A
- Cholesterol: N/A
Keywords: Christmas craft, sponge painting, holiday decoration, DIY decor, kids craft