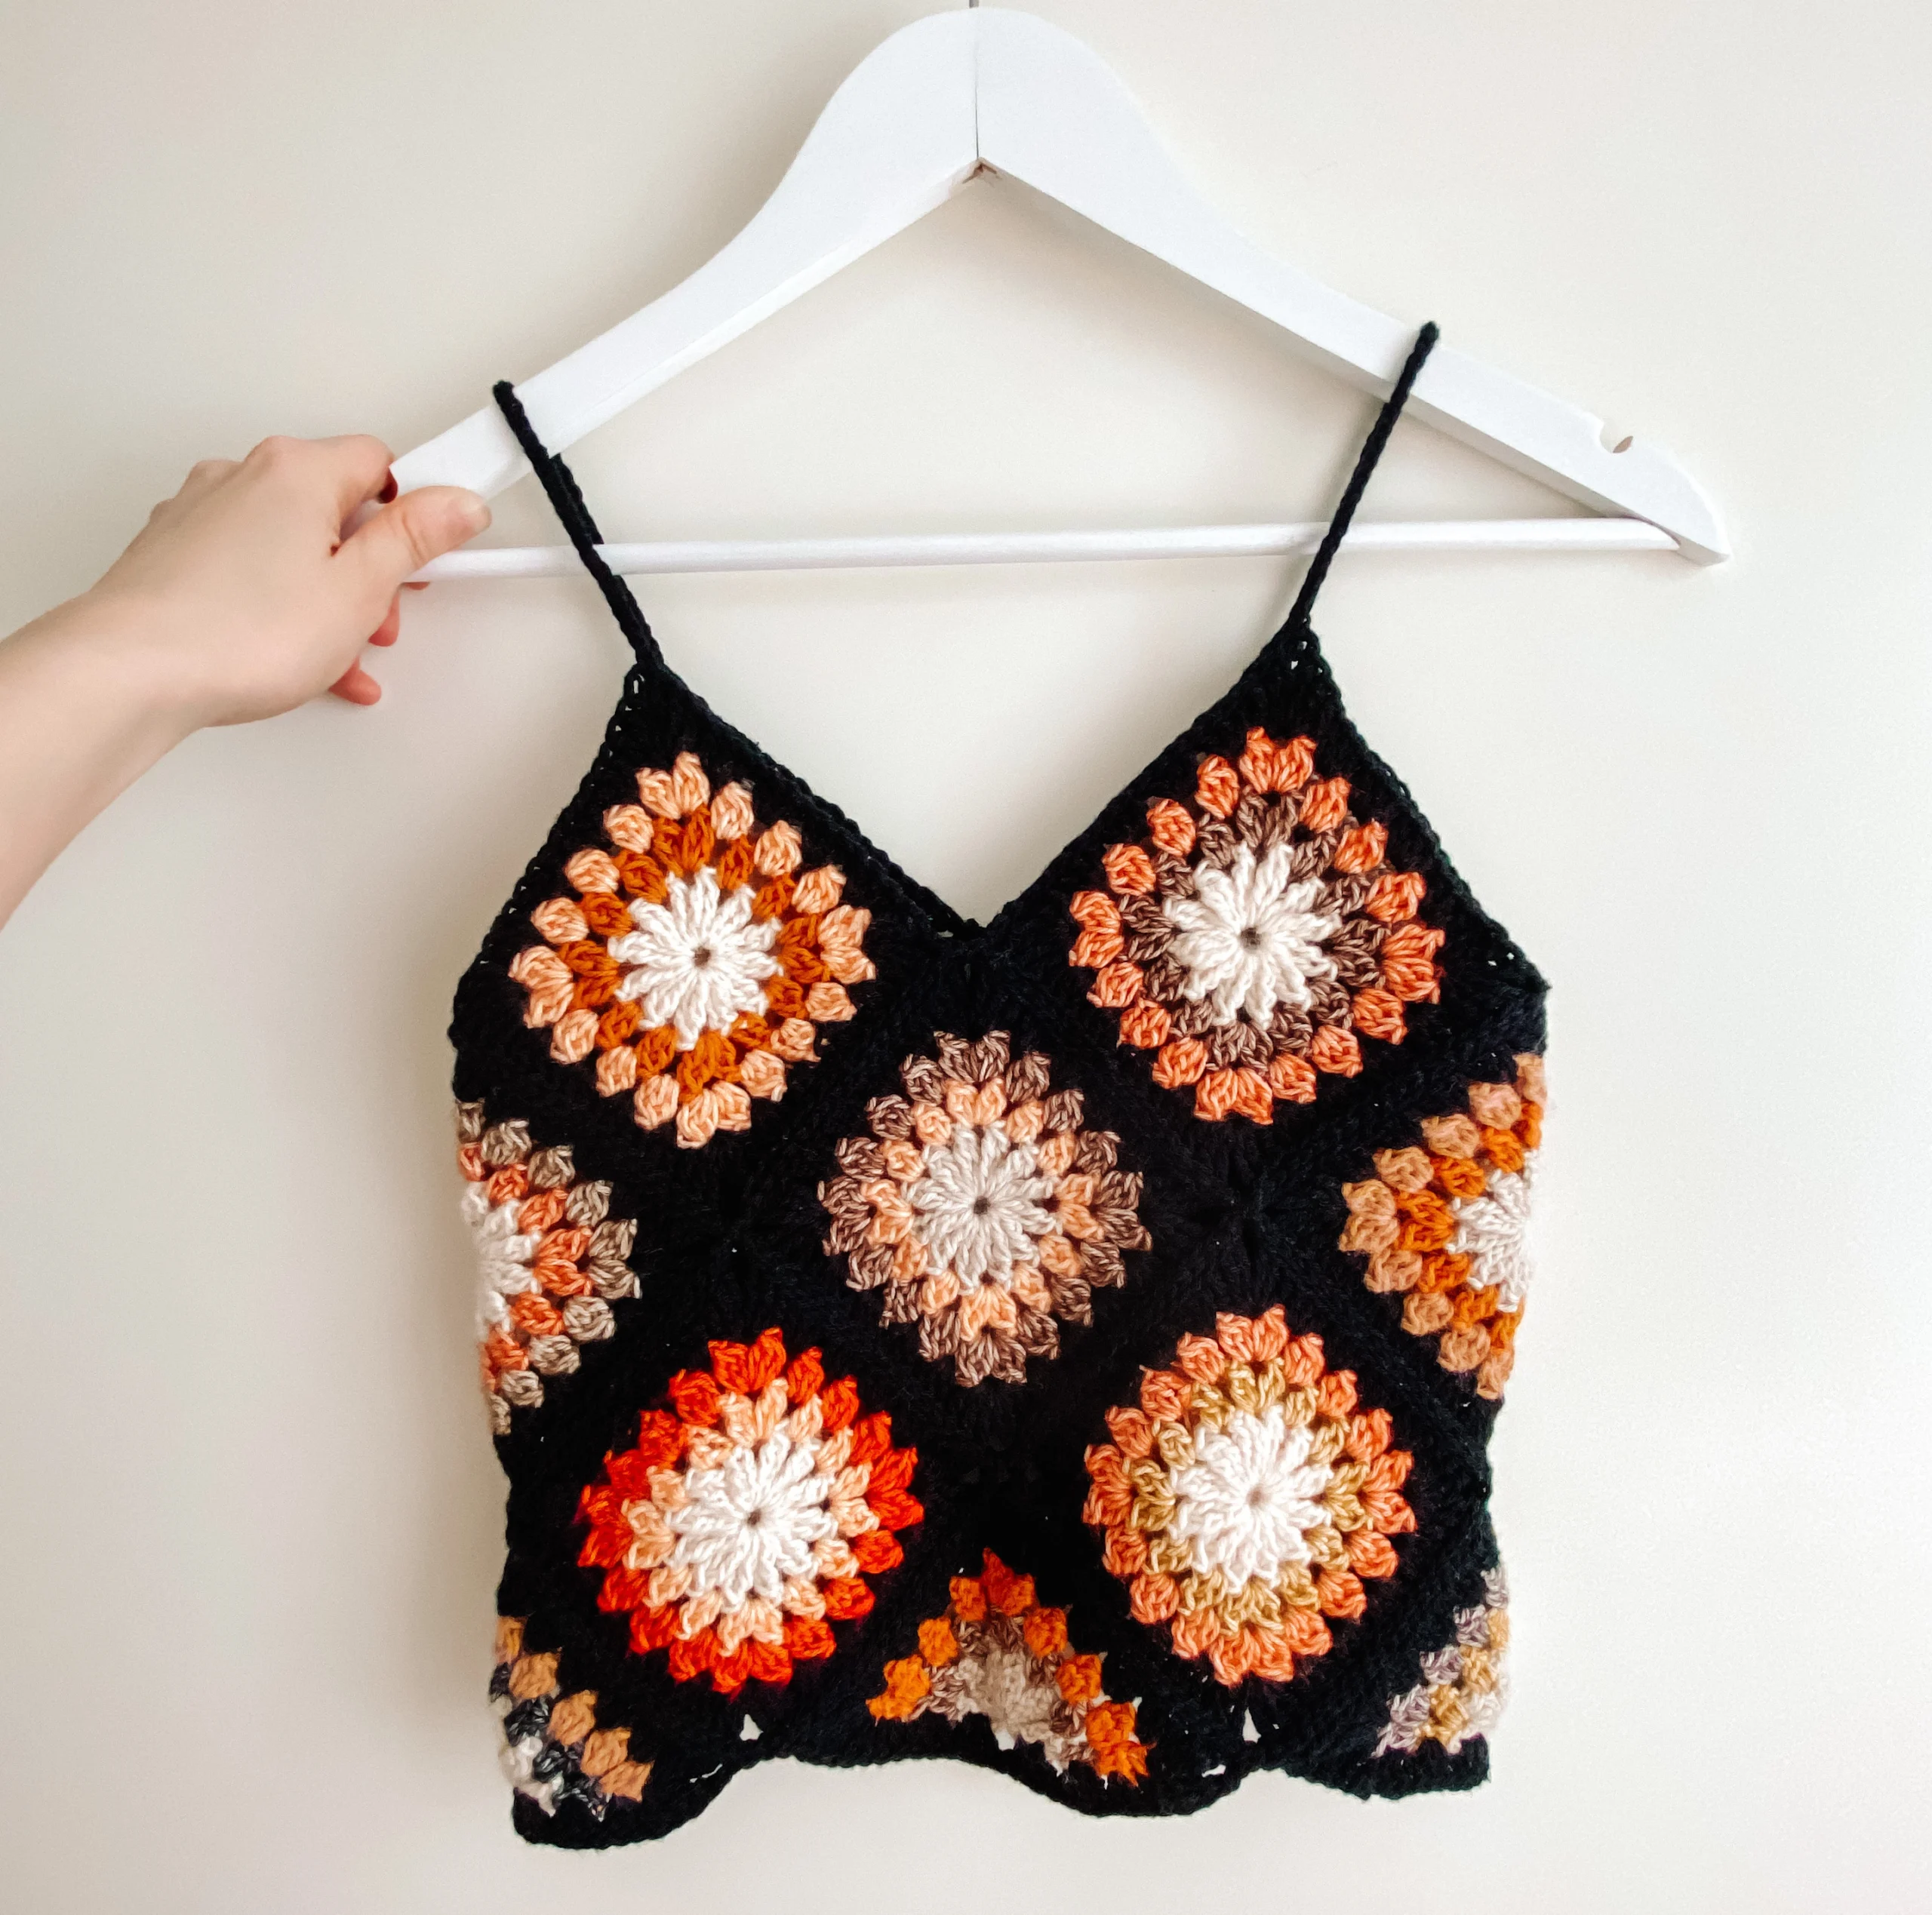
If you love colorful crochet clothing, this free granny square top pattern is a beautiful project to add to your handmade wardrobe. Made from bright flower granny squares and matching granny triangles, this crochet top combines classic granny-square construction with a modern summer style.
The finished top has a fitted, cropped silhouette with simple shoulder straps, a straight neckline, and a decorative open section at the back hem. The individual crochet motifs are worked separately and then joined using the flat slip stitch joining method, giving the garment neat, defined seams.
This free crochet top pattern includes instructions for sizes XS-S and S-M, along with yarn recommendations, measurements, granny square instructions, triangle instructions, assembly guidance, straps, and finishing.
You can also follow the complete granny square top video tutorial while working through the written pattern.
Free Granny Square Top Pattern at a Glance
Skill level: Intermediate
Terminology: US crochet terms
Main technique: Flower granny squares and triangles
Construction: Crochet motifs joined together
Sizes: XS-S and S-M
Suggested hook: 3.0 mm or 3.5 mm
Main yarn weight: Sport/DK
Joining method: Flat slip stitch join
The design is made primarily from colorful flower granny squares. Three granny triangles are incorporated into the lower portion of the top to create its distinctive shape.
Materials and Specifications
Tools
- Crochet hook 3.0 mm* or 3.5 mm
- Tapestry needle
Yarns
- Scheepjes Stone Washed – River Washed yarn pack. I picked 13 different colors (10 g each) so 130 g (4.6 oz) yarn is needed for the colorful parts for both sizes (+ yarn for the black edges (see below)).
- Novita Cotton Feel in color “noki” (099) for the black edges (DK weight yarn). You’ll need 2 x 50 g (2 x 1.76 oz) for the size XS-S.
For the size S-M, you’ll need 2-3 x 50 g (2-3 x 1.76 oz) (2 x 50 g may not be enough). - You can also use other black DK or sport weight yarns such as Lion Brand 24/7 Cotton DK, Paintbox Yarns Cotton DK, Drops Safran*.
- Instead of Scheepjes yarn pack you can also purchase Scheepjes Stone Washed yarn balls* or Scheepjes River Washed yarn balls* separately.

Terminology
This granny square crochet top pattern uses US crochet terminology.
Finished Size
The finished crochet top in size XS-S measures approximately:
71 cm (28″) around the waist when not stretched.
The finished crochet top in size S-M measures approximately:
80 cm (31.5″) around the waist when not stretched.
Granny Square Size
The side length of a smaller square measures:
11.5 cm (4.5″)
The diagonal measures:
15 cm (5.9″)
Video Tutorial
Follow the complete Granny square top tutorial on YouTube alongside the written instructions.
How the Granny Square Crochet Top Is Constructed
The granny square top is made of colorful squares and triangles.
Figure 2 shows three tables. The table on the left shows the yarn color names and codes and which alphabets represent each colors. The tables on the right show the color order in the squares and in the triangles.
The first letter represents the color of the inner circle or half circle and the second letter the color of the next round and so on. The numbers 1-15 in front of the color orders represent the numbers of each square/triangle. This number information is needed so that each square and triangle are in the correct place when joining them together. The correct order is presented in the end of the pattern (Figure 16).
Figure 2. Yarn colors and corresponding alphabets and color order in the squares and triangles.
The numbering is particularly important during assembly because the individual flower granny squares are arranged according to their assigned positions rather than simply joined randomly.
The free crochet top pattern was not tested with other crocheters so be aware that there might be mistakes. Please, feel free to contact me anytime if you face any problems with the granny square top pattern. 🙂
Flower Granny Square Crochet Pattern
The main section of this crochet top is created from colorful flower granny squares outlined in black.
Changing colors between rounds creates the floral appearance, while the final black round defines the shape of each motif before assembly.
Figure 3. The square crochet pattern.
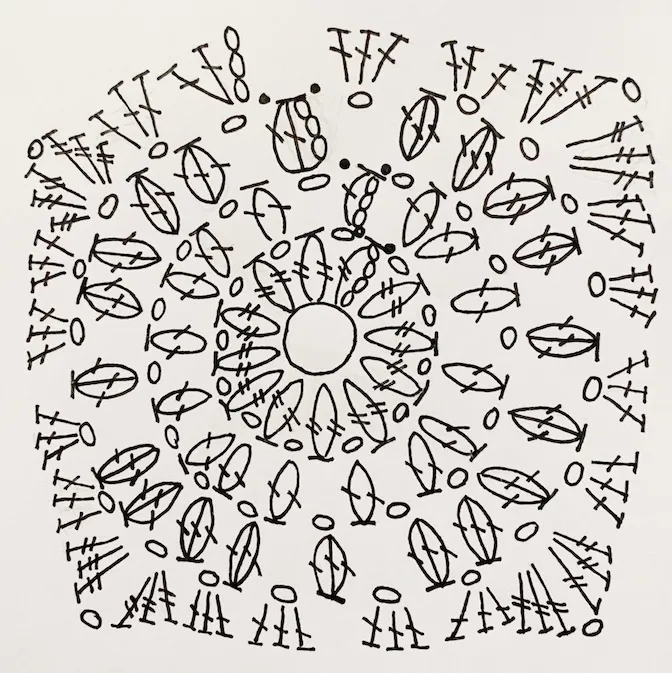
Figure 4. The symbol chart for the granny square and triangle.
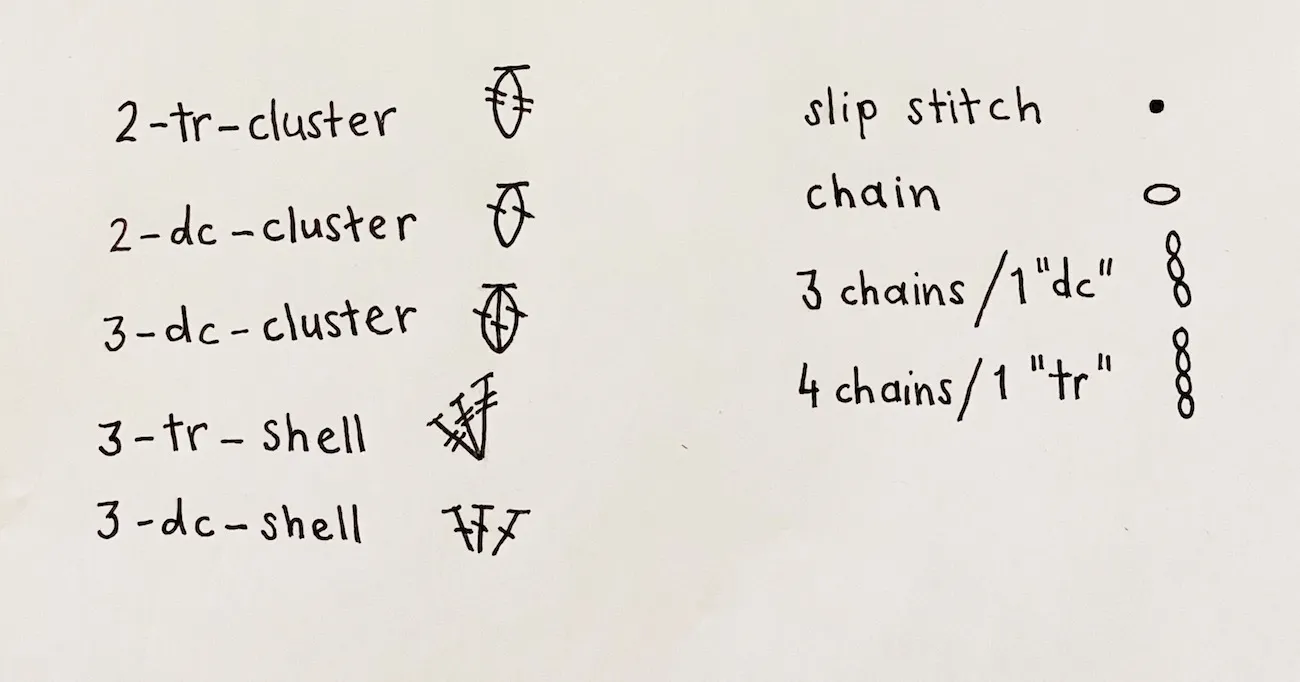
Start the flower granny square doing a magic loop with the first color (XYZN). XYZN represents the color order of the square so that X represents the yarn color of the first round, Y represents the second round’s color and so on. N represents black yarn that finishes the square. The bolded letter in XYZN indicates the yarn color that is used in the following round.
Granny Square Round 1
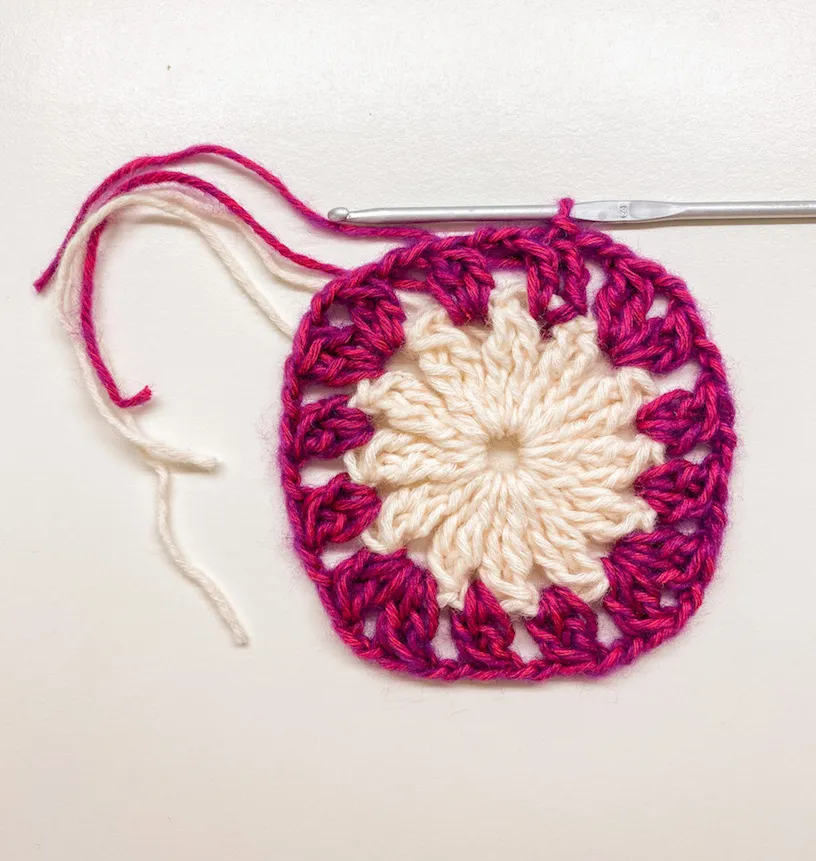
Round 1: Chain 4 into the loop (this counts as the 1st treble (tr) crochet stitch). Insert a treble crochet and pull the yarn through both loops on your hook. Close the cluster with a chain stitch and chain one (1). Crochet a 2-tr-cluster: insert a tr into the loop but do not pull the yarn through the last two loops on your hook. Instead, insert the second tr and pull the yarn through until you have three (3) loops on your hook. Pull the yarn through all of them and close the cluster with a chain. Chain 1. Repeat * 10 more times. Pull the tail end of the yarn and close the round with a slip stitch (sl st) to the top of the first cluster. You now have 12 clusters in a magic loop.
Important Pattern Note About Round 2
The source text provided for this article jumps from Round 1 directly to Round 3. The original Round 2 instructions were not included in the supplied material, so they have not been invented or altered here.
Insert the original Granny Square Round 2 instructions and corresponding figure here before continuing with Round 3.
Figure 6. The round 2 of the granny square.
Granny Square Round 3
Change the color (XYZN).
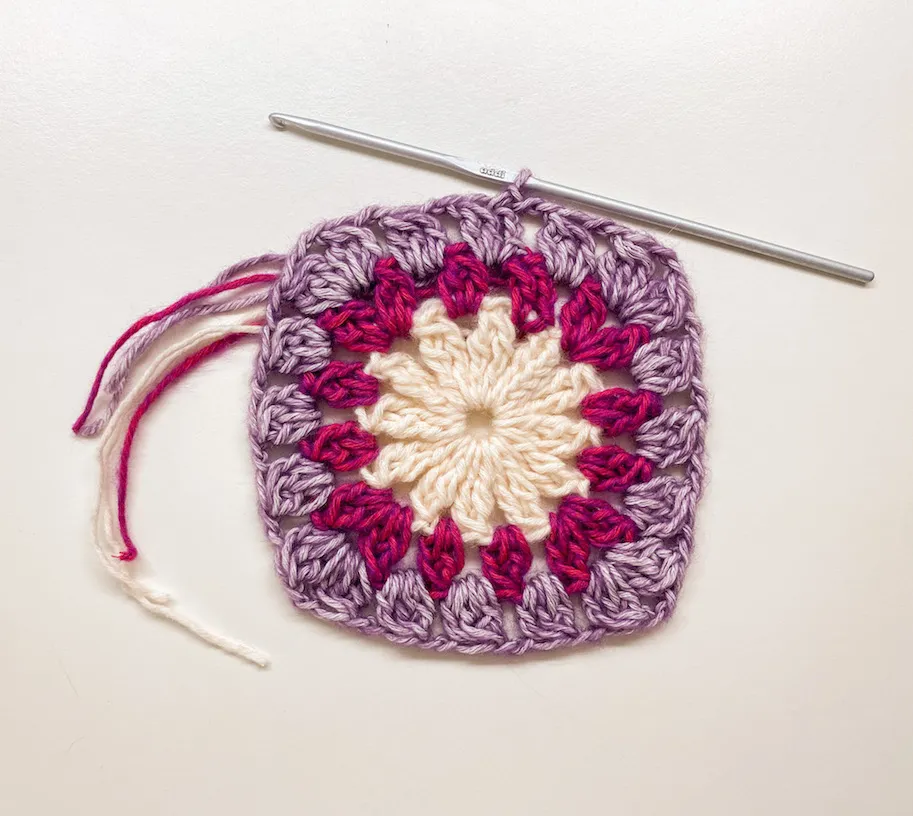
Round 3. Crochet a slip stitch to the chain between the first and the second dc-cluster. Chain 3 (this counts as the first dc). Insert a dc but do not pull the yarn through the last two loops. Instead, insert the third dc and pull the yarn through until you have three (3) loops on your hook. Pull the yarn through all of them and close the cluster with a chain. Chain 1. Crochet a 3-dc-cluster: insert a dc to the chain between the second and the third dc-cluster but do not pull the yarn through both loops on your hook. Instead, insert the second dc and pull the yarn through until you have three (3) loops on your hook. Insert the third dc and pull the yarn through until you have four (4) loops on your hook. Pull the yarn through all of them and close the cluster with a chain. Chain 1. Now, insert two 3-dc-clusters to the chain between the two 2-dc clusters (close the first 3-dc-cluster with a chain and chain 1. Insert the second 3-dc-cluster and close it with a chain and chain 1.) Insert one 3-dc-cluster to the next chain between 2-dc-clusters as described earlier. Insert another 3-dc-cluster to the next chain. Repeat * 3 more times (except in the last repetition time, do not follow the last sentence of *). Close the round with a sl st to the top of the first cluster.
Figure 7. The round 3 of the granny square.
Granny Square Round 4
Change the color to black (XYZN).
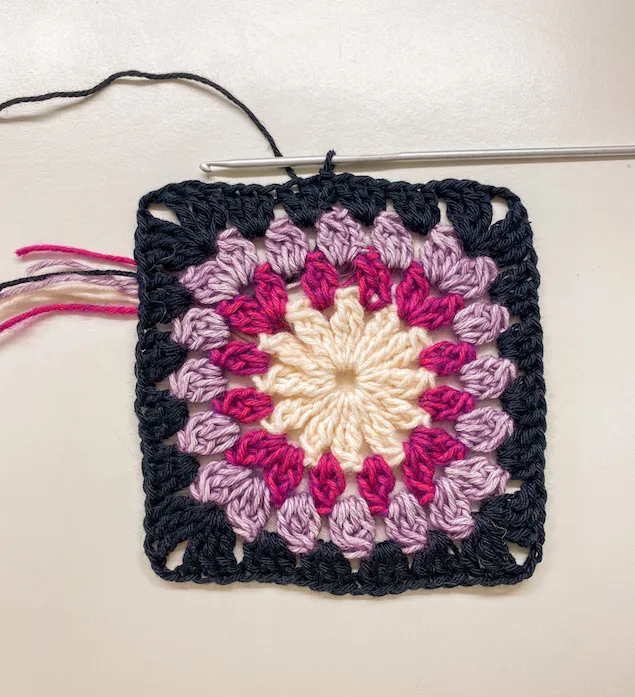
Round 4. Crochet a slip stitch to the chain between the first and the second 3-dc-cluster. Insert the first 3-dc-shell: chain 3 (this counts as the first dc) and insert two dcs to that same chain between the first and the second 3-dc-cluster. Move on forward to the chain between the second and the third 3-dc-cluster and insert a 3-dc-shell (no chaining between the shells). Now after a total of two 3-dc-shells, insert two 3-tr-shells to the chain between the two 3-dc-clusters and chain 1 between these 3-tr-shells. Insert a total of four (4) 3-dc-shells to each chain between 3-dc-clusters of the round 3. Repeat * 3 more times. Insert two 3-tr-shells the the last corner as described earlier and then insert 3-dc-shells to each chain before the end of the round. Close the round with a sl st to the top of the chained dc.
Figure 8. The round 4 of the granny square.
Size XS-S
For size XS/S the flower granny square is now finished.
Size S-M
For larger size (S/M) follow the round 5:
Use the same color again (XYZNN).
FOR SIZE S/M: Round 5. Repeat the round 4 so that you insert 3-dc-shells to every space between previous round’s 3-dc-shells and two 3-tr-shells to the chain between previous round’s 3-tr-shells.
Flower Granny Triangle Crochet Pattern
The top uses three flower granny triangles. These motifs help form the shaped lower edge of the garment.
Figure 10. The triangle crochet pattern.
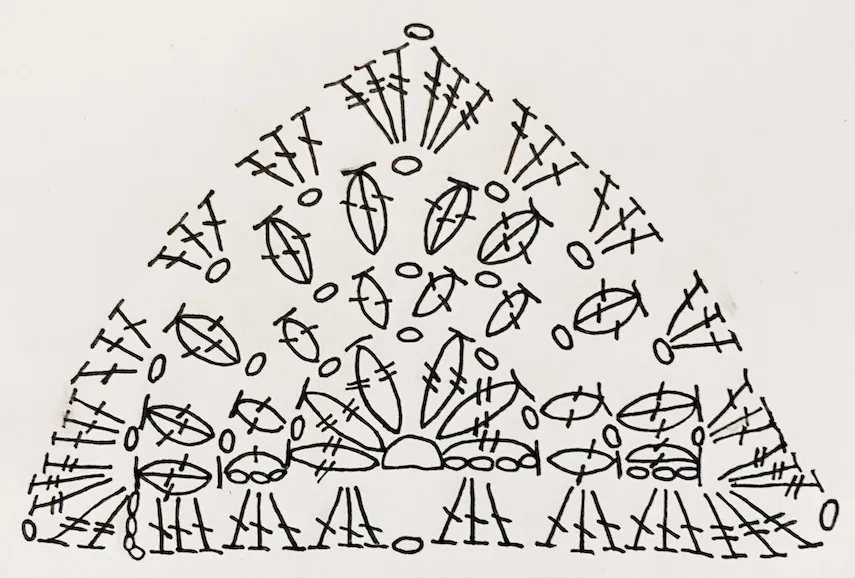
Crochet three (3) flower granny triangles. You can find the color order for the triangles in the Figure 2. Start the triangle doing a magic loop with the first color (XYZN).
Triangle Round 1
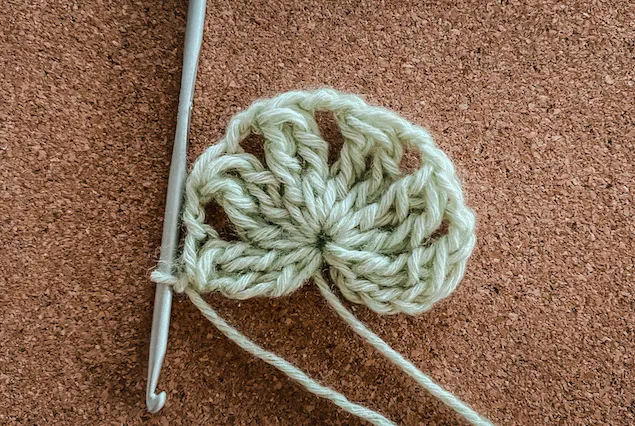
Triangle round 1: Chain 4 into the loop (this counts as the 1st treble (tr) crochet stitch). Insert a treble crochet and pull the yarn through both loops on your hook. Close the cluster with a chain stitch and chain one (1). Crochet a 2-tr-cluster: insert a tr into the loop but do not pull the yarn through the last two loops on your hook. Instead, insert the second tr and pull the yarn through until you have three (3) loops on your hook. Pull the yarn through all of them and close the cluster with a chain. Chain 1. Repeat * 4 more times. Pull the tail end of the yarn so that the clusters form a half circle. You now have 6 clusters in a magic loop.
Figure 11. The round 1 of the triangle.
Triangle Round 2
Change the color (XYZN).
Triangle round 2. Chain 3 (this counts as the 1st double (dc) crochet stitch) and turn the work around. Insert a dc to the top of previous round’s 2-tr-cluster right next to the 3 chains and pull the yarn through both loops on your hook. Close the cluster with a chain stitch and chain one (1). Crochet a 2-dc-cluster: insert a dc to the chain between the first and the second 2-tr-cluster but do not pull the yarn through both loops on your hook. Instead, insert the second dc and pull the yarn through until you have three (3) loops on your hook. Pull the yarn through all of them and close the cluster with a chain. Chain 1. Repeat * one more time. Now, insert two 2-dc-clusters to the chain between the third and the fourth 2-tr-cluster (close the first 2-dc-cluster with a chain and chain 1. After the second 2-dc-cluster, close it with a chain and chain 1). Then repeat * 3 more times but do the last 2-dc-cluster to the top of previous round’s 2-tr-cluster.
Figure 12. The round 2 of the triangle.
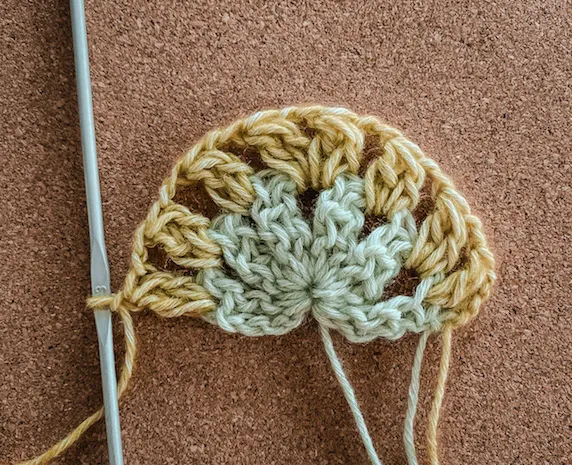
Triangle Round 3
Change the color (XYZN).
Triangle round 3. Chain 3 (this counts as the 1st double (dc) crochet stitch) and turn the work around. Insert a dc to the top of previous round’s 2-dc-cluster right next to the 3 chains but do not pull the yarn through the last two loops. Instead, insert the third dc to the same loop as the second dc and pull the yarn through until you have three (3) loops on your hook. Pull the yarn through all of them and close the cluster with a chain. Chain 1. Crochet a 3-dc-cluster: insert a dc to the chain between the first and the second 2-dc-cluster but do not pull the yarn through both loops on your hook. Instead, insert the second dc and pull the yarn through until you have three (3) loops on your hook. Insert the third dc and pull the yarn through until you have four (4) loops on your hook. Pull the yarn through all of them and close the cluster with a chain. Chain 1. Repeat * two more times. Now, insert two 3-dc-clusters to the chain between the two 2-dc clusters (close the first 3-dc-cluster with a chain and chain 1. Insert the second 3-dc-cluster and close it with a chain and chain 1.) Then repeat * 4 more times but do the last 3-dc-cluster to the top of previous round’s 2-dc-cluster.
Figure 13. The round 3 of the triangle.
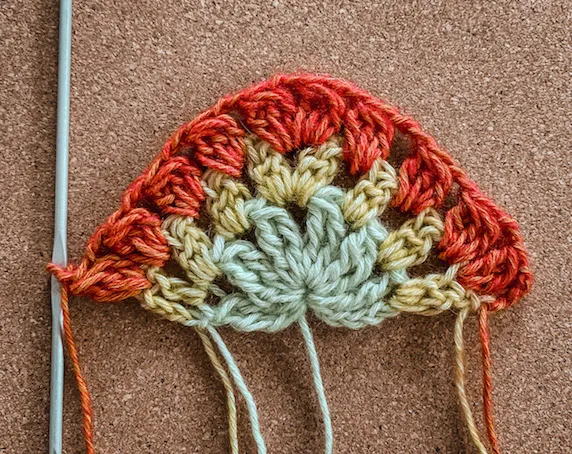
Triangle Round 4
Change the color to black (XYZN).
Triangle round 4. Chain 4 and this time, do not turn the work around. From now on, you will work around the triangle. The 4 chains belong to the last cluster of this round. Base side: Now, you will work the base side (the longest side) of the triangle. Insert three (3) dc stitches to the last dc of the triangle round 3. These three dcs form a 3-dc-shell. Move on forward to the next space (the 3 chains of the triangle round 2) and insert a 3-dc-shell (no chaining between). Move on to the last tr of the triangle round 1 and insert a 3-dc-shell. Now after a total of three 3-dc-shells, chain 1 and insert another three 3-dc-shells to the corresponding spaces as the first three 3-dc-shells. Next comes the right corner: insert two 3-tr-shells to the top of the first 3-dc-cluster of the previous round (round 3) and chain 1 between the 3-tr-shells. Next comes the right side: insert a total of four (4) 3-dc-shells to each chain between 3-dc-clusters of triangle round 3. Next comes the top corner: insert two 3-tr-shells (chain 1 between the 3-tr-shells) to the chain between two 3-dc-clusters of the triangle round 3. Next comes the left side: insert a total of four (4) 3-dc-shells to each chain between 3-dc-clusters of triangle round 3. Next comes the left corner: insert two 3-tr-shells to the top of the last 3-dc-cluster of the previous round (round 3) and chain 1 between the 3-tr-shells, NOTE: in the second 3-tr-cluster, do not insert the third tr because you have already chained one tr in the beginning of this round. Close the round with a sl st to the top of this chained tr.
Figure 14. The round 4 of the triangle.
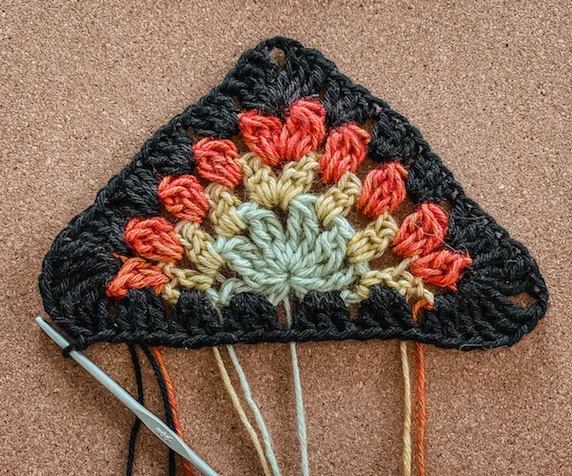
Size XS-S
For size XS/S the flower granny triangle is now finished.
Size S-M
For larger size (S/M) follow the round 5:
Use the same color again (XYZNN).
FOR SIZE S/M: Triangle round 5. Repeat the round 4 so that you insert 3-dc-shells to every space between previous round’s 3-dc-shells and that you insert two 3-tr-shells to the chain between previous round’s 3-tr-shells.
Joining Granny Squares and Triangles
Once you have finished crocheting all of the flower granny squares and three triangles, you can begin constructing the top.
Next step is to join squares and triangles together. I used the flat slip stitch joining method and I used the black yarn for joining. Check a great photo tutorial or a video tutorial for the flat slip stitch joining method.
The black joining yarn coordinates with the final black round of each motif and helps clearly define the colorful squares.
Figure 16. Assembly and layout of the granny squares and triangles from front and back of the top.
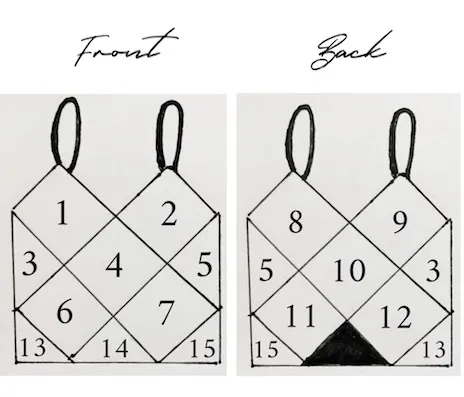
The Figure 16 below shows how to assemble the squares and triangles. Note that there are only three triangles, the back hem of the top will be left “open” as you can see in the Figure 16.
Join the granny squares and triangles so that you crochet two sides together from bottom to top and then the next two parallel sides together and so on. Then join those sides together that are perpendicularly to the first sides.
Start joining the granny squares and triangles together first from the chains of 3-tr-shells and then move on to the loops. Crochet flat slip stitches until you reach the 3-tr-shell chains again and crochet one flat slip stitch to those chains too. Then move on straight to the next squares without chaining between. When you have joined all squares parallelry, start joining the other sides. When you reach the perpendicular flat slip stitch seam, chain 1 and cross over it. Start joining the next squares together first from the chains of 3-tr-shells and then move on to the loops.
Crochet the Shoulder Straps
After all the motifs have been assembled, the basic body of the granny square top is complete.
The next step is to add the simple crochet shoulder straps.
After you have joined all the granny squares and triangles together the next step is to crochet the shoulder straps. Start from the top corner of the square from the back side of the top and chain 40 (you can also test what length is best for you). Join the strap with a slip stitch to the corresponding top corner of the square from the front side and cut the yarn. Do the same thing to the other shoulder strap but this time do not cut the yarn.
Because torso and shoulder measurements vary, you can try on the top before permanently finishing the straps and adjust the chain length if needed.
Finalizing the Granny Square Top Edges
The last stage is to finish the neckline, shoulder straps, back neckline, and hem.
Now, finalize the edges and the straps by crocheting slip stitches first along the front neckline, then along the first strap you chained, then along the back neckline and finally along the second strap. Cut the yarn and close the round with an additional slip stitch. Finalize them hem edge with slip stitches. Weave in the ends.
Once all loose yarn tails have been woven in, your handmade granny square top is finished.
Choosing Yarn for a Granny Square Top
The original version uses a combination of Scheepjes Stone Washed and River Washed yarns for the colorful flower motifs, with black yarn used for the final rounds, joining seams, straps, and edging.
Using many different shades creates the colorful patchwork appearance shown in the original design.
If you want to customize your crochet top, you could also create:
- a pastel granny square top
- a neutral cream and brown version
- a rainbow crochet top
- a two-color granny square top
- a black-and-white version
- a bright retro-inspired summer top
Try to keep the substituted yarns reasonably similar in thickness so your finished squares remain consistent in size.
How Many Granny Squares Do You Need for This Crochet Top?
The pattern uses numbered squares and triangles, with the motif placement determined by the layout shown in Figure 16.
The pattern’s color-order system numbers the squares and triangles so each individual motif can be placed in the correct position during assembly.
For this reason, it is useful to label your completed motifs or keep them arranged in numerical order while crocheting.
This can make final assembly significantly easier.
Can You Make the Granny Square Top Larger?
The written pattern provides instructions for XS-S and S-M.
The main difference between the two included sizes is that the S-M motifs receive an additional black border round.
For the squares:
FOR SIZE S/M: Round 5. Repeat Round 4.
For the triangles:
FOR SIZE S/M: Triangle Round 5. Repeat Round 4.
The finished waist measurements given in the pattern are approximately 71 cm (28″) for XS-S and 80 cm (31.5″) for S-M, measured without stretching.
If you want to modify the pattern beyond those sizes, carefully check motif measurements and garment circumference before joining the pieces.
Frequently Asked Questions
Is this granny square top pattern free?
Yes. The full written free granny square top crochet pattern is provided above, along with a video tutorial.
What crochet terminology does this pattern use?
The pattern uses US crochet terminology.
What crochet hook should I use?
The recommended crochet hook is 3.0 mm or 3.5 mm, depending on your tension and yarn.
What yarn weight works for this crochet top?
The colorful motifs use Scheepjes Stone Washed/River Washed yarn, while a DK-weight black yarn is used for the borders and finishing.
Sport-weight alternatives may also work depending on the yarn and your gauge.
How large are the granny squares?
For the smaller size, each finished granny square has a side length of approximately 11.5 cm (4.5″) and a diagonal measurement of approximately 15 cm (5.9″).
What joining method is used?
The pattern uses the flat slip stitch joining method with black yarn.
This creates a visible but neat joining seam that complements the black border around each colorful motif.
Does the top use granny triangles?
Yes. You will crochet three flower granny triangles.
The back hem remains partly open as shown in the final assembly diagram.
Is there a video tutorial?
Yes. You can follow the Granny square top tutorial while working through the written instructions.
Finished Granny Square Crochet Top
There you have a beautiful crochet summer top!
This colorful granny square top pattern is a fun way to combine flower motifs, color changes, granny-style clusters, garment construction, and simple crochet joining techniques in one project.
The combination of multicolored flower squares, triangular motifs, black borders, and slim shoulder straps creates a handmade crochet top that works especially well for spring and summer outfits.
Once you understand the basic flower square and triangle construction, much of the project becomes repetitive, making it easy to work on individual motifs whenever you have time.
Please feel free to ask or give comments and corrections about this free crochet top pattern.
This crochet pattern and images are property of swoolnordicdesign.com