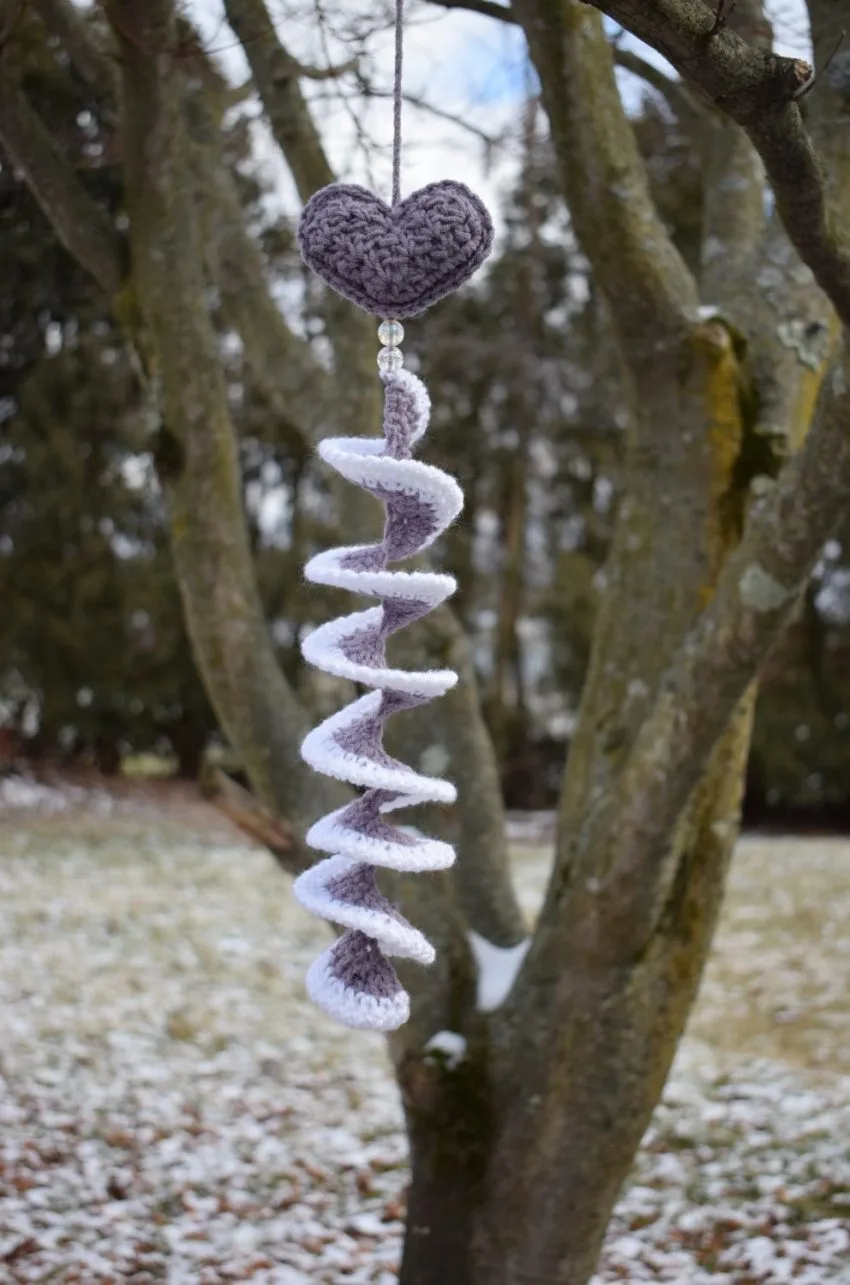
Looking for a beautiful crochet heart wind spinner pattern to decorate your home? This free crochet pattern combines a soft, puffy heart with a colorful spiral wind spinner to create a charming handmade hanging decoration.
Whether you’re decorating for Valentine’s Day, making a thoughtful handmade gift, or adding a little love to your home throughout the year, this crochet heart wind spinner is a lovely project to try.
The pattern uses basic crochet stitches, making it suitable for crocheters with some beginner experience. The main challenge is assembling the different pieces, but don’t worry! This step-by-step tutorial walks you through crocheting the heart, creating the spiral, attaching the beads, and assembling your finished decoration.
Even better, this project requires approximately 75 yards of worsted weight yarn, making it an excellent way to use leftover yarn from your collection.
Crochet Heart Wind Spinner
Project at a glance
| Detail | Information |
|---|---|
| Skill level | Easy |
| Crochet terminology | US terms |
| Yarn weight | #4 worsted |
| Crochet hook | 4.5 mm (G) |
| Total yarn | Approximately 75 yards |
| Finished length | About 16 inches, excluding hanging strand |
| Construction | Puffy heart and spiral, joined together |
Why You’ll Love This Crochet Heart Wind Spinner
This handmade heart wind spinner is a versatile crochet decoration that can be customized for different seasons, occasions, and color schemes.
The design features a textured, stuffed heart at the top, two decorative beads connecting it to the spiral, and a beautifully curled spinner that hangs underneath.
Here are a few reasons to give this pattern a try:
-
Perfect for Valentine’s Day: Use red, pink, and white yarn to create a romantic handmade decoration.
-
Great for using scrap yarn: The entire project requires only two small amounts of worsted weight yarn.
-
Beautiful handmade gift: Make one for someone special as a thoughtful birthday, anniversary, or Valentine’s Day present.
-
Customizable colors: Experiment with different color combinations to complement your home decor.
-
Skill-building project: Practice extended single crochet, reverse single crochet, shaping, stuffing, and assembling separate crochet pieces.
The finished wind spinner is approximately 16 inches long before adding its hanging strand.
Materials Needed
Before starting your crochet heart wind spinner, gather the following materials.
Yarn
You’ll need #4 worsted weight yarn in two colors.
-
Color A (main color): Approximately 40 yards
-
Color B (accent color): Approximately 35 yards
Recommended yarn options include Lion Brand Vanna’s Choice and Red Heart Super Saver.
A thicker, stiffer worsted weight yarn may work especially well for this project because it helps the spiral maintain its shape.
If you have leftover worsted weight yarn from previous projects, this is a wonderful opportunity to use it.
Crochet Tools and Additional Supplies
-
US size G (4.5 mm) crochet hook
-
Yarn needle
-
Scissors
-
12 mm decorative beads
-
Poly-fil or other suitable fiberfill stuffing
-
Glue
The beads add decorative detail and connect the heart to the spiral. You can also add an optional bead to the bottom of the spinner.
Crochet Stitches and Abbreviations
This pattern uses US crochet terminology.
| Abbreviation | Meaning |
|---|---|
| ch | Chain |
| st(s) | Stitch(es) |
| sl st | Slip stitch |
| sc | Single crochet |
| esc | Extended single crochet |
| dc | Double crochet |
| yo | Yarn over |
Special Crochet Stitches
Reverse single crochet (reverse sc)
Also called the crab stitch, reverse single crochet is worked from left to right rather than the usual right-to-left direction.
Essentially, you’ll work backward across the row while making single crochet stitches.
This technique creates a decorative edging along the spiral.
Extended single crochet (esc)
To work an extended single crochet:
-
Insert your hook into the indicated stitch.
-
Yarn over and pull through.
-
Yarn over and pull through one loop.
-
Yarn over again and pull through the remaining two loops.
The extra step creates a slightly taller stitch than a regular single crochet.
Important Pattern Notes
Read through these notes before beginning your project.
-
The pattern is worked in two main sections. First, you’ll create the puffy heart by making two separate pieces, shaping them, and joining them together. Then you’ll crochet the spiral wind spinner.
-
Beginning chains do not count as stitches.
-
Parentheses indicate a group of stitches that must all be worked into the same stitch or space.
-
A thicker or stiffer worsted weight yarn may work best when substituting yarn.
-
If some Poly-fil shows through the puffy heart, weave an additional strand of yarn in and out of any visible gaps to help conceal the stuffing.
Helpful tip: Leave the beginning 7-inch yarn tails on both heart pieces. You’ll need them later to attach the decorative beads and connect the heart to the spiral.
Free Crochet Heart Wind Spinner Pattern: Step-by-Step Instructions
Follow the instructions below to create your crochet heart wind spinner. You’ll begin with the stuffed heart, continue with the spiral, and finish by assembling the decoration and adding its hanging strand.
Part 1: Crochet the Puffy Heart
The puffy heart is made from two identical crochet pieces.
Once both pieces are complete, you’ll join them together and fill the heart with stuffing to give it a soft, three-dimensional appearance.
Step 1: Crochet the First Heart
Using color A, leave a 7-inch beginning yarn tail and chain 8.
Row 1: (Sc, ch 1, sc) in the second chain from the hook, *skip 1, (sc, ch 1, sc) in the next chain; repeat from * across, turn.
Stitch count: 8 sc, 4 ch-1 spaces.
Rows 2–3: Ch 1, (sc, ch 1, sc) in each ch-1 space across, turn.
Stitch count: 8 sc, 4 ch-1 spaces.
Row 4: Ch 1, (sc, ch 1, sc) in the first ch-1 space, (sc, ch 1, sc) in the next ch-1 space, turn, leaving the rest of the row unworked.
Stitch count: 4 sc, 2 ch-1 spaces.
Rows 5–6: Ch 1, (sc, ch 1, sc) in each ch-1 space across, turn.
Stitch count: 4 sc, 2 ch-1 spaces.
At this stage, you should begin to see the heart shape. Rotate your work slightly so that the beginning chain tail sits at the center bottom point of the heart.

Step 2: Add the Heart Border
Border Round: Ch 1, sc evenly around the heart, placing (sc, ch 1, sc) at the bottom point and a sl st in the top center. Join with a sl st.
Fasten off.
Important: Do not weave in the beginning 7-inch tail yet.
You’ll use this tail when attaching the beads during assembly.
Step 3: Crochet the Second Heart
Repeat the puffy heart instructions to create a second identical heart.
Follow Rows 1–6 and complete the border round exactly as you did for the first piece.
This time, do not fasten off after completing the border round.
Keep your working yarn attached so you can use it to join the two pieces together.
Part 2: Join and Stuff the Hearts
Now that both heart pieces are complete, it’s time to assemble your puffy crochet heart.
Place the second heart directly on top of the first heart, making sure the shapes and edges are aligned.
Pick up your working yarn and follow these instructions:
-
Chain 1.
-
Work single crochet stitches evenly through both layers around the heart.
-
Place 3 sc at the bottom point.
-
Work a sl st in the top center.
-
Leave several stitches unworked so you have an opening for the stuffing.
-
Add Poly-fil through the opening to stuff the heart.
-
Continue working sc stitches through both layers across the remaining unworked stitches to close the heart.
-
Join with a slip stitch.
Fasten off.
Do not weave in the beginning 7-inch tails. Keep both tails available for attaching the beads later.
Your puffy crochet heart is now complete!
Crochet tip: If you notice any stuffing showing through the stitches, weave an extra strand of matching yarn in and out of the visible spaces. This will give your puffy heart a neater appearance.
Part 3: Crochet the Spiral Wind Spinner
Now it’s time to make the spiral that hangs underneath your puffy heart.
The spiral is worked in four rows. The increasing number of stitches in each row creates the signature curling effect of the wind spinner.
You’ll begin with color A, change to color B after Row 2, and finish with a decorative reverse single crochet edging.
Step 1: Make the Foundation Chain
Using color A, chain 41.
Step 2: Crochet the Spiral
Row 1: Work 2 sc in the second chain from the hook, then work 2 sc in each chain across. Turn.
Stitch count: 80 stitches.
Row 2: Ch 2, work 2 dc in the first stitch, dc in the next stitch, *2 dc in the next stitch, dc in the next stitch; repeat from * across. Turn.
Stitch count: 120 stitches.
Join color B and fasten off color A.
Row 3: With color B, work 2 esc in the first stitch, esc in the next stitch, *2 esc in the next stitch, esc in the next stitch; repeat from * across.
Do not turn.
Stitch count: 180 stitches.
Row 4: Working from left to right, ch 1, reverse sc in each stitch across to the last stitch, turn, and work a sl st in the last stitch.
Fasten off.
Your crochet spiral is now complete!
Step 3: Add an Optional Bottom Bead
If you would like to add a decorative bead to the bottom of your crochet wind spinner, use the remaining yarn tail from color B.
-
Thread the yarn tail through a yarn needle.
-
Add a decorative bead.
-
Tie several knots at the bottom of the bead to hold it securely in place.
-
Trim the excess yarn.
-
Secure the knots with a small amount of glue.
This optional finishing detail adds a decorative touch to the bottom of the spiral.
Part 4: Attach the Puffy Heart to the Wind Spinner
With both main sections complete, you’re ready to join them.
You’ll use the two 7-inch yarn tails that you left attached to the puffy heart during the first stage of the pattern.
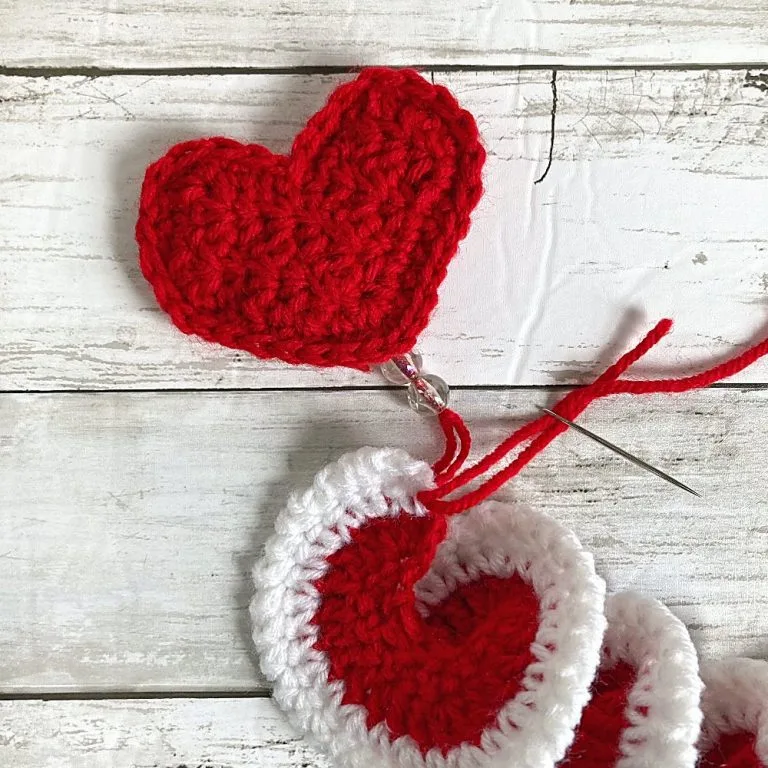
Step 1: Add the Top Beads
-
Gather the two beginning 7-inch tails from the puffy heart.
-
Tie a knot at the base of the strands, positioning the knot as close to the heart as possible.
-
Thread the strands through a yarn needle.
-
Add 2 decorative beads.
Step 2: Connect the Heart and Spiral
Using the same yarn strands, securely attach the heart to the short edge of the spiral at Row 3.
Make sure the connection is secure so the spiral hangs properly beneath the heart.
Weave in any remaining yarn ends.
Your crochet heart and spiral should now be connected, with the two decorative beads positioned between them.
Part 5: Make the Hanging Strand
The final construction step is to create the hanging strand.
This allows you to display your finished crochet heart wind spinner as a hanging decoration.
Using color A, follow these instructions:
-
Cut a 16-inch strand of yarn.
-
Thread the yarn through your yarn needle.
-
Attach the strand to the top center of the puffy heart.
-
Bring the two ends of the strand together so they are even.
-
Tie a knot to create a hanging strand approximately 5–6 inches long.
-
Position the knot against the puffy heart fabric.
-
Weave the yarn ends into the heart.
Final Step: Twist the Spiral
To finish your project, twist the wind spinner so that the spiral is twisted evenly in one direction.
Adjust the spiral until the curls look consistent along its length.
Your crochet heart wind spinner is now complete!
Tips for Making Your Crochet Heart Wind Spinner
Here are a few helpful tips for achieving a beautiful finished decoration.
1. Choose a Yarn That Holds Its Shape
Although this crochet pattern works with #4 worsted weight yarn, a thicker, stiffer yarn may produce a more structured spiral.
Lion Brand Vanna’s Choice and Red Heart Super Saver are two suggested options.
2. Pay Attention to Your Stitch Counts
The spiral relies on stitch increases to create its curling shape.
Before continuing to the next row, check that your stitch counts match the pattern.
| Row | Stitch count |
|---|---|
| Row 1 | 80 |
| Row 2 | 120 |
| Row 3 | 180 |
These increases help create the spiral effect.
3. Don’t Forget the Heart’s Beginning Tails
Leaving the two 7-inch tails attached is important because you’ll need them to connect the heart, beads, and spiral.
Avoid cutting or weaving them in prematurely.
4. Adjust Your Spiral Before Hanging
After completing the entire decoration, take a moment to twist the spiral evenly in one direction.
This simple finishing step helps give your crochet wind spinner its intended appearance.
If you plan to display the spinner outdoors, choose a sheltered location and bring it indoors during wet or windy weather.
Final Thoughts
This free crochet heart wind spinner pattern is a lovely way to transform a small amount of yarn into a handmade hanging decoration.
With its soft, textured heart, decorative beads, and colorful crochet spiral, it makes an attractive project for Valentine’s Day, seasonal decorating, or handmade gifting.
Once you’ve mastered the construction, experiment with different yarn color combinations to create wind spinners for different occasions.
Pattern and images credits : simplyhookedbyjanet.com