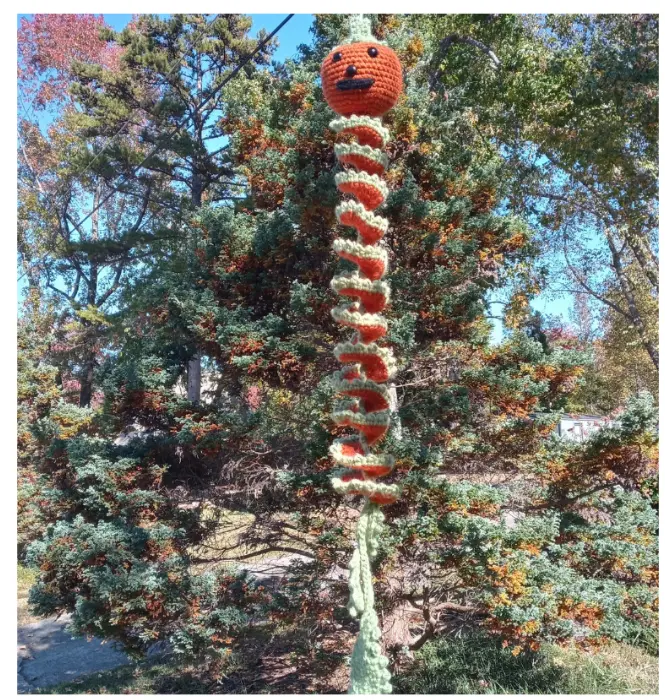
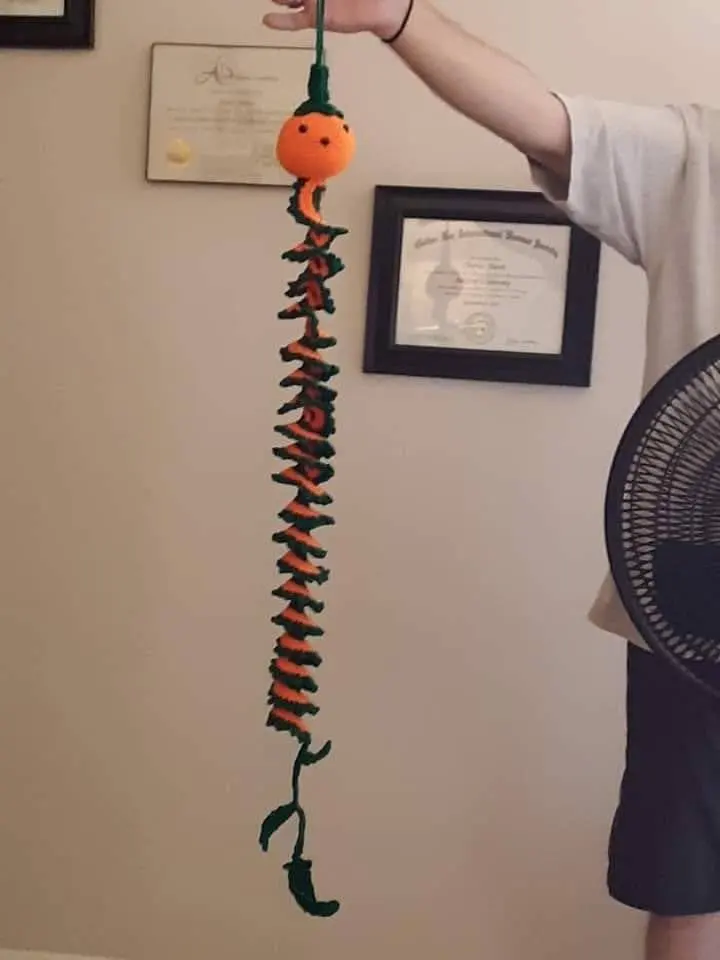
Looking for a fun and festive free pumpkin wind spinner crochet pattern to decorate your home this fall? This Gourd-geous Pumpkin Wind Spinner is a charming crochet project featuring a colorful spiral, an adorable pumpkin topper, a curly vine, and decorative crochet leaves.
Perfect for autumn decorating, Halloween, and Thanksgiving, this handmade crochet wind spinner adds a beautiful seasonal touch to your porch, garden, front door, or indoor fall decorations.
The best part? You can customize this pattern to suit your style. Choose one, two, or three colors, adjust the length of your wind spinner, and even give your pumpkin an adorable face!
This project is suitable for advanced beginners who are comfortable with basic crochet stitches and ready to try a few decorative techniques.
In this tutorial, you’ll find the materials, crochet abbreviations, special stitches, and step-by-step instructions needed to create your own pumpkin wind spinner.
Pumpkin Wind Spinner Crochet Pattern Overview
| Pattern details | Information |
|---|---|
| Skill level | Advanced beginner |
| Finished length | Approximately 36 inches |
| Yarn weight | Worsted weight #4 |
| Estimated yarn | Approximately 200 yards |
| Crochet hook | US size 4 mm |
| Main techniques | Single crochet, double crochet, treble crochet, spike double crochet, increases and decreases |
| Construction | Spiral wind spinner, amigurumi pumpkin, stem, vine and decorative leaves |
| Customizable | Length, colors and optional pumpkin face |
Pattern credit: Owensvillachick Designs. The original designer retains copyright to the pattern and photographs. The original permission allows the sale of finished handmade items in small quantities, with design credit appreciated.
Why You’ll Love This Pumpkin Wind Spinner
This crochet pumpkin wind spinner combines several decorative elements into one eye-catching fall project.
The spiral body creates a beautiful twisted effect, while the miniature pumpkin adds an adorable seasonal detail. The crochet leaves and dangling vine complete the autumn-inspired design.
Here are some reasons to try this project:
-
Customizable length: Make a shorter wind spinner for smaller spaces or a longer decoration for your porch.
-
Flexible color combinations: Use classic orange and green, or experiment with cream, mustard yellow, rust, and other autumn colors.
-
Optional pumpkin face: Create a traditional pumpkin or add eyes, a nose, and an embroidered smile for Halloween.
-
Decorative finishing touches: The crochet vine and three leaves make the finished decoration stand out.
You can also make several wind spinners in different color combinations to create a coordinated collection of handmade fall decorations.
Materials Needed for the Pumpkin Wind Spinner
Before starting your free crochet pumpkin wind spinner, gather the following supplies.
Recommended yarn
Use any worsted weight #4 yarn.
The original pattern uses:
-
Yarn: I Love This Yarn
-
Yarn weight: Worsted #4
-
Estimated quantity: Approximately 200 yards
For a traditional pumpkin wind spinner, use orange for the spiral and pumpkin body and green for the edging, stem, vine, and leaves.
You can also choose a single color or create a three-color design.
Crochet hooks and other supplies
-
US size 4 mm crochet hook
-
Scissors
-
Yarn needle
-
Stitch marker (recommended)
-
Fiberfill for stuffing the pumpkin
-
Optional safety eyes and safety nose
-
Optional embroidery thread for the pumpkin’s mouth
-
Optional wooden ring or shower curtain ring for hanging
Important: Keep your starting yarn tails long enough if you plan to use them for attaching the pumpkin or creating the hanging loop. Safety eyes and noses are not recommended for items accessible to children under three because they can present a choking hazard.
Finished Size
The completed pumpkin wind spinner measures approximately 36 inches long.
However, you can customize its length by increasing or decreasing the number of chains in your foundation row.
Your finished measurements may vary depending on your yarn choice, crochet tension, and starting chain length.
Crochet Abbreviations (US Terminology)
This pattern uses US crochet terms.
| Abbreviation | Meaning |
|---|---|
| St(s) | Stitch(es) |
| ch | Chain |
| sc | Single crochet |
| hdc | Half double crochet |
| dc | Double crochet |
| tr | Treble crochet |
| fsc | Foundation single crochet |
| inc | Increase |
| inv dec | Invisible decrease |
| MC | Magic circle |
| sl st | Slip stitch |
| blo | Back loop only |
| beg | Beginning |
| sp | Space |
| sdc | Spike double crochet |
| yo | Yarn over |
| Rd | Round |
Important Pattern Notes
Read through these instructions before beginning your pumpkin wind spinner.
-
The wind spinner is worked in rows, starting at the same end and working in the same direction for each row.
-
Change colors at the beginning of each row if desired.
-
The pumpkin is worked in continuous rounds.
-
The stem is worked in rows and rounds.
-
The leaves are worked in a continuous spiral.
-
Chain 1 does not count as a stitch.
-
Chain 3 counts as a stitch.
Helpful tip: Place a stitch marker at the beginning of your wind spinner row. This helps you identify the starting end and distinguish the top from the bottom as you work.
Crochet Gauge
Gauge is not necessary for this project.
Your finished wind spinner may vary slightly in size depending on your crochet tension, but this will not negatively affect the final result.
Special Crochet Stitches
Before following the pattern instructions, familiarize yourself with these three special stitches.
1. Picot Stitch
-
Chain 3.
-
Slip stitch into the first chain.
This creates a small decorative point that adds texture to the leaves.
2. Mini Picot Stitch
-
Chain 2.
-
Slip stitch into the first chain.
The mini picot is used to create the delicate edging along your wind spinner and small leaves.
3. Spike Double Crochet (sdc)
The spike double crochet adds texture to the decorative leaves around the pumpkin stem.
To work this stitch:
-
Yarn over.
-
Insert your hook from front to back around the first double crochet of the previous three-double-crochet block.
-
Yarn over and draw a loop through.
-
Pull the loop upward enough to avoid crushing the three-double-crochet block.
-
Yarn over and draw through two loops.
-
Yarn over and draw through the remaining two loops.
The original designer includes a photo tutorial demonstrating this special stitch in the paid PDF version of the pattern.
Free Pumpkin Wind Spinner Crochet Pattern: Step-by-Step Instructions
This crochet pattern is divided into six main sections: the spiral wind spinner, pumpkin body, pumpkin stem and stem leaves, curly vine, decorative bottom leaves, and hanging loop.
Complete each section in order and assemble your pieces to create your finished autumn decoration.
Part 1: Crochet the Spiral Wind Spinner
The first step is making the long spiral that forms the body of your pumpkin wind spinner.
This part of the pattern is worked in rows. Remember that every row begins at the same end of the project.
Use a stitch marker to identify the beginning of each row.
Create the foundation chain
Using your chosen yarn, chain 76 and turn.
Alternatively, work 75 foundation single crochet stitches and skip Row 1.
Work the spiral rows
Row 1:
Using green yarn, work 1 single crochet into the second chain from your hook.
Continue working 1 single crochet into each remaining chain across.
Fasten off.
Stitch count: 75 sc.
Row 2:
Starting at the same end where Row 1 began, attach your orange yarn with a slip stitch.
Chain 3, work 1 double crochet into the first stitch, then work 2 double crochet stitches into each stitch across.
Fasten off.
Stitch count: 150 dc.
Row 3:
Starting at the same end where Row 2 began, attach orange yarn with a slip stitch.
Chain 3, work 2 double crochet stitches into the first stitch, then work 3 double crochet stitches into each stitch across.
Fasten off.
Stitch count: 450 dc.
Row 4:
Starting at the same end where Row 3 began, attach green yarn with a slip stitch.
Chain 1 and work 1 single crochet into the same stitch.
Repeat the following sequence across the row:
-
Work 1 mini picot.
-
Single crochet into the next 2 stitches.
Continue repeating this sequence until you reach the end of the row.
Fasten off.
Original pattern stitch count: 225 mini picots and 450 sc.
Weave in your yarn tails, leaving any tails needed for assembly or hanging.
Your crochet spiral wind spinner body is now complete!
Pattern clarification: The row instructions and stated stitch totals above follow the supplied original pattern. The turning chain in Rows 2 and 3 may cause ambiguity when counting the first stitch and increases. The Row 4 stitch total also depends on how the initial single crochet is counted. Follow the original wording while checking your stitch placement, and consult the original designer if you need clarification.
Part 2: Crochet the Amigurumi Pumpkin
Next, create the small pumpkin that sits at the top of your wind spinner.
The pumpkin is worked in continuous rounds, meaning you won’t join with a slip stitch at the end of each round.
Use a stitch marker to keep track of the beginning of each round.
Create the pumpkin body
Using orange yarn, begin with a magic circle.
Round 1: Work 6 sc into the magic ring. (6)
Round 2: Work 2 sc into each stitch around. (12)
Round 3: Repeat 1 sc, increase in next stitch 6 times. (18)
Round 4: Repeat Sc in next 2 stitches, increase in next stitch 6 times. (24)
Round 5: Repeat Sc in next 3 stitches, increase in next stitch 6 times. (30)
Round 6: Repeat Sc in next 4 stitches, increase in next stitch 6 times. (36)
Round 7: Repeat Sc in next 5 stitches, increase in next stitch 6 times. (42)
Rounds 8–15: Work 1 sc into each stitch around. (42)
Your pumpkin should now have a rounded body.
Add the optional pumpkin face
If you want your pumpkin to have an adorable Halloween-inspired face, add the facial details before closing the pumpkin.
-
Eyes: Insert safety eyes between Rounds 14 and 15, approximately 8 stitches apart.
-
Nose: Insert the safety nose between Rounds 11 and 12.
-
Mouth: Using embroidery thread, stitch a mouth below the eyes and nose in your preferred shape.
You can also leave the pumpkin without a face for a more traditional autumn decoration.
Shape and close the pumpkin
Now decrease your stitches to create the top of your pumpkin.
Round 16: Repeat Sc in next 5 stitches, invisible decrease 6 times. (36)
Round 17: Repeat Sc in next 4 stitches, invisible decrease 6 times. (30)
Round 18: Repeat Sc in next 3 stitches, invisible decrease 6 times. (24)
Round 19: Repeat Sc in next 2 stitches, invisible decrease 6 times. (18)
Begin stuffing your pumpkin with fiberfill. Continue adding stuffing as you complete the remaining rounds.
Round 20: Repeat 1 sc, invisible decrease 6 times. (12)
Round 21: Work 6 invisible decreases. (6)
Fasten off and close the top of your pumpkin.
Weave in any remaining ends.
Attach the pumpkin to the wind spinner
Using your yarn needle and the long tail from the top of your wind spinner, attach your pumpkin to the spiral.
-
Position your pumpkin at the top of your wind spinner.
-
Insert your needle through both the top rows of the wind spinner and the pumpkin.
-
Bring the needle back and forth between the two pieces.
-
Continue sewing until the pumpkin is securely attached.
Make sure your stitches are secure so that the pumpkin remains firmly attached when the wind spinner is hanging.
Part 3: Crochet the Pumpkin Stem
The pumpkin stem is worked first in rows and then in rounds to create the decorative leaves surrounding the stem.
You will use green yarn for this section.
Create the pumpkin stem
Row 1: Chain 7. Work 1 sc in the back loop only of the second chain from your hook and in each remaining chain. Turn. (6)
Row 2: Chain 1. Work 1 sc in the back loop only of each stitch across. Turn. (6)
Rows 3–7: Repeat Row 2. (6)
Once you have completed all seven rows, follow these instructions:
-
Chain 1.
-
Bring Rows 1 and 7 together.
-
Join them by working a slip stitch through the corresponding stitches of both rows across.
-
Turn the stem right side out so the slip stitch seam is hidden inside.
If you want to use your starting yarn tail to create a hanging loop, pull it through to the top of the stem.
You will now begin crocheting in rounds along the edges of your previous rows.
Crochet the stem leaves
These decorative leaves surround the base of the stem.
Round 1: Chain 1 and work 8 sc evenly around the opening. Join. (8)
Round 2: Chain 1 and work 2 sc into each stitch around. Join. (16)
Round 3: Chain 3 (counts as a double crochet).
Repeat the following sequence around:
-
Work 1 dc into the next stitch.
-
Work 1 picot.
-
Work 1 dc into the next stitch.
-
Work 1 spike double crochet.
-
Skip 1 stitch.
-
Work 1 dc into the next stitch.
Join with a slip stitch to the top of the beginning chain 3.
Original pattern stitch count: 12 dc and 4 sdc.
Fasten off, leaving a long yarn tail for sewing.
The original designer provides an additional photograph of this round in the paid pattern PDF.
Attach the stem to the pumpkin
Once your stem and leaves are complete, position them on top of your crochet pumpkin.
-
Thread your long yarn tail through your yarn needle.
-
Insert the needle through both the leaf section and the pumpkin.
-
Bring the needle back up through the leaf section.
-
Continue sewing around the base to secure the stem firmly to the pumpkin.
If desired, pull your yarn tail back up through the stem to use for hanging.
Part 4: Crochet the Curly Pumpkin Vine
The dangling vine is attached to the bottom of your wind spinner. It provides an additional decorative detail and serves as the attachment point for your crochet leaves.
Make the vine tail
Using green yarn, join your yarn to the bottom of your wind spinner with a slip stitch.
Follow these steps:
-
Chain 25 and turn.
-
Work 1 slip stitch into the second chain from your hook.
-
Continue working 1 slip stitch into each remaining chain across.
-
Join the vine to the bottom of the wind spinner with another slip stitch.
-
Fasten off and weave in your ends.
Your vine is now ready for its decorative crochet leaves.
Part 5: Crochet the Decorative Pumpkin Leaves
For the bottom of the wind spinner, you’ll crochet three leaves: two small leaves and one large leaf.
The leaves are worked in continuous spirals and use decorative picot stitches to create their textured edges.
Small Crochet Pumpkin Leaf (Make 2)
Make the small leaves
Using green yarn, chain 9.
Follow the stitch sequence below, working in spirals.
First side of the foundation chain
Starting in the second chain from your hook, work:
-
1 slip stitch.
-
1 single crochet.
-
1 half double crochet.
-
2 double crochets.
-
1 half double crochet.
-
1 single crochet.
-
1 slip stitch.
Chain 2.
Second side of the foundation chain
Working along the opposite side of your foundation chain, place the following stitches:
-
1 slip stitch.
-
1 single crochet.
-
1 half double crochet.
-
2 double crochets.
-
1 half double crochet.
-
1 single crochet.
-
1 slip stitch.
Chain 2 and work 1 slip stitch into the beginning of the first spiral.
Create the decorative edging
Continue with the following stitches:
-
Work 1 sc.
-
Work 1 mini picot.
-
Repeat (1 slip stitch into each of the next 2 stitches, 1 mini picot) 3 times.
-
Into the chain-2 space at the leaf’s point, work the following sequence:
-
1 slip stitch.
-
Chain 3.
-
Slip stitch into the second chain from your hook.
-
Chain 1.
-
1 slip stitch.
-
-
Repeat (1 mini picot, 1 slip stitch into each of the next 2 stitches) 4 times.
-
Work 1 slip stitch into the chain-2 space.
Fasten off, leaving a long enough yarn tail to attach your leaf to the vine.
Repeat these instructions to create your second small leaf.
Large Crochet Pumpkin Leaf (Make 1)
Make the large leaf
The large leaf follows a similar construction method but uses taller stitches to create a fuller shape.
Using green yarn, chain 15.
First side of the foundation chain
Starting in the second chain from your hook, work the following stitch sequence:
-
1 single crochet.
-
1 half double crochet.
-
3 double crochets.
-
4 treble crochets.
-
3 double crochets.
-
1 half double crochet.
-
1 single crochet.
Chain 3.
Second side of the foundation chain
Working along the opposite side of your foundation chain, follow this stitch sequence:
-
1 single crochet.
-
1 half double crochet.
-
3 double crochets.
-
4 treble crochets.
-
3 double crochets.
-
1 half double crochet.
Chain 3.
Create the decorative edging
Continue working in a spiral to create the decorative leaf edging.
-
Work 1 sc into the first sc at the beginning of your spiral.
-
Work 1 sc into the next hdc.
-
Work 1 picot.
-
Repeat (1 sc into each of the next 2 stitches, 1 picot) 6 times.
-
Into the chain-3 space at the point of the leaf, work the following:
-
1 single crochet.
-
Chain 4.
-
Slip stitch into the third chain from your hook.
-
Chain 1.
-
1 single crochet.
-
-
Repeat (1 picot, 1 sc into each of the next 2 stitches) 7 times.
-
Slip stitch into the chain-3 space.
Fasten off and leave a sufficiently long tail for attaching the large leaf to your vine.
Pattern note: The supplied large-leaf instructions contain a repeated comma after the final half double crochet on the second side, but do not specify an additional stitch there. The sequence above retains all stated stitches without inventing a missing stitch.
Attach the crochet leaves
Once your two small leaves and one large leaf are finished, attach them to your crochet vine.
Position them along the vine according to your preference.
Use the long yarn tails and your yarn needle to sew each leaf securely into place.
Once all three leaves are attached, weave in the remaining yarn ends.
Part 6: Add the Hanging Loop
Create the hanging loop
Your pumpkin wind spinner is almost complete!
You can use the beginning yarn tails that you saved earlier or attach a new length of yarn to create your hanging loop.
To finish your project:
-
Use your beginning yarn tails, or attach a 12-inch length of yarn to the top of the wind spinner.
-
Tie the yarn ends together to create a hanging loop.
-
Alternatively, use a slip stitch join to attach your hanging loop to a wooden ring or shower curtain ring.
Secure your ends and check that all parts of your finished wind spinner are firmly attached.
Congratulations! Your Gourd-geous Pumpkin Wind Spinner is complete.

Photos and pattern credits : ovcdesigns.com