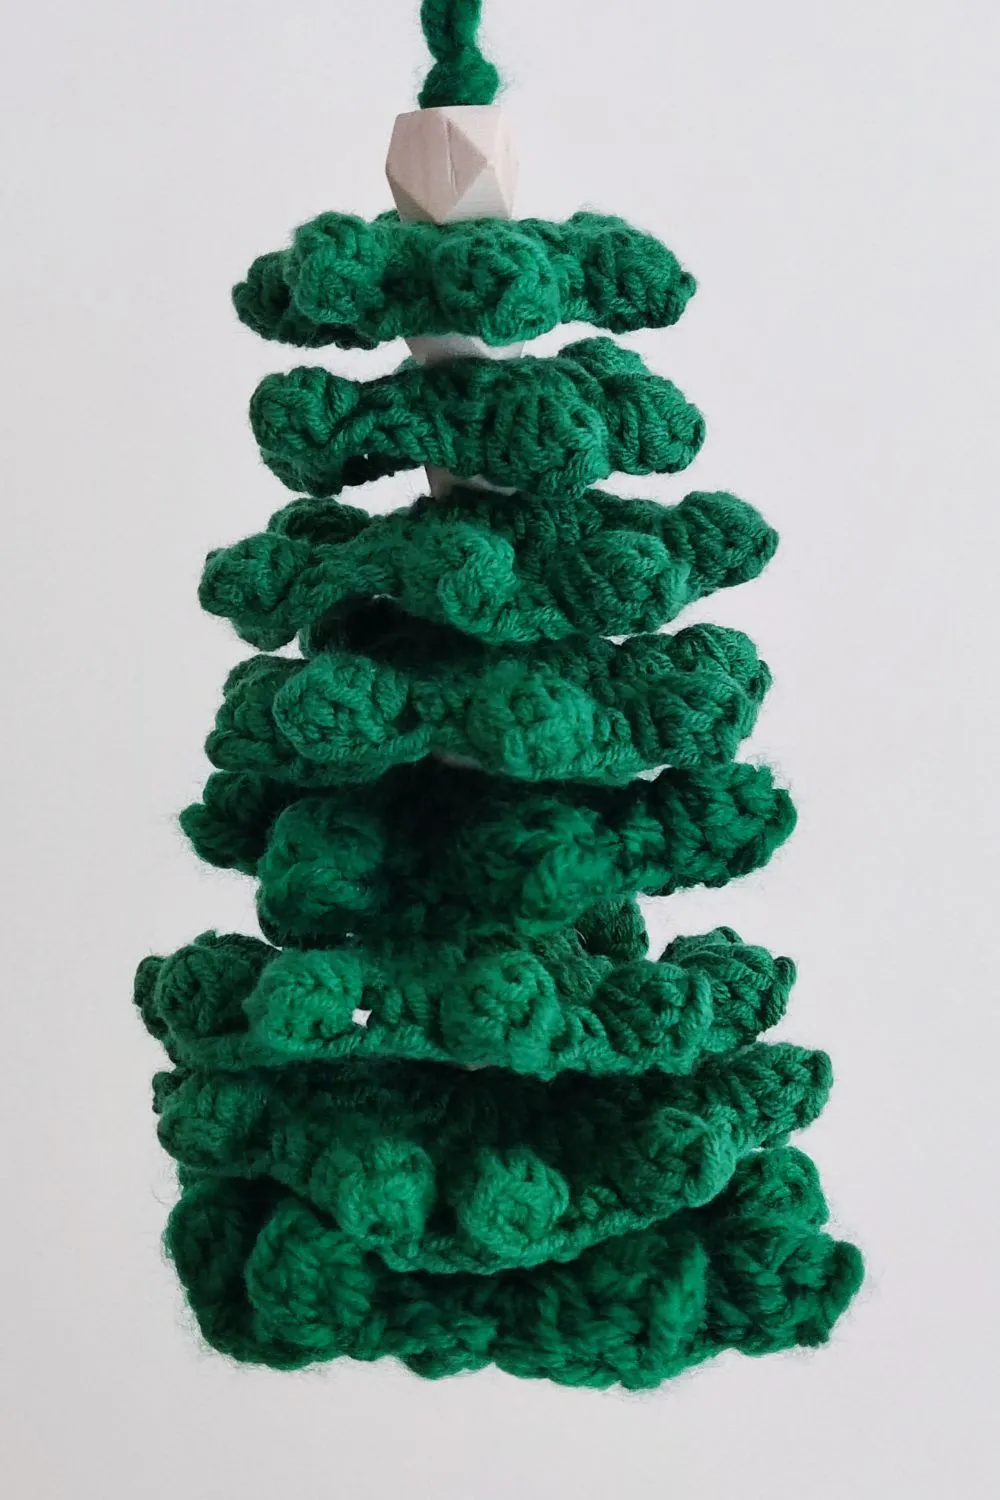
Looking for a unique handmade Christmas decoration? This free wind spinner crochet Christmas tree pattern is a festive project that combines beautiful textured crochet circles with a creative hanging design. The finished tree features multiple layers of crocheted bases decorated with popcorn stitches, creating a beautiful three-dimensional Christmas tree.
Whether you’re decorating your home for the holidays, preparing handmade Christmas gifts, or looking for a creative seasonal crochet project, this pattern is a lovely addition to your Christmas crochet collection.
The best part? You can customize your crochet Christmas tree by adjusting the number of layers, choosing different yarn colors, or adding decorative wooden beads.
This tutorial includes instructions for two sizes: a small Christmas tree measuring approximately 8 inches tall and a larger version measuring approximately 17 inches tall.
You’ll find the complete materials list, stitch abbreviations, detailed instructions for all eight base sizes, and a step-by-step assembly guide below.
Pattern at a glance
| Feature | Details |
|---|---|
| Pattern name | Wind Spinner Crochet Christmas Tree |
| Skill level | Intermediate |
| Terminology | US crochet terms |
| Yarn weight | DK #3 or Aran #4 |
| Crochet hook | 4 mm or 6 mm |
| Estimated yarn | 200–340 yards |
| Small tree | 8″ tall × 3.5″ base |
| Large tree | 17″ tall × 8″ base |
| Construction | Individual crochet circles assembled into a hanging tree |
Why you’ll love this crochet Christmas tree
This Christmas tree pattern uses a series of crocheted circular bases that gradually increase in size. Each circle has a textured popcorn stitch border, giving the tree its decorative appearance.
You can make the smaller version with eight crocheted circles or continue working all eight base sizes to create the larger Christmas tree with 16 pieces.
The pattern is also customizable. You can increase the number of pieces in each size to make the tree taller, add florist wire or fishing line for stability, and substitute knots for beads during assembly.
Materials needed
Before starting your wind spinner crochet Christmas tree, gather the following materials.
Yarn
Choose either of these yarn options:
Option 1: Stylecraft Special Aran
-
Yarn weight: #4
-
Fiber content: 100% acrylic
-
Yardage: 232 yards / 212 meters
-
Skein size: 3.5 oz / 100 g
Option 2: Stylecraft Special DK
-
Yarn weight: #3
-
Fiber content: 100% acrylic
-
Length: 295 meters
-
Skein size: 3.5 oz / 100 g
Estimated yarn requirement: 200–340 yards.
Other #3 or #4 weight yarns may be substituted.
Crochet hooks and additional supplies
-
4 mm crochet hook for DK-weight yarn.
-
6 mm crochet hook for worsted-weight yarn.
-
Decorative beads, such as hexagonal wooden beads.
-
Florist wire or fishing line for additional stability, if needed.
If you don’t have beads, you can create knots between the layers instead.
Finished measurements
Choose your tree size
Small Christmas tree
8 crochet bases
Height: 8 inches
Base: 3.5 inches
Large Christmas tree
16 crochet bases
Height: 17 inches
Base: 8 inches
The exact finished measurements may vary depending on your chosen yarn, hook size, and crochet tension.
Gauge: Gauge is not important for this project.
Crochet abbreviations (US terms)
| Abbreviation | Meaning |
|---|---|
| ch / chs | Chain / chains |
| sc | Single crochet |
| hdc | Half double crochet |
| dc | Double crochet |
| sl st | Slip stitch |
| st / sts | Stitch / stitches |
| sp | Space |
| rep | Repeat |
Special stitch: Popcorn stitch
The popcorn stitch creates the raised, textured decorations around each circular base.
Here’s how to crochet the popcorn stitch used in this Christmas tree pattern:
-
Work 5 double crochet stitches into the indicated stitch.
-
Remove your hook from the last stitch.
-
Insert your hook into the top of the first double crochet.
-
Pass the hook through the loop left from the fifth stitch.
-
Complete the stitch with a slip stitch.
Repeat this technique whenever the instructions call for a popcorn stitch.
Important pattern notes
Please read through the complete pattern before starting.
This pattern is worked in separate circular pieces. Each base size requires two identical pieces, which are then assembled to create the Christmas tree.
For the smaller version, stop after completing Base 4. To create the larger Christmas tree, continue working through Base 8.
The original pattern also includes an optional stability round for the larger bases. This allows you to crochet around florist wire or fishing line to help maintain the circular shape.
Pattern accuracy note: The instructions below preserve the supplied round sequences, stitch counts, and assembly details. The original edging repeat contains an extra ch 2 that appears inconsistent with its stated stitch counts and the optional stability rounds. It has been retained as supplied rather than silently changed. Base 1 also ends after the edging round, with no separate fastening-off instruction provided.
Free Wind Spinner Crochet Christmas Tree Pattern
Let’s begin making the individual crocheted bases. Start with the smallest circle and gradually work toward the largest.
Each base is made in joined rounds, beginning with a magic ring.
Base 1: Smallest crochet circle
This is the smallest base used at the top of the Christmas tree.
Section 1 – Base
Round 1: In a magic ring, ch 2 (does not count as a stitch), work 12 hdc in the magic ring, join. (12 hdc)
Round 2: Ch 1, work 2 hdc in each stitch around, join. (24 hdc)
Section 2 – Edges
Round 1: Ch 2, *popcorn st in next st, ch 2, skip next st, sc in next st, ch 2, skip next st, ch 2; repeat from * to the end, join. (6 popcorn/sc)
Complete two identical pieces before proceeding to Base 2.

Base 2: Second crochet circle
The second base has an additional round of increases, creating a slightly larger circular layer.
Section 1 – Base
Round 1: In a magic ring, ch 2 (does not count as a stitch), work 12 hdc in the magic ring, join. (12 hdc)
Round 2: Ch 1, work 2 hdc in each stitch around, join. (24 hdc)
Round 3: Ch 1, *hdc in next stitch, 2 hdc in next stitch; repeat from * around, join. (36 hdc)
Section 2 – Edges
Round 1: Ch 2, *popcorn st in next st, ch 2, skip next st, sc in next st, ch 2, skip next st, ch 2; repeat from * to the end, join. (9 popcorn/sc)
Optional stability round
Round 2: Ch 1, crocheting over wire or fishing line, sc in first st, *sc in popcorn st, 2 sc in ch-2 sp, sc in next st, 2 sc in next ch-2 sp; repeat from * to the end, join.
Fasten off.
Complete two identical pieces.
Base 3: Medium crochet circle
Continue increasing the diameter of your crochet Christmas tree by adding another round to the circular base.
Section 1 – Base
Round 1: In a magic ring, ch 2 (does not count as a stitch), work 12 hdc in the magic ring, join. (12 hdc)
Round 2: Ch 1, work 2 hdc in each stitch around, join. (24 hdc)
Round 3: Ch 1, *hdc in next stitch, 2 hdc in next stitch; repeat from * around, join. (36 hdc)
Round 4: Ch 1, *hdc in next 2 sts, 2 hdc in next stitch; repeat from * around, join. (48 hdc)
Section 2 – Edges
Round 1: Ch 2, *popcorn st in next st, ch 2, skip next st, sc in next st, ch 2, skip next st, ch 2; repeat from * to the end, join. (12 popcorn/sc)
Optional stability round
Round 2: Ch 1, crocheting over wire or fishing line, sc in first st, *sc in popcorn st, 2 sc in ch-2 sp, sc in next st, 2 sc in next ch-2 sp; repeat from * to the end, join.
Fasten off.
Make two identical pieces.
Base 4: Final circle for the small Christmas tree
Base 4 completes the crocheted layers needed for the smaller version of the wind spinner Christmas tree.
Section 1 – Base
Round 1: In a magic ring, ch 2 (does not count as a stitch), work 12 hdc in the magic ring, join. (12 hdc)
Round 2: Ch 1, work 2 hdc in each stitch around, join. (24 hdc)
Round 3: Ch 1, *hdc in next stitch, 2 hdc in next stitch; repeat from * around, join. (36 hdc)
Round 4: Ch 1, *hdc in next 2 sts, 2 hdc in next stitch; repeat from * around, join. (48 hdc)
Round 5: Ch 1, *hdc in next 3 sts, 2 hdc in next stitch; repeat from * around, join. (60 hdc)
Section 2 – Edges
Round 1: Ch 2, *popcorn st in next st, ch 2, skip next st, sc in next st, ch 2, skip next st, ch 2; repeat from * to the end, join. (15 popcorn/sc)
Optional stability round
Round 2: Ch 1, crocheting over wire or fishing line, sc in first st, *sc in next st, 2 sc in ch-2 sp; repeat from * to the end, join.
Your small Christmas tree is ready for assembly
If you’re making the smaller wind spinner Christmas tree, stop here. You should have two pieces of each base size, giving you eight crocheted circles in total.
Proceed to the assembly instructions further below. Continue with Base 5 if you’re making the larger version.
Additional crochet bases for the large Christmas tree
The following four base sizes are used to create the taller and wider Christmas tree.
As the circular bases become larger, they may lose their shape. Adding florist wire or fishing line to the final round can help them retain their circular structure.
If you’re using worsted-weight yarn, the original pattern recommends stopping after Base 5 because the finished tree may otherwise become too heavy, unless you plan to add wire for stability.
You can also increase the height of your Christmas tree by crocheting four or more pieces of each base size.
Base 5: Large crochet circle
Section 1 – Base
Round 1: In a magic ring, ch 2 (does not count as a stitch), work 12 hdc in the magic ring, join. (12 hdc)
Round 2: Ch 1, work 2 hdc in each stitch around, join. (24 hdc)
Round 3: Ch 1, *hdc in next stitch, 2 hdc in next stitch; repeat from * around, join. (36 hdc)
Round 4: Ch 1, *hdc in next 2 sts, 2 hdc in next stitch; repeat from * around, join. (48 hdc)
Round 5: Ch 1, *hdc in next 3 sts, 2 hdc in next stitch; repeat from * around, join. (60 hdc)
Round 6: Ch 1, *hdc in next 4 sts, 2 hdc in next st; repeat from * around, join. (72 hdc)
Section 2 – Edges
Round 1: Ch 2, *popcorn st in next st, ch 2, skip next st, sc in next st, ch 2, skip next st, ch 2; repeat from * to the end, join. (18 popcorn/sc)
Optional stability round
Round 2: Ch 1, crocheting over wire or fishing line, sc in first st, *sc in popcorn st, 2 sc in ch-2 sp, sc in next st, 2 sc in next ch-2 sp; repeat from * to the end, join.
Fasten off.
Base 6: Extra-large crochet circle
Section 1 – Base
Round 1: In a magic ring, ch 2 (does not count as a stitch), work 12 hdc in the magic ring, join. (12 hdc)
Round 2: Ch 1, work 2 hdc in each stitch around, join. (24 hdc)
Round 3: Ch 1, *hdc in next stitch, 2 hdc in next stitch; repeat from * around, join. (36 hdc)
Round 4: Ch 1, *hdc in next 2 sts, 2 hdc in next stitch; repeat from * around, join. (48 hdc)
Round 5: Ch 1, *hdc in next 3 sts, 2 hdc in next stitch; repeat from * around, join. (60 hdc)
Round 6: Ch 1, *hdc in next 4 sts, 2 hdc in next st; repeat from * around, join. (72 hdc)
Round 7: Ch 1, *hdc in next 5 sts, 2 hdc in next stitch; repeat from * around, join. (84 hdc)
Section 2 – Edges
Round 1: Ch 2, *popcorn st in next st, ch 2, skip next st, sc in next st, ch 2, skip next st, ch 2; repeat from * to the end, join. (21 popcorn/sc)
Optional stability round
Round 2: Ch 1, crocheting over wire or fishing line, sc in first st, *sc in popcorn st, 2 sc in ch-2 sp, sc in next st, 2 sc in next ch-2 sp; repeat from * to the end, join.
Fasten off.
Base 7: Second-largest crochet circle
Section 1 – Base
Round 1: In a magic ring, ch 2 (does not count as a stitch), work 12 hdc in the magic ring, join. (12 hdc)
Round 2: Ch 1, work 2 hdc in each stitch around, join. (24 hdc)
Round 3: Ch 1, *hdc in next stitch, 2 hdc in next stitch; repeat from * around, join. (36 hdc)
Round 4: Ch 1, *hdc in next 2 sts, 2 hdc in next stitch; repeat from * around, join. (48 hdc)
Round 5: Ch 1, *hdc in next 3 sts, 2 hdc in next stitch; repeat from * around, join. (60 hdc)
Round 6: Ch 1, *hdc in next 4 sts, 2 hdc in next st; repeat from * around, join. (72 hdc)
Round 7: Ch 1, *hdc in next 5 sts, 2 hdc in next stitch; repeat from * around, join. (84 hdc)
Round 8: Ch 1, *hdc in next 6 sts, 2 hdc in next stitch; repeat from * around, join. (96 hdc)
Section 2 – Edges
Round 1: Ch 2, *popcorn st in next st, ch 2, skip next st, sc in next st, ch 2, skip next st, ch 2; repeat from * to the end, join. (24 popcorn/sc)
Optional stability round
Round 2: Ch 1, crocheting over wire or fishing line, sc in first st, *sc in popcorn st, 2 sc in ch-2 sp, sc in next st, 2 sc in next ch-2 sp; repeat from * to the end, join.
Fasten off.
Base 8: Largest crochet circle
This is the largest base used for the full-sized wind spinner Christmas tree.
Section 1 – Base
Round 1: In a magic ring, ch 2 (does not count as a stitch), work 12 hdc in the magic ring, join. (12 hdc)
Round 2: Ch 1, work 2 hdc in each stitch around, join. (24 hdc)
Round 3: Ch 1, *hdc in next stitch, 2 hdc in next stitch; repeat from * around, join. (36 hdc)
Round 4: Ch 1, *hdc in next 2 sts, 2 hdc in next stitch; repeat from * around, join. (48 hdc)
Round 5: Ch 1, *hdc in next 3 sts, 2 hdc in next stitch; repeat from * around, join. (60 hdc)
Round 6: Ch 1, *hdc in next 4 sts, 2 hdc in next st; repeat from * around, join. (72 hdc)
Round 7: Ch 1, *hdc in next 5 sts, 2 hdc in next stitch; repeat from * around, join. (84 hdc)
Round 8: Ch 1, *hdc in next 6 sts, 2 hdc in next stitch; repeat from * around, join. (96 hdc)
Round 9: Ch 1, *hdc in next 7 sts, 2 hdc in next stitch; repeat from * around, join. (108 hdc)
Section 2 – Edges
Round 1: Ch 2, *popcorn st in next st, ch 2, skip next st, sc in next st, ch 2, skip next st, ch 2; repeat from * to the end, join. (27 popcorn/sc)
Optional stability round
Round 2: Ch 1, crocheting over wire or fishing line, sc in first st, *sc in popcorn st, 2 sc in ch-2 sp, sc in next st, 2 sc in next ch-2 sp; repeat from * to the end, join.
Fasten off.
You’ve now completed all the crocheted layers needed for the large Christmas tree.
How to Assemble Your Wind Spinner Crochet Christmas Tree
Once you’ve finished crocheting all the circular bases, it’s time to assemble your Christmas tree.
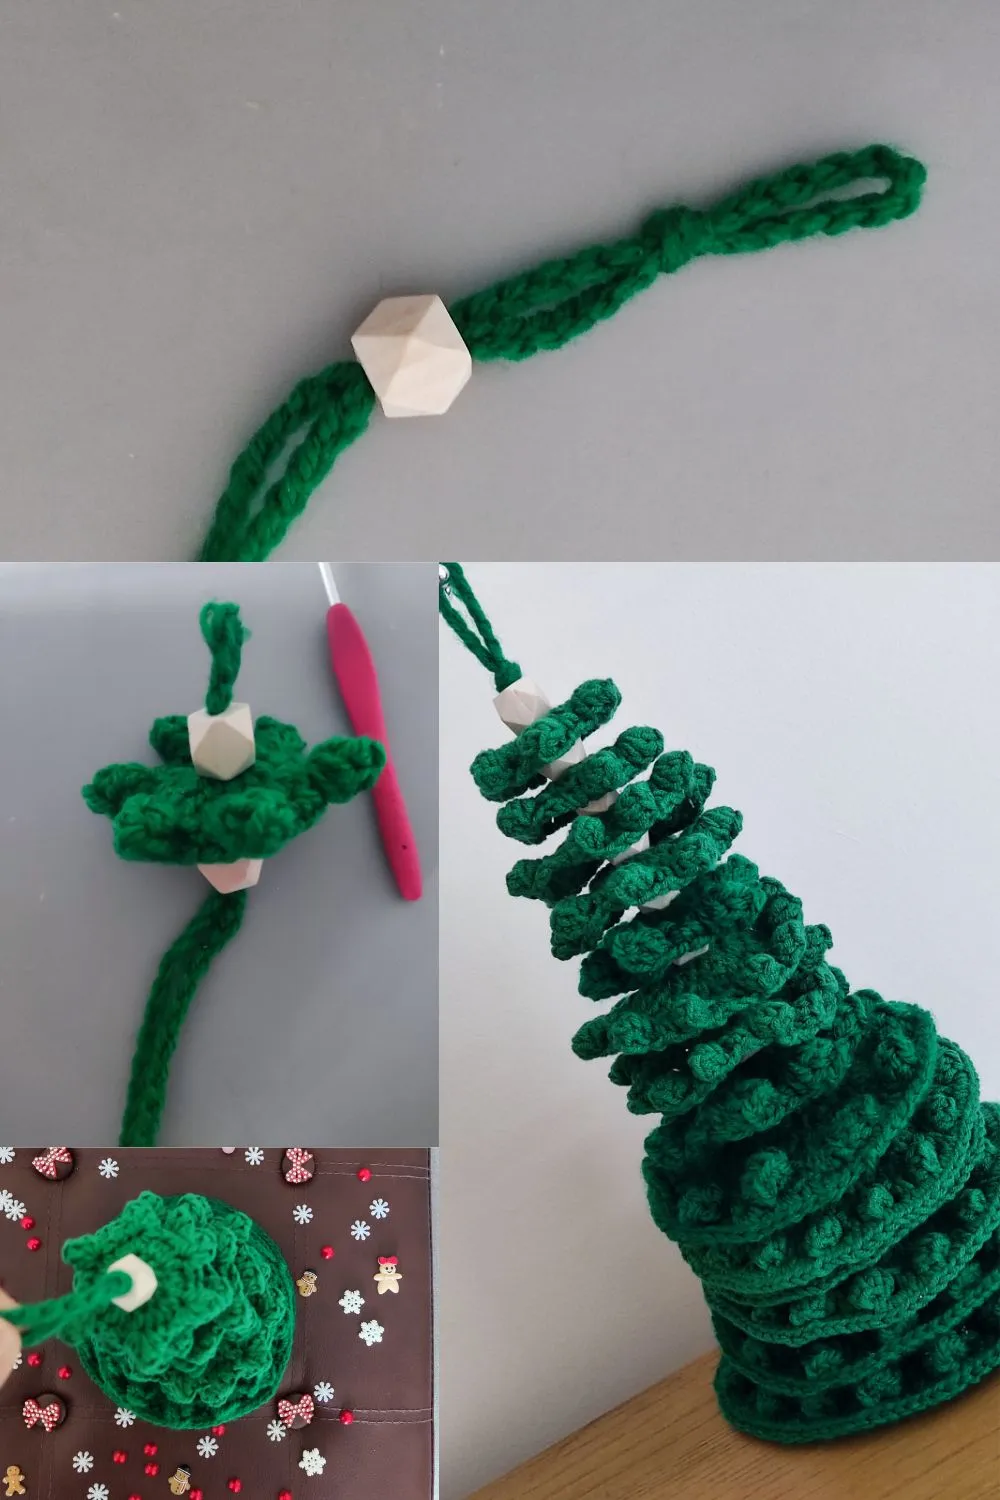
You’ll connect the crochet circles using a long crochet chain, with beads or knots separating the individual layers.
Step 1: Crochet the hanging chain
Chain 100.
If you’ve made additional crochet bases or want a taller Christmas tree, make the chain longer.
Step 2: Secure your first bead
Make a knot at the middle of your chain.
Pass a bead through the end of the chain. The knot you made will prevent the bead from falling off.
Step 3: Attach the smallest crochet base
Pick up your smallest crochet circle.
Pass the chain through the center of the circle, using the opening created by the magic ring.
Make sure the crochet base sits above your first bead.
Step 4: Add beads between the layers
Pass one or two beads onto the chain.
These beads create space between the crocheted circles and help establish the layered Christmas tree shape.
Step 5: Attach the next crochet base
Pick up the next crochet circle.
Pass the chain through its center.
Remember to arrange the bases in pairs, placing two circles of the same diameter together before moving to the next larger size.
Step 6: Continue assembling the Christmas tree
Repeat Steps 4 and 5 until you’ve used all your crocheted bases.
Always work from the smallest circle to the largest.
For the small version, you’ll assemble eight circles. For the large version, you’ll assemble 16 circles.
Christmas tree assembly order
| Order | Small tree | Large tree |
|---|---|---|
| Base 1 | 2 pieces | 2 pieces |
| Base 2 | 2 pieces | 2 pieces |
| Base 3 | 2 pieces | 2 pieces |
| Base 4 | 2 pieces | 2 pieces |
| Base 5 | — | 2 pieces |
| Base 6 | — | 2 pieces |
| Base 7 | — | 2 pieces |
| Base 8 | — | 2 pieces |
| Total | 8 pieces | 16 pieces |
How to assemble your crochet Christmas tree without beads
Don’t have wooden beads available? You can assemble your crochet Christmas tree using knots instead.
Follow the same assembly instructions, but replace each bead with one or more knots.
The knots will separate your crocheted bases and help keep them in position.
Once all your pieces have been assembled, fasten off and sew in the remaining yarn ends.
Your handmade wind spinner crochet Christmas tree is complete!
Tips for Making Your Crochet Christmas Tree
Choose the right yarn. The original pattern allows both DK-weight and Aran-weight yarn. Remember to use the appropriate crochet hook for your chosen yarn.
Add stability to larger circles. As the bases increase in diameter, they may struggle to retain their shape. Crocheting over florist wire or fishing line during the optional stability round can help.
Adjust the height. If you’d like a taller Christmas tree, make four or more pieces of each base size instead of two. Remember to increase the length of your assembly chain accordingly.
Be careful with heavier yarn. When using worsted-weight yarn, the pattern recommends stopping at Base 5 unless you’re adding extra support.
Experiment with colors. Traditional Christmas green is a natural choice, but white, cream, red, or a combination of festive colors can create a different appearance.
Frequently Asked Questions
Is this wind spinner crochet Christmas tree pattern suitable for beginners?
The pattern is classified as intermediate. You’ll need to understand basic crochet stitches, increases, working in joined rounds, and the popcorn stitch.
If you’re familiar with these techniques, the repeated circular construction should be straightforward to follow.
How much yarn do I need?
The pattern estimates 200–340 yards of yarn. Your actual yarn consumption will depend on the tree size, yarn weight, and number of crocheted bases.
Can I make the crochet Christmas tree taller?
Yes! Instead of making two pieces of each base size, you can crochet four or more. You’ll also need a longer assembly chain to accommodate the additional layers.
Do I have to use wooden beads?
No. The pattern allows you to replace the beads with knots. Make one or more knots wherever the assembly instructions call for beads.
Why are my larger crochet circles losing their shape?
As your circular bases become wider, they may not retain their shape without additional support. The original pattern includes an optional round that allows you to crochet over florist wire or fishing line to reinforce the edges.
Final Thoughts
This free wind spinner crochet Christmas tree pattern is a creative way to add handmade decorations to your holiday collection. Its textured popcorn stitch borders and layered construction create an interesting alternative to traditional crocheted Christmas trees.
You can make a small version, experiment with additional layers, or create a taller tree for your Christmas decorations.
Save this free crochet Christmas tree pattern for your next holiday project, and share your finished creation with other crochet lovers!
Images credits : fosbasdesigns.com