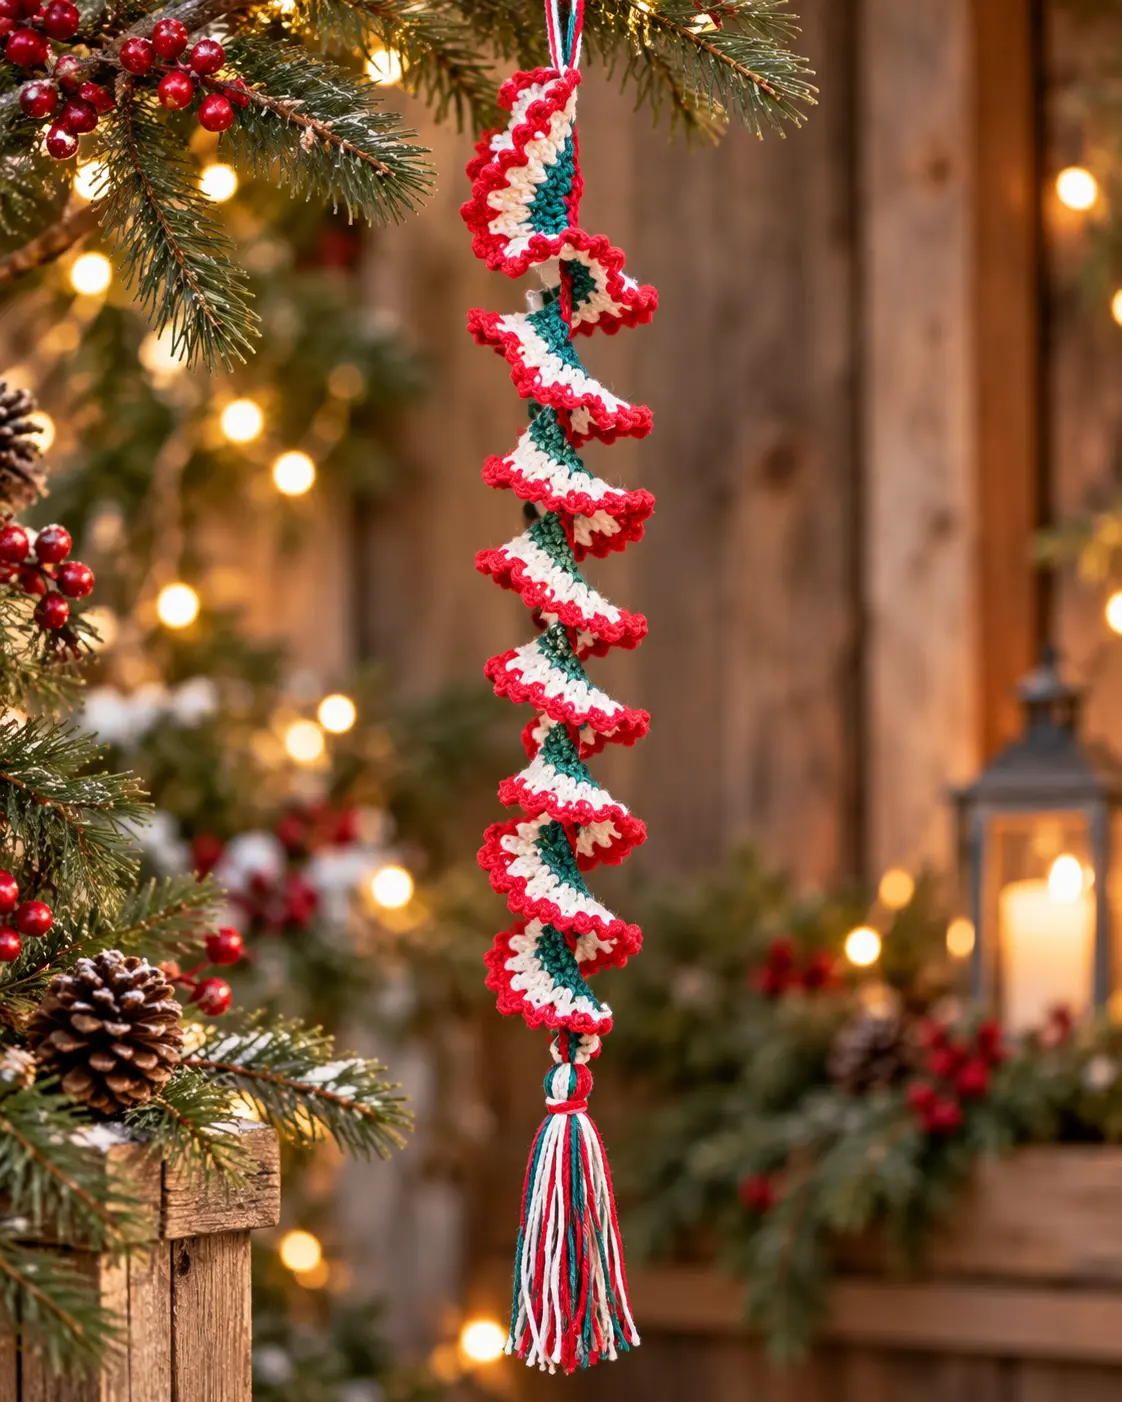
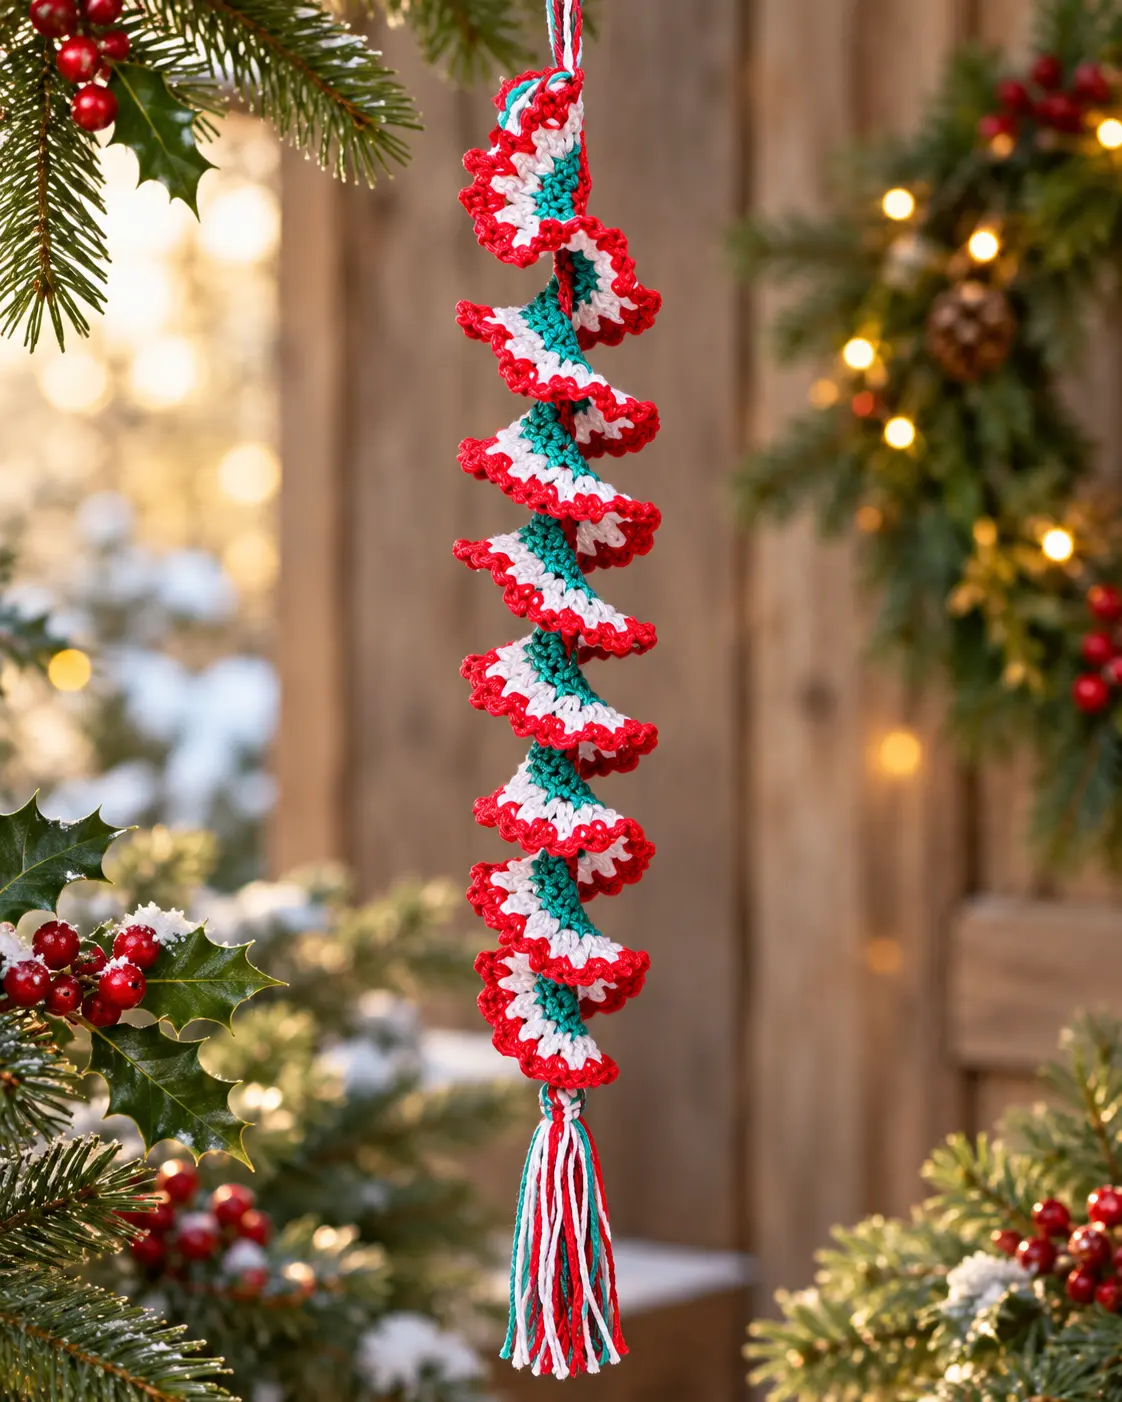
Looking for a beautiful handmade Christmas decoration? This free Christmas wind spinner crochet pattern is a quick and easy project that adds a festive touch to your Christmas tree, windows, porch, or holiday decorations.
With just five simple rows, two yarn colors, and a pretty tassel, you can create a gorgeous spiral ornament that twists and turns when hanging. The delicate lace design gives this Christmas crochet decoration an elegant appearance, while the repeating stitches make it an enjoyable project.
The best part? You can customize this crochet wind spinner with your favorite colors. Choose classic red and white, traditional Christmas green and red, or even experiment with different shades to create decorations for Valentine’s Day, Easter, or Halloween.
In this step-by-step tutorial, you’ll learn how to crochet a Christmas wind spinner, including the materials, stitches, detailed instructions, and finishing techniques. The pattern includes both US and UK crochet terminology.
Christmas Wind Spinner
| Pattern details | |
|---|---|
| Skill level | Easy |
| Construction | 5 rows, worked without turning |
| Suggested yarn | Fingering weight |
| Crochet hook | 4 mm |
| Yarn required | Approximately 65 yards (60 m) |
| Finished length | Approximately 14 inches (35 cm) |
| Terminology | US and UK |
| Customizable | Length, colors, and yarn |
Why You’ll Love This Christmas Wind Spinner Pattern
A crocheted Christmas wind spinner is a wonderful alternative to store-bought plastic ornaments. Handmade decorations can be reused year after year and can even become treasured family keepsakes.
This project is particularly enjoyable because it requires relatively little yarn, uses a straightforward five-row construction, and can be adapted to different lengths and color combinations.
The decorative spiral forms naturally as you increase the number of stitches. The final row adds a delicate lace edging, while the handmade tassel gives the finished decoration an attractive touch.
You can also make several wind spinners in coordinating colors to decorate your Christmas tree or create a handmade Christmas gift set.
Materials Needed
You only need a few basic crochet supplies to make this Christmas wind spinner.
For a decoration similar to the original sample, gather the following materials:
-
Yarn: Performance Cotton Dazzle (60% cotton, 40% viscose), 50 g/120 m per ball.
-
Yarn quantity: Approximately 60 meters (65 yards) per wind spinner.
-
Colors: Two contrasting yarn colors (Color 1 and Color 2).
-
Crochet hook: 4 mm.
-
Darning needle: For adding the tassel and finishing the decoration.
-
Stitch marker: To identify the beginning of every row.
-
Scissors: For cutting the yarn.
-
Optional: A small bell or another decorative item to attach to the end.
Choosing the Best Yarn
You can use almost any yarn to make this crochet wind spinner. However, different yarn weights will affect the finished size, appearance, and amount of yarn required.
Lighter yarns generally give the wind spinner a more delicate appearance and help it maintain its spiral shape.
Fingering weight yarn is recommended, although it isn’t essential.
Wool is another option because it is lightweight. Pure cotton may produce a heavier decoration and potentially pull the finished spiral out of shape. A cotton and bamboo blend can provide a lighter alternative.
The original sample uses a cotton and viscose blend.
Feel free to experiment with different yarns and hook sizes until you achieve the appearance you prefer.
Finished Size and Gauge
The sample Christmas wind spinner has the following measurements:
-
Starting chain: 50 chain stitches.
-
Finished length: Approximately 35 cm (14 inches).
-
Additional length: The completed wind spinner measures approximately 5 cm (2 inches) longer than Row 2.
You can adjust the size by changing the number of chain stitches in the starting chain.
For example, a shorter chain will create a smaller ornament, while a longer starting chain will produce a longer Christmas decoration.
Crochet Gauge
Gauge is not critical for this project.
Different yarn weights, hook sizes, and personal crochet tension will change the dimensions of your completed decoration.
If you want to test your yarn before starting, make a small sample by chaining 10 stitches and following the row instructions.
Pay particular attention to how the fabric looks and how the lace stitches open up. Achieving a pleasing appearance is more important than matching an exact measurement.
Crochet Stitches and Techniques
Before starting your Christmas wind spinner, familiarize yourself with the stitches used in this pattern.
| US crochet term | UK crochet term |
|---|---|
| Chain | Chain |
| Single crochet | Double crochet |
| Double crochet | Treble crochet |
| Slip stitch | Slip stitch |
| V stitch | V stitch |
How to Crochet the V Stitch
The V stitch is an important part of this Christmas wind spinner because it creates the open, decorative lace structure.
US terminology
Work 1 double crochet, chain 1, and 1 double crochet into the same stitch.
UK terminology
Work 1 treble crochet, chain 1, and 1 treble crochet into the same stitch.
Important Pattern Notes
Read these instructions before beginning your project.
-
The wind spinner is worked in rows, but you will not turn your work.
-
Every row begins at the same starting point at the top of the decoration.
-
Use a stitch marker to identify the starting end throughout the project.
-
Each row is disconnected and fastened off before the next row begins, except where you are simply joining the yarn at the start of a row.
-
Keep the yarn tails because they will be incorporated into the tassel and hanging loop.
Fasten off: Pull open the last stitch and pull the ball of yarn through it. Pull tight to secure the work.
Disconnect: Cut the yarn, leaving a tail of at least 10 cm (4 inches).
The instructions below use the same stitch counts, color changes, construction sequence, and finishing method as the supplied pattern.
Free Christmas Wind Spinner Crochet Pattern (US Terms)
This section uses US crochet terminology.
If you’re following the pattern with US crochet stitches, use these instructions from beginning to end.
Row 1: Create the Foundation Chain
Using Color 1, chain 50 stitches, or make a starting chain with any number of stitches you prefer.
The finished wind spinner will measure approximately 2 inches longer than your starting chain.
Disconnect the yarn and fasten off.
Place a stitch marker at the beginning of your foundation chain so you can easily identify the starting point.
Important: Every row starts again from this same end. Do not turn your work.
Row 2: Single Crochet Foundation
Continue using Color 1.
Join the yarn at the beginning of your work and chain 3.
Work 1 single crochet into every chain stitch until you reach the end of the row.
Disconnect the yarn and fasten off.
Stitch count: Your stitch count should match the number of stitches in your starting chain.
For example, if you started with 50 chain stitches, you should now have 50 single crochet stitches.
This row creates the foundation for the increases that will form the spiral.
Row 3: Create the Spiral With Double Crochet Increases
Change to Color 2.
Join your yarn at the beginning of the work and chain 3.
Work 2 double crochet stitches into each single crochet stitch from the previous row.
Continue working 2 double crochets into every stitch until you reach the end.
Disconnect the yarn and fasten off.
Stitch count: The number of stitches will now have doubled.
If you began with 50 chain stitches, you will now have 100 double crochet stitches.
The increases in this row begin creating the curved structure that gives the Christmas wind spinner its distinctive spiral appearance.
Row 4: Add the Decorative V Stitches
Continue using Color 2.
Join your yarn at the beginning of your work and chain 3.
Work 1 V stitch into each stitch from the previous row.
Remember that a V stitch consists of:
-
1 double crochet.
-
Chain 1.
-
1 double crochet into the same stitch.
Continue working 1 V stitch into every stitch until you reach the end of the row.
Disconnect the yarn and fasten off.
Stitch count: Work 1 V stitch for every stitch in the previous row.
If Row 3 contains 100 stitches, Row 4 will contain 100 V stitches.
This row produces the open lace effect and adds extra volume to the spiral.
Row 5: Crochet the Final Decorative Edging
Change back to Color 1.
Join the yarn with a slip stitch at the beginning of your work.
Work the following sequence into the chain-1 space of the first V stitch from the previous row:
[Single crochet, chain 3, single crochet into the chain-1 space of the V stitch, chain 2].
Repeat this sequence into every V stitch until you reach the end of the row.
Disconnect the yarn and fasten off.
The fifth row completes the decorative lace edging of your Christmas wind spinner.
Finishing Your Christmas Wind Spinner
Once you’ve completed all five rows, it’s time to add the tassel and create the hanging loop.
These finishing details give your handmade decoration its completed appearance.
Step 1: Make the tassel
Do not weave in the yarn ends.
Cut 2 or 3 lengths of yarn measuring approximately 20 cm (8 inches) in each color used.
Thread each length onto a darning needle and insert it through the bottom of the wind spinner.
Step 2: Secure the tassel
Tie a final thread around the top of the tassel you’ve formed.
Take care to include the yarn ends left at the end of each row when securing the tassel.
If desired, attach a small bell or another decorative item to the tassel.
Step 3: Create the hanging loop
Return to the top of your Christmas wind spinner.
Gather the remaining yarn ends and trim them to the same length.
Tie a small knot at the base to form a hanging loop.
Your handmade Christmas wind spinner is now complete! Hang it on your Christmas tree, near a window, or anywhere you’d like to display your festive crochet decoration.
Christmas Wind Spinner Crochet Pattern (UK Terms)
If you prefer UK or International crochet terminology, follow these instructions instead.
The construction, number of rows, color changes, and finishing techniques remain the same.

Row 1: Foundation Chain
Using Colour 1, chain 50 stitches, or any number you choose.
The completed wind spinner will measure approximately 2 inches longer than your starting chain.
Disconnect and fasten off.
Place a stitch marker at the beginning of your chain so you can easily identify the starting point.
Remember that every row begins at this same point. Do not turn your work.
Row 2: Double Crochet Foundation
Continue using Colour 1.
Join the yarn at the start of your work and chain 3.
Work 1 double crochet into every chain stitch until you reach the end of the row.
Disconnect and fasten off.
Stitch count: The number of stitches will match your original starting chain.
Row 3: Treble Crochet Increases
Change to Colour 2.
Join the yarn at the beginning of your work and chain 3.
Work 2 treble crochets into each double crochet stitch from the previous row.
Continue working these increases into every stitch until you reach the end.
Disconnect and fasten off.
Stitch count: The number of stitches will have doubled. If you started with 50 stitches, you will now have 100.
Row 4: V Stitch Row
Continue using Colour 2.
Join your yarn at the beginning of the work and chain 3.
Work 1 V stitch into every stitch from the previous row.
For UK terminology, a V stitch consists of 1 treble crochet, chain 1, and 1 treble crochet into the same stitch.
Continue repeating the V stitch until you reach the end of the row.
Disconnect and fasten off.
Stitch count: Work 1 V stitch for every stitch in the previous row.
Row 5: Decorative Lace Edging
Change back to Colour 1.
Join the yarn with a slip stitch at the beginning of the work.
Repeat the following sequence:
[Double crochet, chain 3, double crochet into the chain-1 space of the V stitch from the previous row, chain 2].
Continue repeating this sequence into every V stitch until you reach the end.
Disconnect and fasten off.
Finishing (UK Version)
Do not weave in the yarn ends.
Cut 2 or 3 lengths of yarn measuring approximately 20 cm (8 inches) in each colour used.
Thread each length onto a darning needle and insert it through the bottom of the wind spinner.
Tie a final thread around the top of the tassel you have created. Make sure you also catch the yarn ends left at the end of each row.
If desired, tie a small bell or another decorative item to the tassel.
Return to the top of the wind spinner. Gather the remaining yarn ends and trim them to the same length.
Tie a small knot at the base to create the hanging loop.
Your Christmas wind spinner is ready to display!
Tips for Making Your Crochet Wind Spinner
Although this is a relatively simple crochet project, these practical tips can help you achieve an attractive result.
Keep your starting point consistent. Every row begins at the same end of your project. Keeping your stitch marker in place makes it easier to avoid accidentally turning your work.
Experiment with yarn weight. Lighter yarns generally produce a more delicate decoration. Heavier yarns can create larger wind spinners but may also affect how the finished spiral hangs.
Customize the length. You aren’t limited to the suggested 50 chain stitches. Adjust your foundation chain according to the size of decoration you want to create.
Save the yarn ends. Don’t weave them in as you work. The finishing instructions use these yarn tails to create the tassel and hanging loop.
Add decorative details. A small bell at the bottom of the tassel can make your Christmas wind spinner even more festive.
Frequently Asked Questions
Is this Christmas wind spinner crochet pattern suitable for beginners?
This pattern uses basic crochet stitches, increases, V stitches, and simple finishing techniques. It is particularly suitable for crocheters who already understand the basic stitches and want to practice decorative crochet.
How much yarn do I need?
The original sample uses approximately 60 meters (65 yards) of yarn.
The quantity required may change depending on your yarn weight, hook size, starting chain length, and crochet tension.
Can I make a longer Christmas wind spinner?
Yes! You can start with any number of chain stitches to create a decoration of your preferred length.
Remember that changing the starting chain will also change the number of stitches in subsequent rows and the amount of yarn required.
Do I need to use fingering weight yarn?
No. Although fingering weight yarn is recommended for the original design, you can use other yarn weights.
A lighter yarn generally produces a more delicate decoration, while a thicker yarn will change the size and appearance of the finished wind spinner.
Why isn’t my crochet wind spinner lying flat?
The spiral structure is created intentionally through the stitch increases in Rows 3 and 4.
These increases create the curved, decorative shape. The project isn’t supposed to lie completely flat.
Can I use this crochet pattern for other holidays?
Absolutely! Change the colors to create wind spinners for different seasonal decorations.
Consider pastel shades for Easter, pink and red for Valentine’s Day, or orange and black for Halloween.
Final Thoughts
This free Christmas wind spinner crochet pattern is an enjoyable way to create personalized decorations for the holiday season.
With only five rows, two yarn colors, and a handmade tassel, you can turn a small amount of yarn into an elegant spiral decoration.
Experiment with different color combinations, make several wind spinners in coordinating sizes, or create a set to give as handmade Christmas gifts.
Hang your completed wind spinner and enjoy your festive crochet creation!