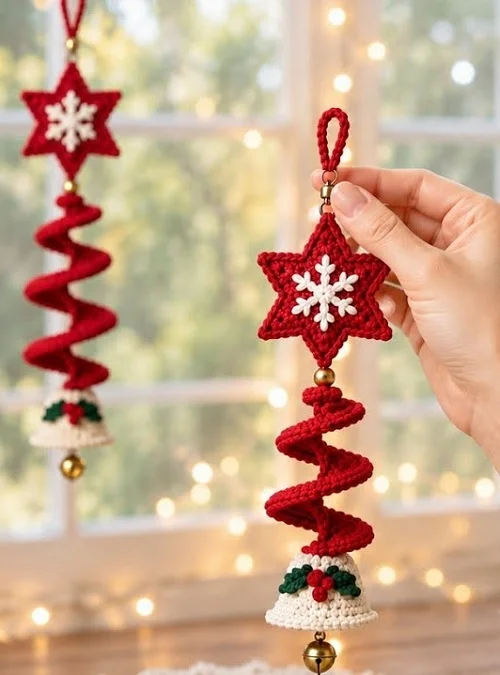
A red crochet spiral, a snowflake-decorated star, and a tiny white bell make a lovely combination for Christmas decor. This Christmas wind spinner is made in separate pieces, then assembled into one hanging ornament.
The spiral gets its curl from repeated increases. The star is worked around a magic ring, and the bell uses simple single crochet rounds with a flared edge. A little embroidery adds the festive finishing touch.
Table of Contents
- Step 1: Prepare Your Yarn, Hook, and Finishing Supplies
- Step 2: Make the Foundation and First Spiral Row
- Step 3: Work the Second Increase Row
- Step 4: Arrange the Spiral into Its Hanging Shape
- Step 5: Crochet Two Matching Stars
- Step 6: Add Optional Snowflake Embroidery
- Step 7: Crochet the White Bell
- Step 8: Embroider Leaves and Berries on the Bell
- Step 9: Assemble the Christmas Wind Spinner
Step 1: Prepare Your Yarn, Hook, and Finishing Supplies
Use 3-ply yarn and a crochet hook in the 2.5 to 3 mm range. The hook shown is marked 2.75 mm. Red forms the spiral and stars, white forms the bell and snowflake embroidery, and green adds the leaves on the bell.
- Red, white, and green yarn
- A crochet hook suitable for the yarn
- A yarn needle for embroidery and securing ends
- A bead for the connection below the star
- Glue for joining the two star pieces
- Scissors
The instructions below use US crochet terminology:
- ch: chain
- sl st: slip stitch
- sc: single crochet
- hdc: half double crochet
- dc: double crochet
- inc: increase, made by working two stitches into one stitch
Step 2: Make the Foundation and First Spiral Row
Begin with red yarn. Make a slip knot and chain 27, keeping the chain even enough to work into comfortably.
The first row progresses from taller stitches to shorter stitches:
- Skip three stitches at the hook end, following the starting instruction.
- Work 2 dc into each of the next 10 foundation stitches.
- Work 2 hdc into each of the next 10 foundation stitches.
- Work 2 sc into each of the next 5 foundation stitches.
For each increase, make both stitches in the same foundation stitch before moving on. The extra stitches begin to bend the strip into a curl, so do not try to force it flat.
Foundation count note: The displayed starting instructions contain a mismatch: 27 chains minus three skipped chains leaves 24, while the three stitch sections require 25 foundation positions. Check the starting placement carefully before proceeding. The section counts are 10 double crochet increases, 10 half double crochet increases, and 5 single crochet increases.
Step 3: Work the Second Increase Row
Chain 1 and turn. Work back across the strip, again changing stitch height as you go:
- Work 2 sc into each of the next 10 stitches.
- Work 2 hdc into each of the next 20 stitches.
- Work 2 dc into each of the next 20 stitches.
These instructions use the stitches created in the first row, not the original foundation chains. The 10 single crochet stitches at the end of the first row become the first section after turning.
The repeated increases make the strip fuller and more tightly curled. Leave yarn at the ends for assembly.
Step 4: Arrange the Spiral into Its Hanging Shape
Before adding the decorations, gently arrange the red strip into a consistent spiral. Bring the curved sections together into a compact stack, easing each section into the same direction rather than leaving folds twisted against one another.
Then separate the ends gently and allow the strip to extend. It should open into a corkscrew shape, with the smaller curves toward one end and the wider section toward the other.
Lift it by the narrow end to check the shape. Adjust any section that bunches up before attaching the star and bell.
Step 5: Crochet Two Matching Stars
The star has a round center and six pointed arms. Make two matching stars so they can be joined back to back at the top of the wind spinner.
Make the center
- Make a magic ring with red yarn.
- Chain 3.
- Work 17 dc into the ring.
- Pull the yarn tail to close the center.
- Join with a slip stitch at the top of the beginning chain.
The beginning chain supplies the height of the first double crochet, giving the center 18 stitch positions for the six-point repeat.
Shape the points
Work this sequence around the center:
- Chain 5.
- Skip the chain nearest the hook.
- Working back down the chain, make 1 sl st, 1 sc, 1 hdc, and 1 dc, one stitch in each remaining chain.
- Skip 2 stitches on the round center.
- Slip stitch into the next center stitch to anchor the point.
- Repeat around the center to make six points.
Finish with a slip stitch to close the round. Secure the end, then make the second star in the same way.
Step 6: Add Optional Snowflake Embroidery
A white snowflake looks lovely against the red star. Embroider it onto the center before joining the two stars, while the back of the stitches is still accessible.
Use straight stitches radiating from a central point, then add short branches near their outer ends. Keep the embroidery within the round center so the crochet points remain clearly defined.
This decoration is optional. You can leave the stars plain or add the snowflake to the face you want to display.
Step 7: Crochet the White Bell
Use white yarn for the small bell. Start at the crown, build the sides, and finish with an increase round that flares the lower edge.
Start the crown
- Make a magic ring and chain 1.
- Work 10 sc into the ring.
- Close the ring and join with a slip stitch.
Increase and build the body
Chain 1 for the next round. Repeat 1 sc in the next stitch, then 2 sc in the following stitch all the way around. Join with a slip stitch. This increases the round from 10 to 15 stitches.
For the straight sides, chain 1 and work 1 sc into each stitch. Continue the plain single crochet rounds until the bell reaches the indicated five rounds total before the final edging round.
Flare the lower edge
For the last round, repeat 1 sc, then a single crochet increase around the opening. Finish with a slip stitch.
Gently shape the piece so the crown is rounded and the opening spreads outward into a little bell rim.
Step 8: Embroider Leaves and Berries on the Bell
Add a small green-and-red motif to the front of the white bell. The green stitches form two leaf shapes, and the red stitches form a cluster of three berries.
- Thread the yarn needle with green yarn.
- Bring the yarn through the bell wall near the upper front.
- Group short stitches into one leaf shape, then make a second leaf beside it.
- Secure the green yarn inside the bell.
- Use red yarn to make three small rounded berries between and below the leaves.
- Secure the embroidery ends inside the bell.
Keep the stitches snug without pulling the bell wall inward. Smooth the rim again after finishing the embroidery.
Step 9: Assemble the Christmas Wind Spinner
Arrange the finished pieces in this order: hanging loop, star, bead, red spiral, and white bell.
- Add a bead to the yarn connection at the narrow end of the spiral.
- Position the two stars back to back above the bead, with their points aligned.
- Glue the stars together, enclosing the connection between them.
- Secure a hanging loop at the top of the star.
- Attach the white bell to the wider, lower end of the spiral.
- Secure the remaining yarn ends neatly.
The finished example also has a small bead suspended inside the bell. If you include this detail, position it within the opening before securing its yarn.
Hold the ornament by its hanging loop and let the spiral settle. Ease apart any curls that overlap awkwardly, and check that the bell hangs freely below the red strip.
Your crochet Christmas star wind spinner is ready to hang. The snowflake, leaves, and berries give the simple red spiral a cheerful handmade finish for Christmas decor.
Article Made based on Crochet Christmas Star Wind Spinner | Christmas Ornament DIY | Christmas Decor 2026