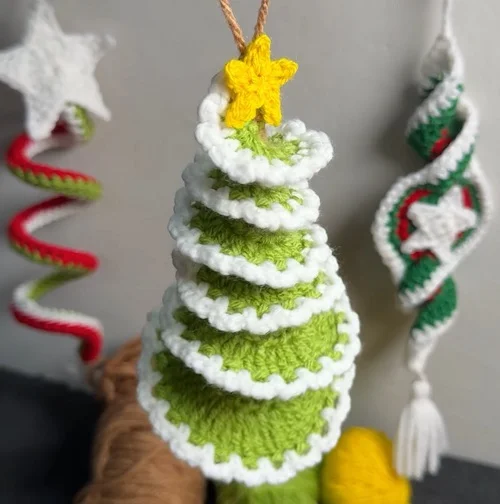
A bright green spiral, snowy white edging, and a little yellow star turn this crochet Christmas tree wind spinner into a cheerful handmade decoration. Its layered shape looks intricate, but the tree begins as a simple brown strip with green stitches worked along one edge.
The trick is to combine increases with gradually changing stitch heights. The increases make the fabric curl, while the different heights give the spiral its tapered Christmas tree shape. A white border brings out every turn of the tree.
What You’ll Learn
- A 28-stitch brown foundation supports four green sections with progressively changing stitch heights.
- Two rounds of increases create the fullness needed for the curling tree spiral.
- Shape from the single crochet end to make the tree widen toward its base.
- White chain-loop edging and a yellow crochet star complete the Christmas ornament.
Table of Contents
- Materials and Stitch Abbreviations
- 1. Crochet the Brown Foundation Strip
- 2. Add the First Green Row
- 3. Increase Again to Create the Spiral
- 4. Shape the Green Christmas Tree
- 5. Crochet the Snowy White Edging
- 6. Thread the Center and Make a Hanging Loop
- 7. Crochet the Yellow Star
- A Handmade Christmas Ornament with a Lovely Spiral Finish
Materials and Stitch Abbreviations
For this crochet Christmas ornament, use 3-ply yarn and a 2.5 mm crochet hook. The colors each have a part to play: brown forms the central strip and hanging loop, green creates the tree, white outlines the spiral, and yellow makes the star.
- Green, white, brown, and yellow 3-ply yarn
- 2.5 mm crochet hook
- Yarn needle for threading the hanging cord and securing ends
- Scissors
- Glue for attaching the star
The instructions below use US crochet terminology:
- ch: chain
- sl st: slip stitch
- sc: single crochet
- hdc: half double crochet
- dc: double crochet
- tr: treble crochet
- st: stitch
When an instruction calls for two or three stitches in each stitch, work all of those stitches into the same insertion point before moving to the next one.
1. Crochet the Brown Foundation Strip
Begin with brown yarn and chain 29. Skip the first chain from the hook, then work one single crochet into each remaining chain. This gives you a foundation strip of 28 single crochet stitches.
Keep the strip untwisted while working. It is the narrow backbone of the ornament, and its 28 stitches will be divided into four equal sections when you add the green yarn.
2. Add the First Green Row
Turn the brown strip so you begin from its wrong side, then attach the green yarn at the end. Chain 4 before working the green row.
Work along the brown foundation in four groups of seven stitches. Each group receives two green stitches per brown stitch, but the stitch height becomes shorter as you move along the strip.
| Foundation section | Instruction | Stitches worked |
|---|---|---|
| First 7 stitches | 2 tr in each stitch | 14 tr |
| Next 7 stitches | 2 dc in each stitch | 14 dc |
| Next 7 stitches | 2 hdc in each stitch | 14 hdc |
| Last 7 stitches | 2 sc in each stitch | 14 sc |
The initial chain 4 is separate from the listed 14 treble crochet stitches. Count the stitches in each section as you go, rather than waiting until the end of the row.
This row introduces both essential features of the design. Two stitches in each foundation stitch add fullness, and the progression from treble crochet to single crochet changes the width of the green fabric. The strip starts to bend and wave instead of staying flat.
3. Increase Again to Create the Spiral
At the end of the first green row, chain 1 and turn. You are now starting at the short, single crochet end and working back toward the tall, treble crochet end.
Work three stitches into each stitch of the matching section:
- Single crochet section: Work 3 sc into each of the next 14 stitches, making 42 sc.
- Half double crochet section: Work 3 hdc into each of the next 14 stitches, making 42 hdc.
- Double crochet section: Work 3 dc into each of the next 14 stitches, making 42 dc.
- Treble crochet section: Work 3 tr into each of the last 14 stitches, making 42 tr.
These four sections contain 168 worked stitches altogether. Keep the stitch-height changes aligned with the sections beneath them.
As the extra stitches build up along the outer edge, the strip becomes much more curly. That curling is part of the design, not something to flatten out. The brown edge stays narrow while the green edge has enough fabric to form the tree’s broad spiral turns.
4. Shape the Green Christmas Tree
Begin wrapping from the single crochet end, which becomes the small top of the tree. Coil the strip in one consistent direction, following its natural curl.
Continue wrapping toward the taller stitches. The turns gradually become larger, with the treble crochet end forming the widest part at the bottom. Use your fingers to arrange the layers rather than folding the strip sharply.
The ornament can look like a stack of green circles when compressed. Gently separate the turns along the brown center to reveal the tapered spiral.
5. Crochet the Snowy White Edging
Attach white yarn at the outer green edge near the narrow end. The border uses a simple repeating combination:
Chain 2, then single crochet into the next edge stitch.
Repeat this sequence along the entire outer green edge. Each chain-2 section creates a little loop between the single crochet anchors, giving the tree its snowy, scalloped outline.
Follow the continuous edge of the strip rather than treating each spiral turn as a separate round. Open out the curls as needed to reach the next stitch, then let them curl back into place.
Once the border is complete, wrap the tree again from the narrow end. Arrange the white edges so they remain visible around each layer. The contrast makes the spiral shape much clearer and gives the green tree a lovely snow-covered finish.
6. Thread the Center and Make a Hanging Loop
Use a length of brown yarn and a yarn needle to create the central hanging support. With the tree coiled, pass the yarn through the brown central stitches, working from the broad base toward the small top.
Keep the cord running through the center, not across the white outer border. As you thread it, adjust the spiral turns so the smallest layer sits above the larger ones.
Draw the yarn through gently. The aim is to support the tree while keeping space between its layers, not to pull everything into a tightly compressed stack.
At the top, form a brown hanging loop and secure it with knots and passes through the top stitches. Check the shape by lifting the ornament from its loop, then adjust the spacing of the turns. Secure the remaining yarn ends and trim the excess.
7. Crochet the Yellow Star
The little yellow star is made separately around a magic ring. Each point begins with a short chain and returns to the ring.
- Make a magic ring with yellow yarn.
- Chain 3.
- Skip the first chain from the hook and slip stitch into the next chain.
- Work a half double crochet into the remaining chain.
- Slip stitch into the magic ring to anchor the point.
- Repeat the point sequence until you have five points.
Pull the magic ring closed, secure the yarn, and arrange the points into a star shape.
Attach the star with glue at the top of the tree, just in front of the brown hanging loop. Keep the loop clear so the ornament can hang freely.
A Handmade Christmas Ornament with a Lovely Spiral Finish
Lift the finished crochet Christmas tree wind spinner by its loop and give the layers one final adjustment. The small top should lead into progressively wider green turns, each outlined with white, with the yellow star completing the shape.
The beauty of this DIY Christmas ornament is in its construction: a straight foundation becomes a curling strip, and that strip becomes a tree. Careful section counts and gentle shaping bring the whole design together.
Article made based on Trending Now! Crochet Christmas Tree Wind Spinner | Easy DIY Christmas Ornament