homemade jello is one of those things that sounds a little old school until you actually make it and realize how easy it is. If you have a random bottle of juice in the fridge and you are craving something sweet, wiggly, and cold, this is your sign. Store bought cups are fine, but they never taste like real fruit to me. This version is fresher, you can control the sweetness, and it feels kind of fun in a kid like way. Also, it is a nice little reset dessert when you want something light after dinner.

Simple Ingredients To Start
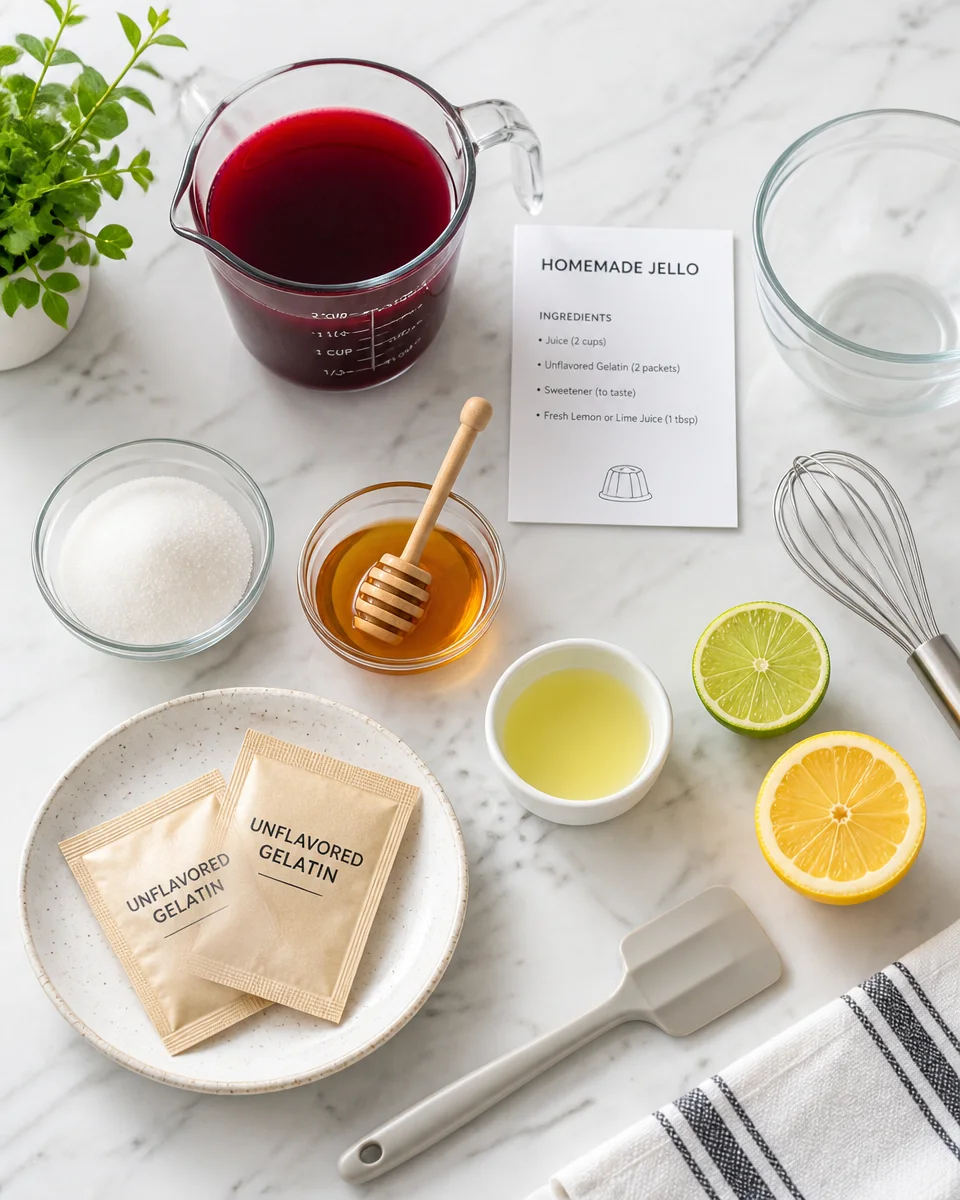
I keep the ingredient list super basic because that is the whole point of a quick win recipe. You do not need fancy molds or special powders. If you can heat a little juice and stir, you are in business.
Here is what you will want to grab:
- Juice (100 percent juice or a juice blend you actually like drinking)
- Gelatin (unflavored packets or bulk gelatin)
- Sweetener (optional) like honey, sugar, or maple syrup if your juice is tart
- Lemon or lime juice (optional) for a brighter flavor
If you are into making things from scratch, homemade basics make this even better. I sometimes pair this with a simple snack like these delicious and easy homemade granola bars and call it an easy afternoon treat.
One more tip: if you are using a juice that is already sweet, skip the extra sugar at first. You can always add a little next time, but you cannot take it out once it is set.
What Kind Of Juice Works?
Almost any juice works for homemade jello, which is why I love it. This is a clean out the fridge kind of recipe. But yes, some juices behave better than others, so here is the real talk.
Best juices for a reliable set
These usually set up nicely and taste great:
Apple juice, grape juice, cranberry juice blends, cherry juice, pomegranate blends, and most berry mixes.
I also love using apple based juices when I have a cozy fall vibe going. If you are on an apple kick, you might also like this easy homemade stovetop apple butter for toast and pancakes.
Juices that can cause problems
Some fresh juices have enzymes that can keep gelatin from setting. The biggest ones are pineapple, kiwi, papaya, and mango when they are truly fresh and not heated. If the juice is pasteurized or you simmer it for a couple minutes, it usually behaves much better.
And if you are wondering about dairy free add ins, sometimes I make a creamy snack plate with jello cubes and a glass of homemade almond milk. It sounds a little random, but it is honestly a refreshing combo.
Quick flavor idea: a tiny squeeze of lemon makes berry flavors pop. If you like bright flavors in general, you would probably enjoy this easy homemade lemon ginger vinaigrette for salads too.
How To Make Homemade Jello, Step By Step
This is the part where you realize you have been overthinking it. Once you do it once, you can basically do it from memory.
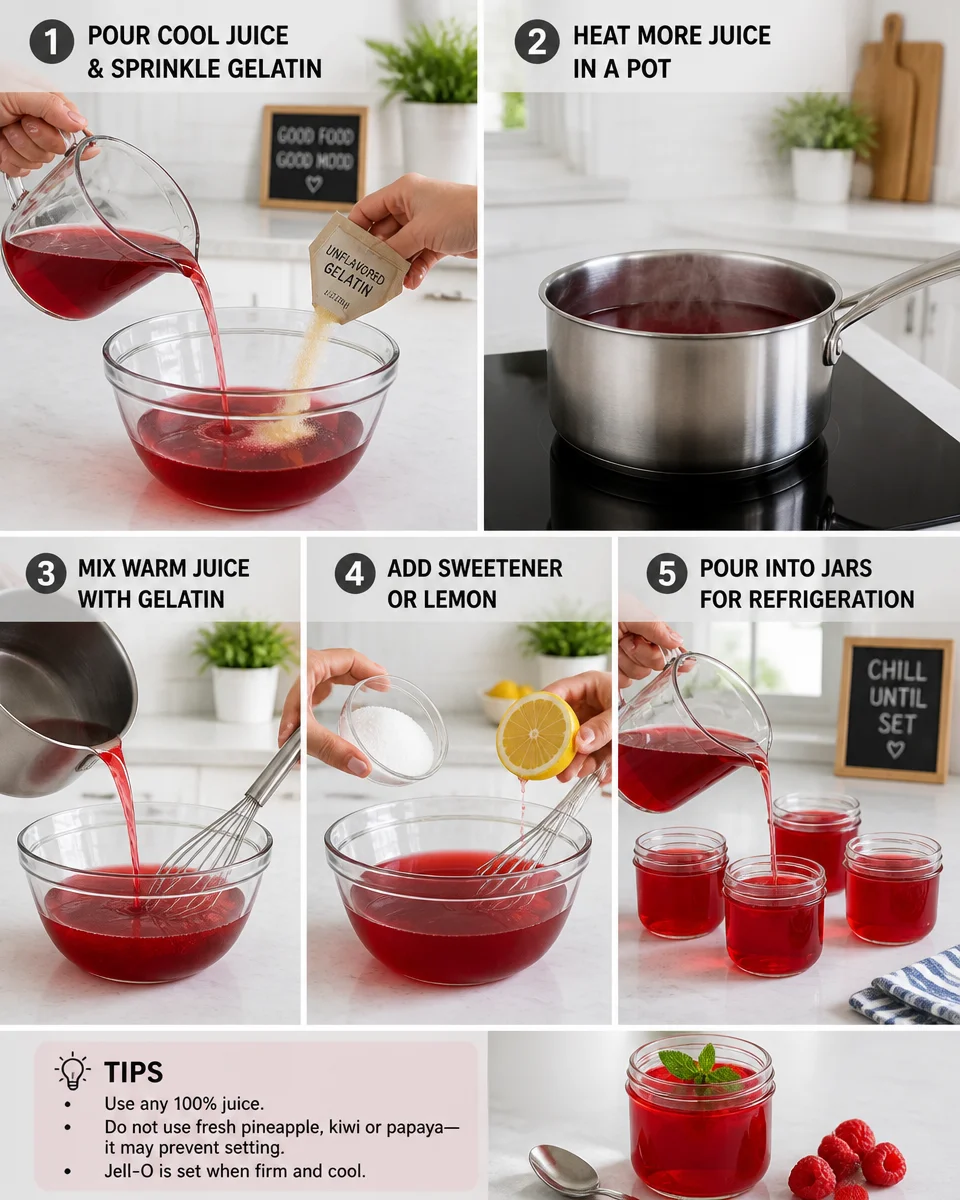
Base ratio that works: For 2 cups of juice, use 2 and a half teaspoons of unflavored gelatin (that is about 1 packet). For a firmer, more snackable set, go up to 3 teaspoons.
My simple method
- Bloom the gelatin: Pour 1 half cup of cool juice into a bowl. Sprinkle the gelatin over the top and let it sit for 5 minutes. It will look wrinkly and thick. That is good.
- Warm the rest: Heat the remaining 1 and 1 half cups of juice in a small pot until it is warm but not boiling. Think steaming, not bubbling hard.
- Combine: Pour the warm juice into the bowl and stir until the gelatin completely dissolves. No grainy bits.
- Taste and adjust: Add a little sweetener if needed, or a squeeze of lemon. Stir again.
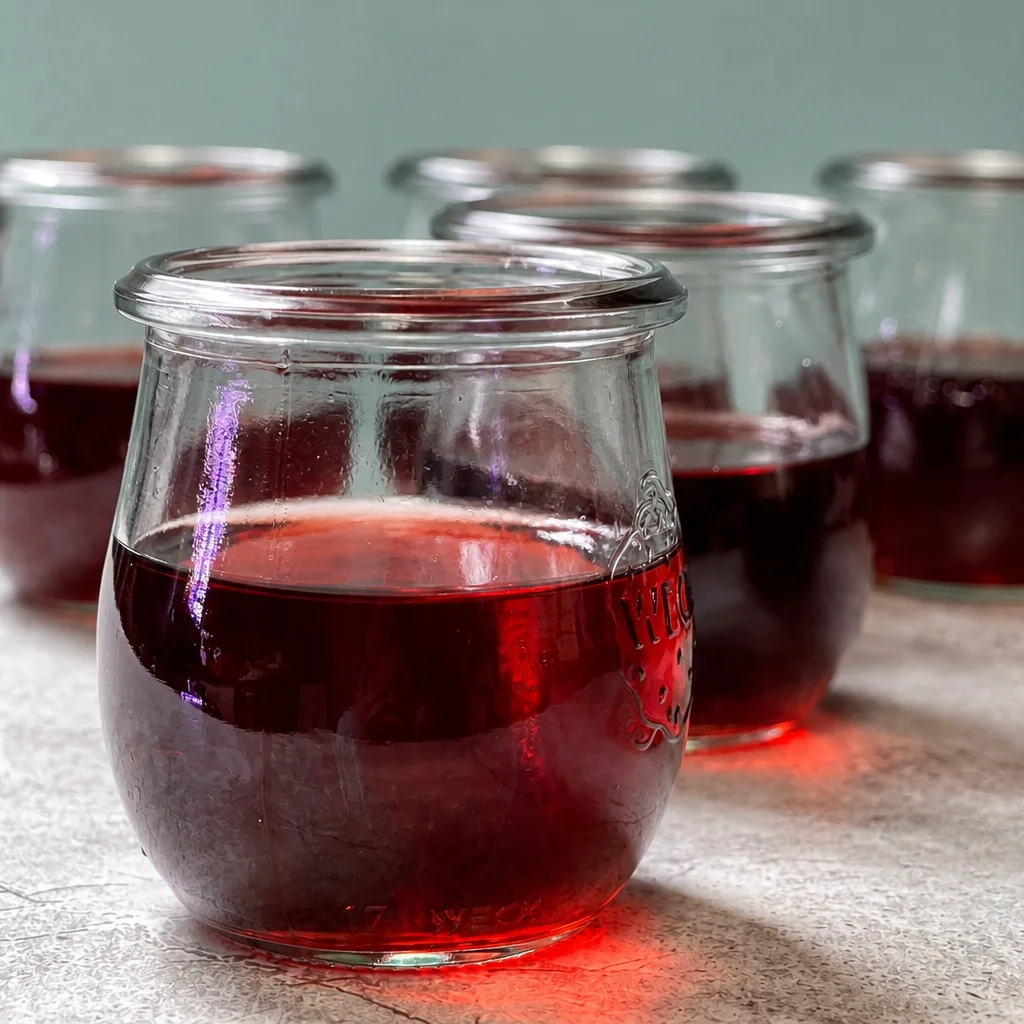
- Chill: Pour into a dish or little cups. Refrigerate about 3 to 4 hours, until set.
If you want to serve it in cute shapes, use silicone molds. If you want zero fuss, just use a glass storage container and slice into cubes.
I started making this for my kids, but now I make it for myself too. It tastes like real fruit and it is so much better than the little plastic cups. The grape one disappears fast in our house.
Small kitchen note: if you accidentally boil the juice, it is not ruined, but boiling can dull the fresh flavor. I try to keep it gentle.
Collagen vs. Gelatin
This part confuses a lot of people, so let me make it simple. Gelatin is what makes homemade jello set into that classic wiggle. Collagen peptides dissolve into liquids, but they do not gel up the same way.
Here is the practical takeaway:
Use gelatin when you want it to set. Use collagen peptides if you just want to stir something into coffee, smoothies, or oatmeal and you do not care about a firm texture.
Also, different gelatin brands can set slightly differently. If you try it once and it is softer than you like, just use a touch more next time. That is the easiest fix.
Speaking of stirring things into coffee, if you are a coffee person, you will probably have fun with these best homemade coffee recipes. I like pairing a small jello cup with an iced coffee in the afternoon when I need a mood boost.
Tips And Tricks For The Best Homemade Gelatin
After making this a bunch of times, these are the little things that actually matter. They are not complicated, but they help you get the texture you want and keep the flavor bright.
Tip 1: Blooming is not optional. If you skip it and dump gelatin straight into warm liquid, you can end up with clumps. Bloom first, always.
Tip 2: Do not rush the fridge time. It is tempting to check at the 2 hour mark. I get it. But 3 to 4 hours is usually the sweet spot for a clean set.
Tip 3: Adjust firmness based on how you will eat it. If you want to eat it with a spoon, keep it softer. If you want cubes for lunchboxes, add a bit more gelatin.
Tip 4: Watch fresh pineapple and kiwi. If you want those flavors, choose pasteurized juice or warm it briefly first.
Tip 5: Store it covered. It keeps in the fridge about 5 days. If it is uncovered, it can pick up random fridge smells, and nobody wants onion scented jello.
My favorite flavor combo lately is cherry juice with a squeeze of lime. It tastes like a simple mocktail, but in dessert form. This is also a great recipe to make with kids because they can stir and help pour, and then they get to proudly wiggle the container later.
Common Questions
1) Can I make homemade jello with less sugar?
Yes. Start with 100 percent juice and do not add sweetener until you taste it. Tart juices may need a small spoonful of honey or sugar, but you can keep it pretty light.
2) Why did my jello not set?
Most of the time it is either not enough gelatin, skipping the bloom step, or using fresh pineapple or kiwi juice without heating it. Also make sure it chilled long enough.
3) Can I use sparkling juice or soda?
You can, but carbonation can mess with clarity and the set can be a bit softer. If you try it, let it go mostly flat first and use a slightly higher amount of gelatin.
4) Can I add fruit pieces?
Yes, but keep them small and not too watery. Berries and mandarin orange pieces work well. Avoid fresh pineapple chunks unless they were cooked, for the same enzyme reason.
5) Can I freeze homemade jello?
I would not. Freezing changes the texture and it can turn watery when it thaws. It is best enjoyed straight from the fridge.
A Sweet Little Dessert You Can Totally Pull Off Today
If you have juice and gelatin, you can make homemade jello today with almost no effort and it tastes so much fresher than the boxed stuff. Keep it simple the first time, then play with flavors once you know your favorite texture. If you want more ideas and variations, I like looking at Homemade Jello – Sidewalk Shoes and How to Make Healthy Homemade Jello – One Lovely Life for extra inspiration. Put a batch in the fridge, forget about it for a few hours, and then treat yourself to that first cold, fruity bite.